Single sign-on (SSO) - Configure SSO setting
In the era of diverse applications and resources, employing a distinct set of credentials for each application can appear quite challenging. Single sign-on (SSO) is an authentication method that enables users to log in using a single set of credentials across various independent software systems, simplifying the login process. Implementing SSO removes the necessity for users to log in separately to each application they use. Within an SSO system, instead of repeatedly verifying their identity, a user establishes their identity just once and gains access to multiple services. This not only augments user convenience but also reinforces security for businesses. Single sign-on represents a technology offering numerous benefits, including cost savings for IT, heightened employee job satisfaction, and an enhanced customer experience.
Single sign-on (SSO) plays a crucial role in enhancing organizational security by implementing robust authentication procedures and safeguarding against account takeover attempts. It enforces stringent authentication measures such as adaptive policies and multi-factor authentication across all linked corporate accounts. SSO also benefits end-users who grapple with numerous accounts and services. By using SSO, users are relieved of the burden of managing intricate passwords, as they only need to recall one set of credentials for authentication through the identity provider. This simplification of the authentication process makes it more user-friendly and secure for both organizations and users.
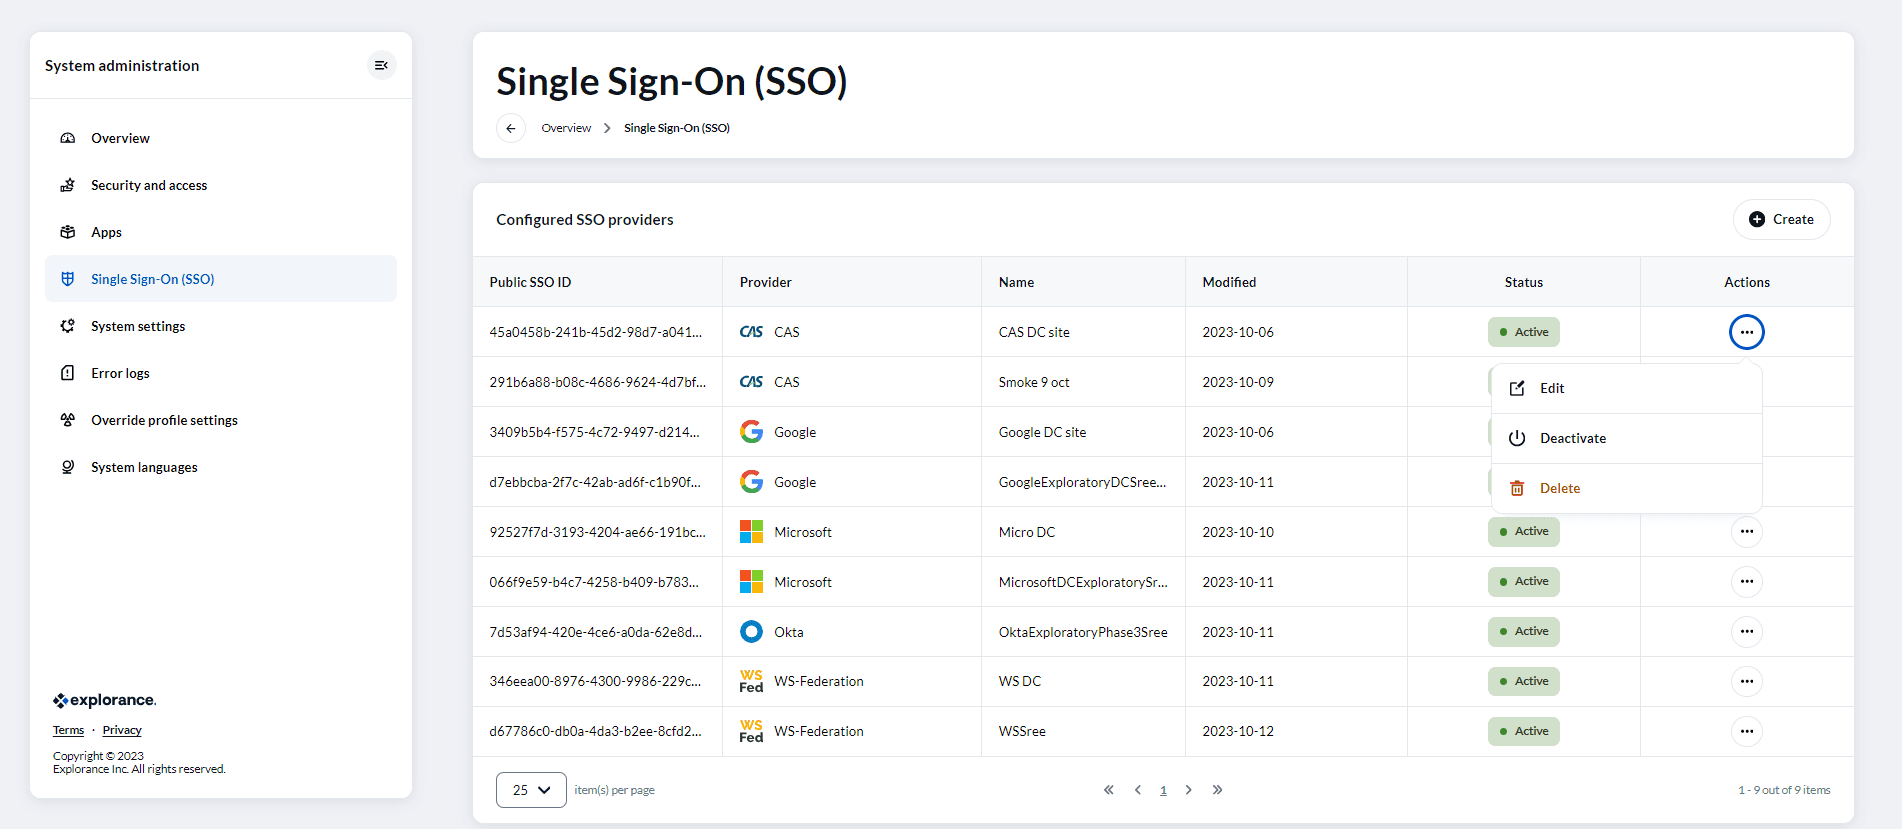
List of service providers:
Single sign-on (SSO) typically operates through a trust relationship established between an application, often referred to as the service provider, and an identity provider, such as SAML. This trust relationship is commonly founded on a certificate exchange between the identity provider and the service provider, ensuring secure authentication and authorization processes. The SSO providers associated with our SSO system include CAS, Facebook, Google, Microsoft, OpenID, Okta, SAML, and WS-Federation.
Configure SSO:
Configuring the authentication process involves several steps to ensure a smooth and secure Single Sign-On (SSO) setup within your system.
- Navigate to the Single Sign-on page located within the System Administration section.
- Click on the “Create" button to set up a new SSO provider. A list of available SSO providers to choose from will appear.
- Select one of the available SSO providers, the Configure SSO page will be displayed. Here, you will have the opportunity to set up your Single Sign-On and customize the provider settings that will be used to authenticate users.
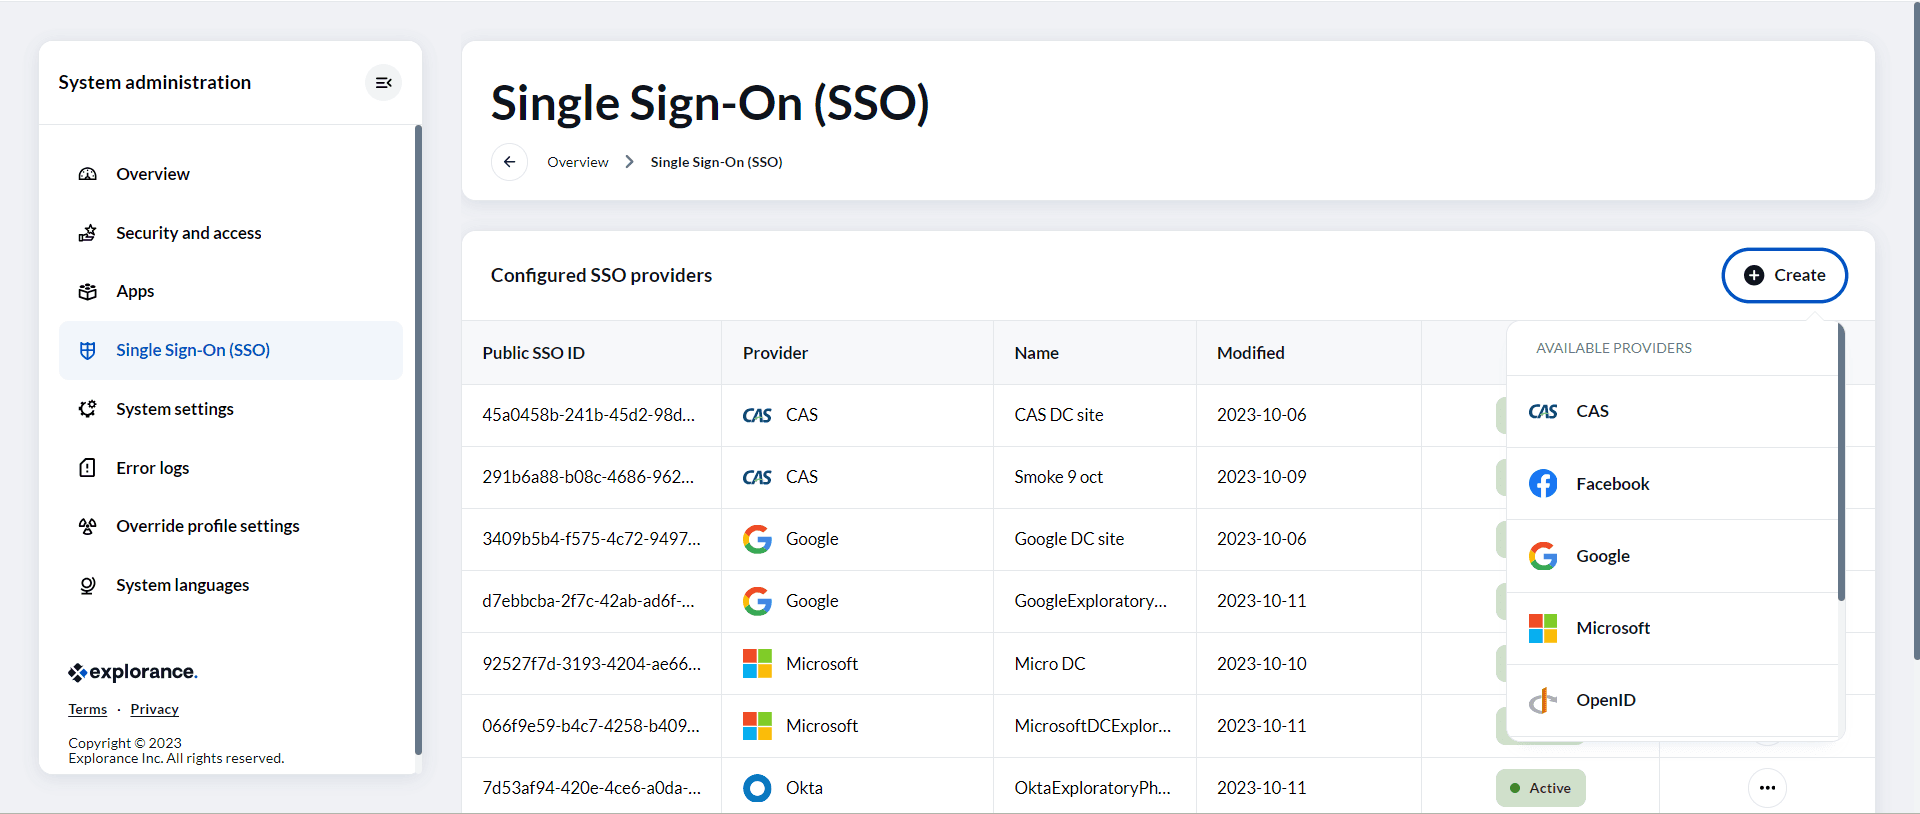
4. The Configure SSO Provider page is where you'll find all the variables and parameters required from the chosen SSO provider.
Now, let's delve deeper into the common parameters that apply to all SSO providers:
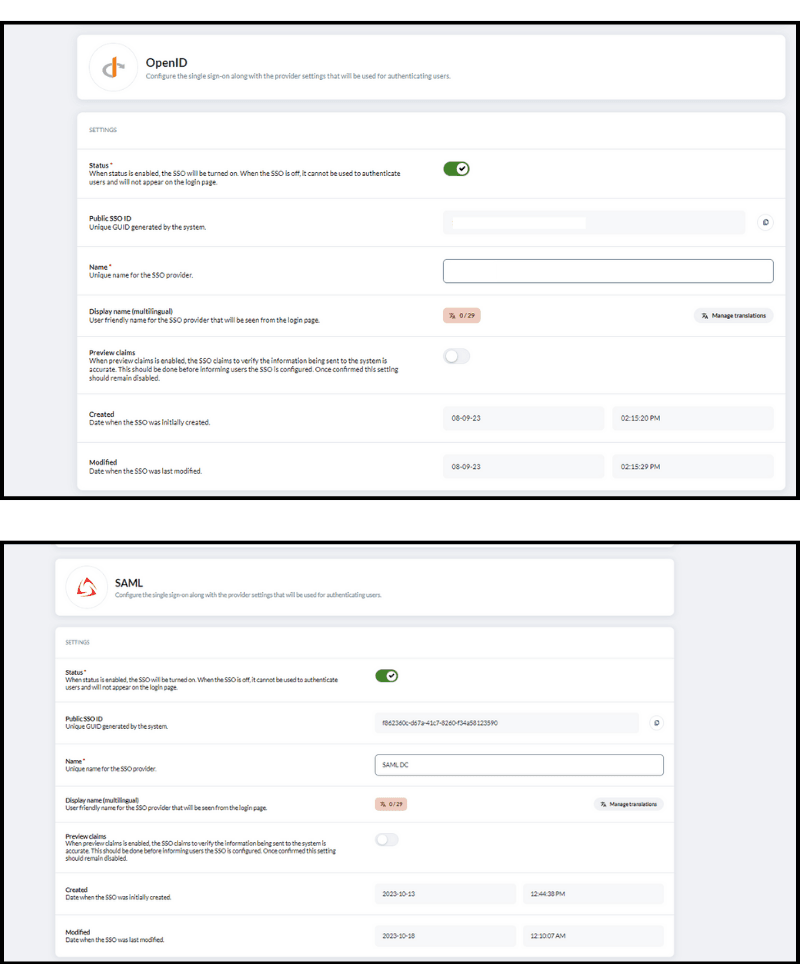
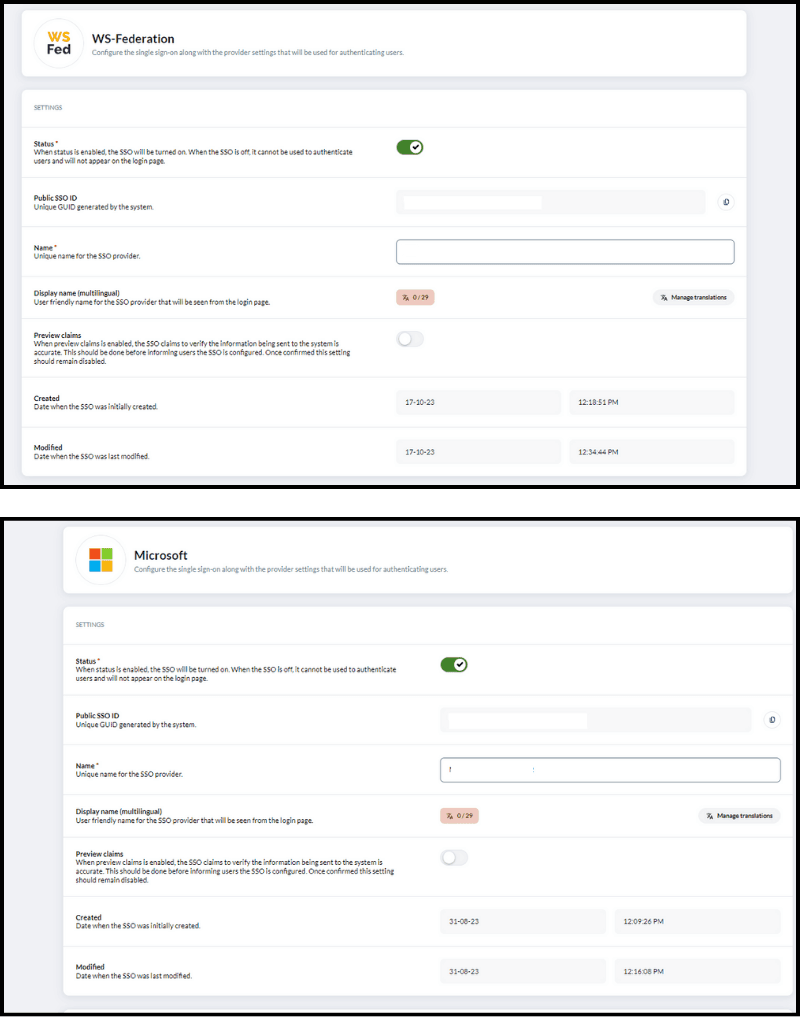
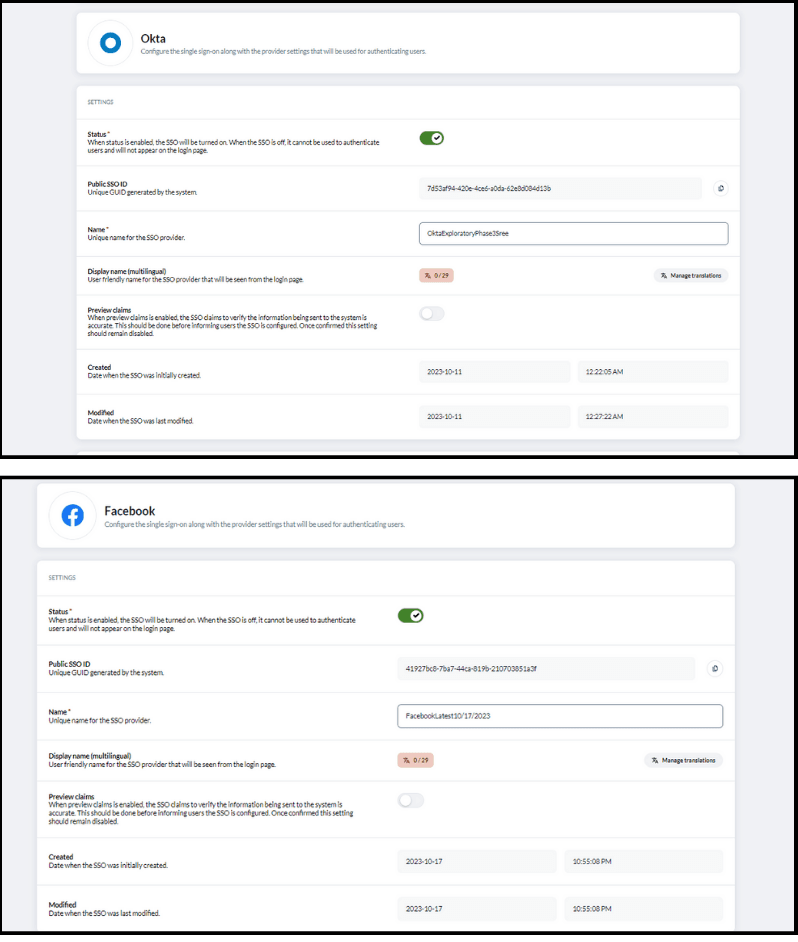
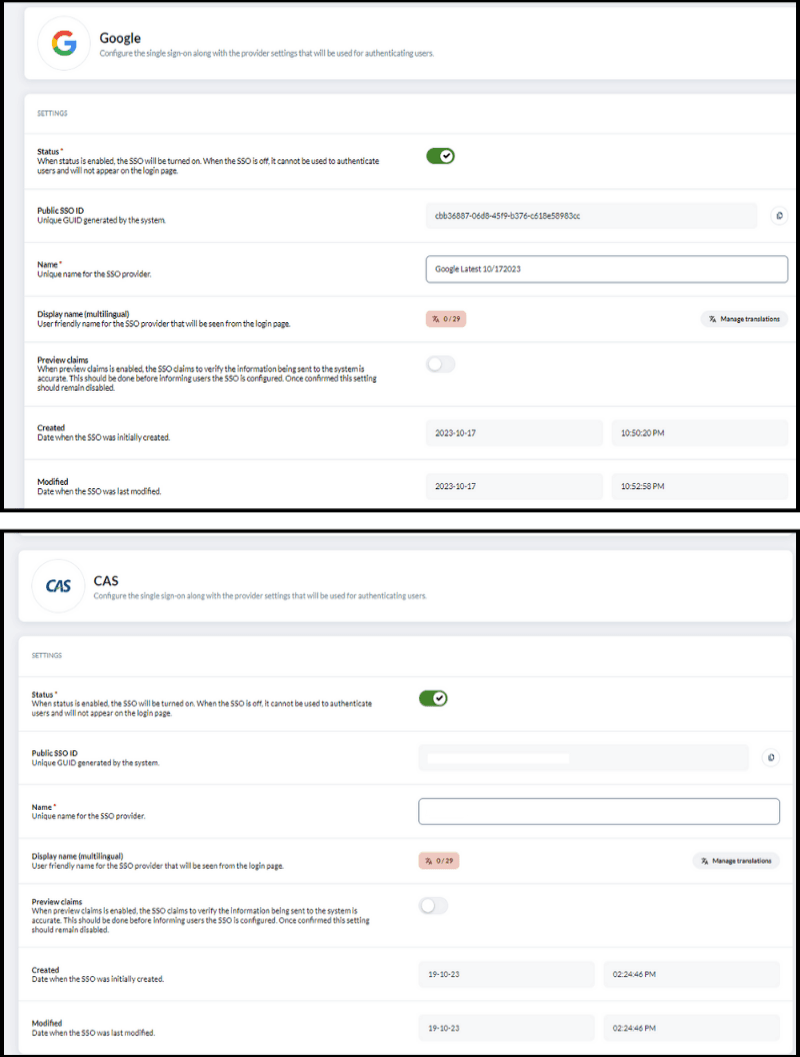
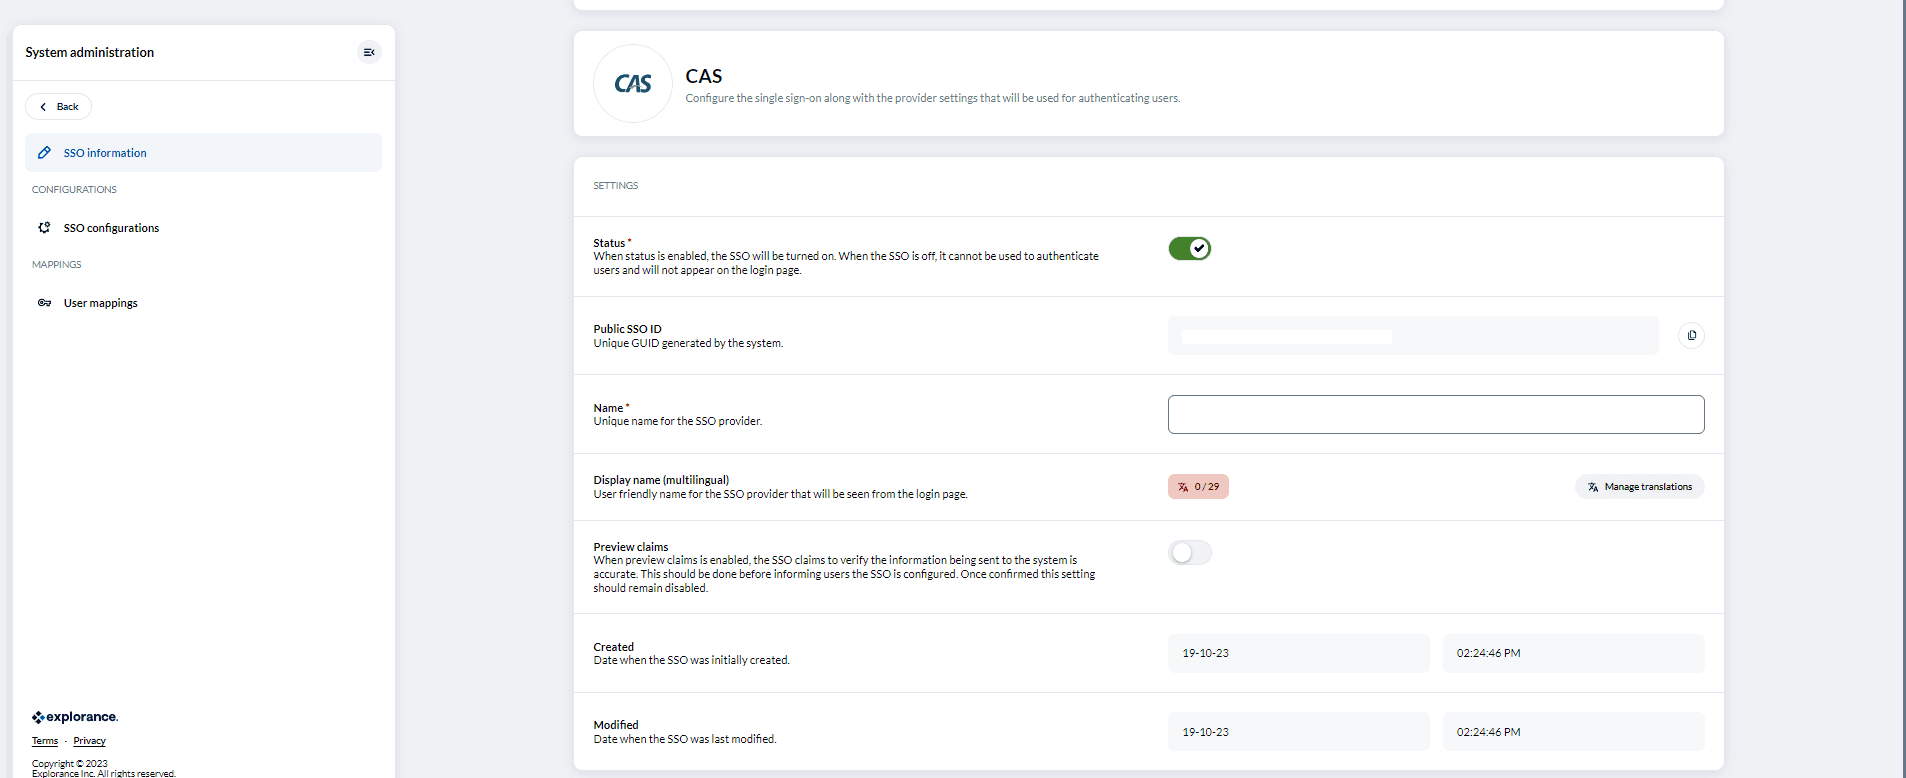
- Status: When the status is "enabled," the SSO will be active and ready to use for user authentication. Conversely, if the SSO is “disabled”, it will not be available for authentication purposes, and it won't appear on the login page.
- Name: Assign a unique name for your chosen SSO provider. It helps differentiate providers when multiple options are available, ensuring clarity and organization in your system.
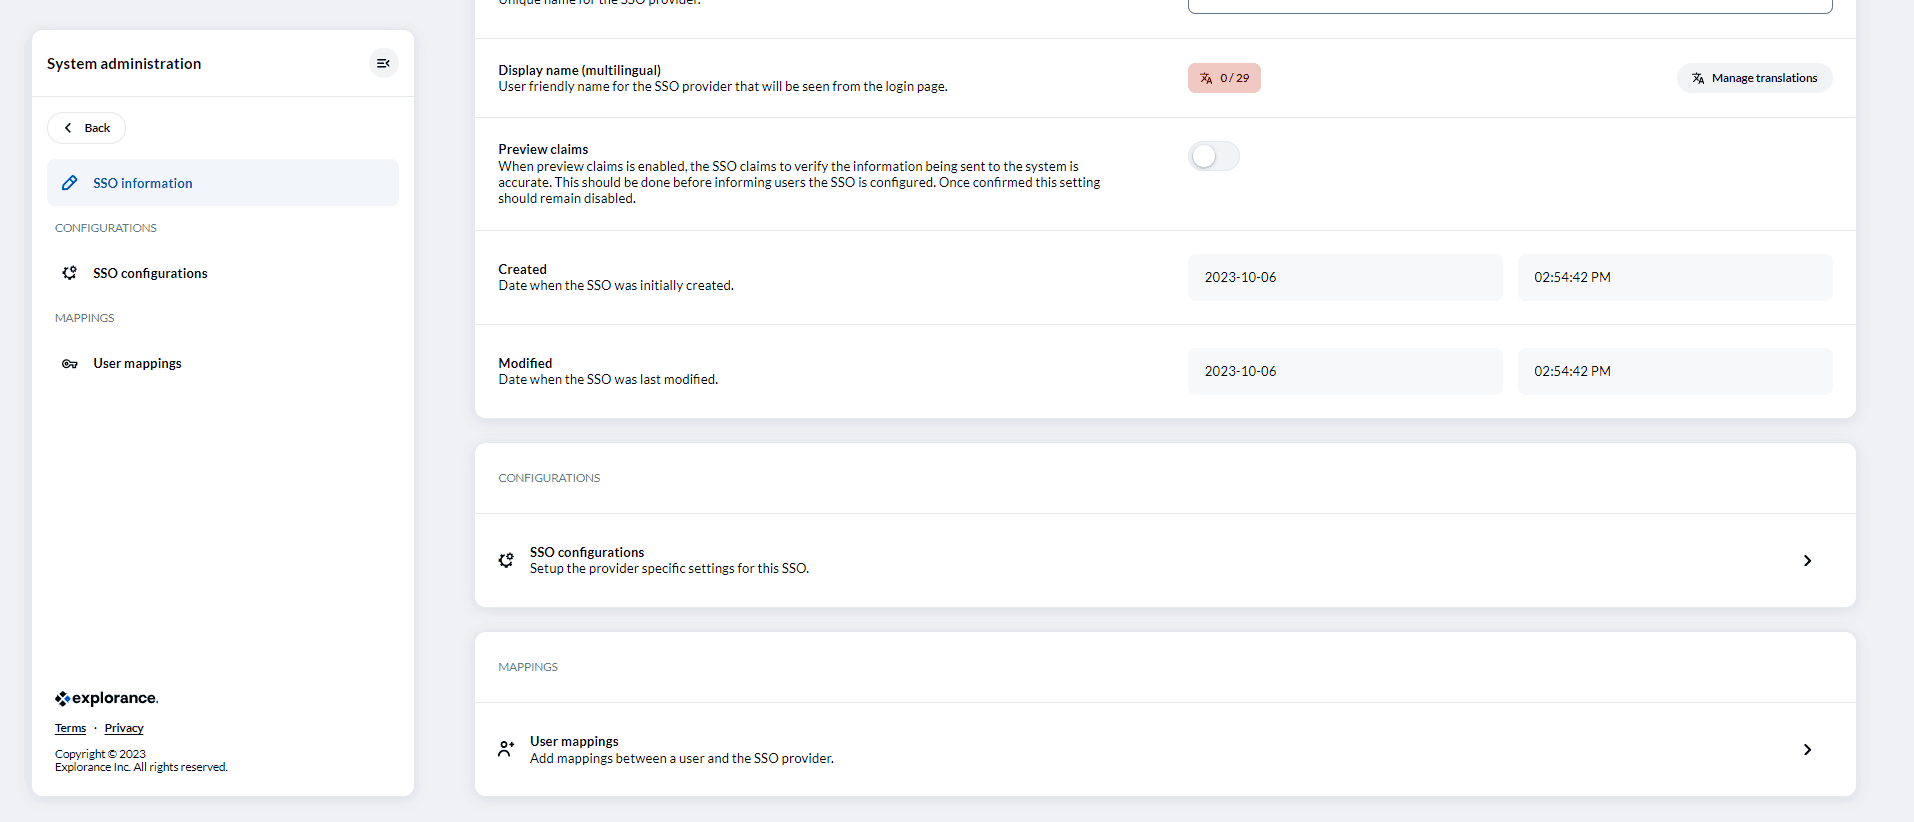
- Display name (Multilingual): The display name parameter allows you to set a user-friendly name for the SSO provider. This name will be visible to users on the login page, making it essential for a good user experience.
- Preview claims: Preview claims is an optional setting that's worth considering. Enabling this feature allows you to inspect the SSO claims before finalizing the user authentication process. It's a useful step to ensure the accuracy of the information sent to your system. However, once you're confident in the configuration, it's recommended to keep this setting disabled for operational efficiency and security.
In addition to the common parameters applicable to all SSO providers, each provider offers a distinct set of SSO configuration parameters that must be filled in to facilitate a smooth setup. Below, I've outlined specific parameters for a couple of the SSO providers:
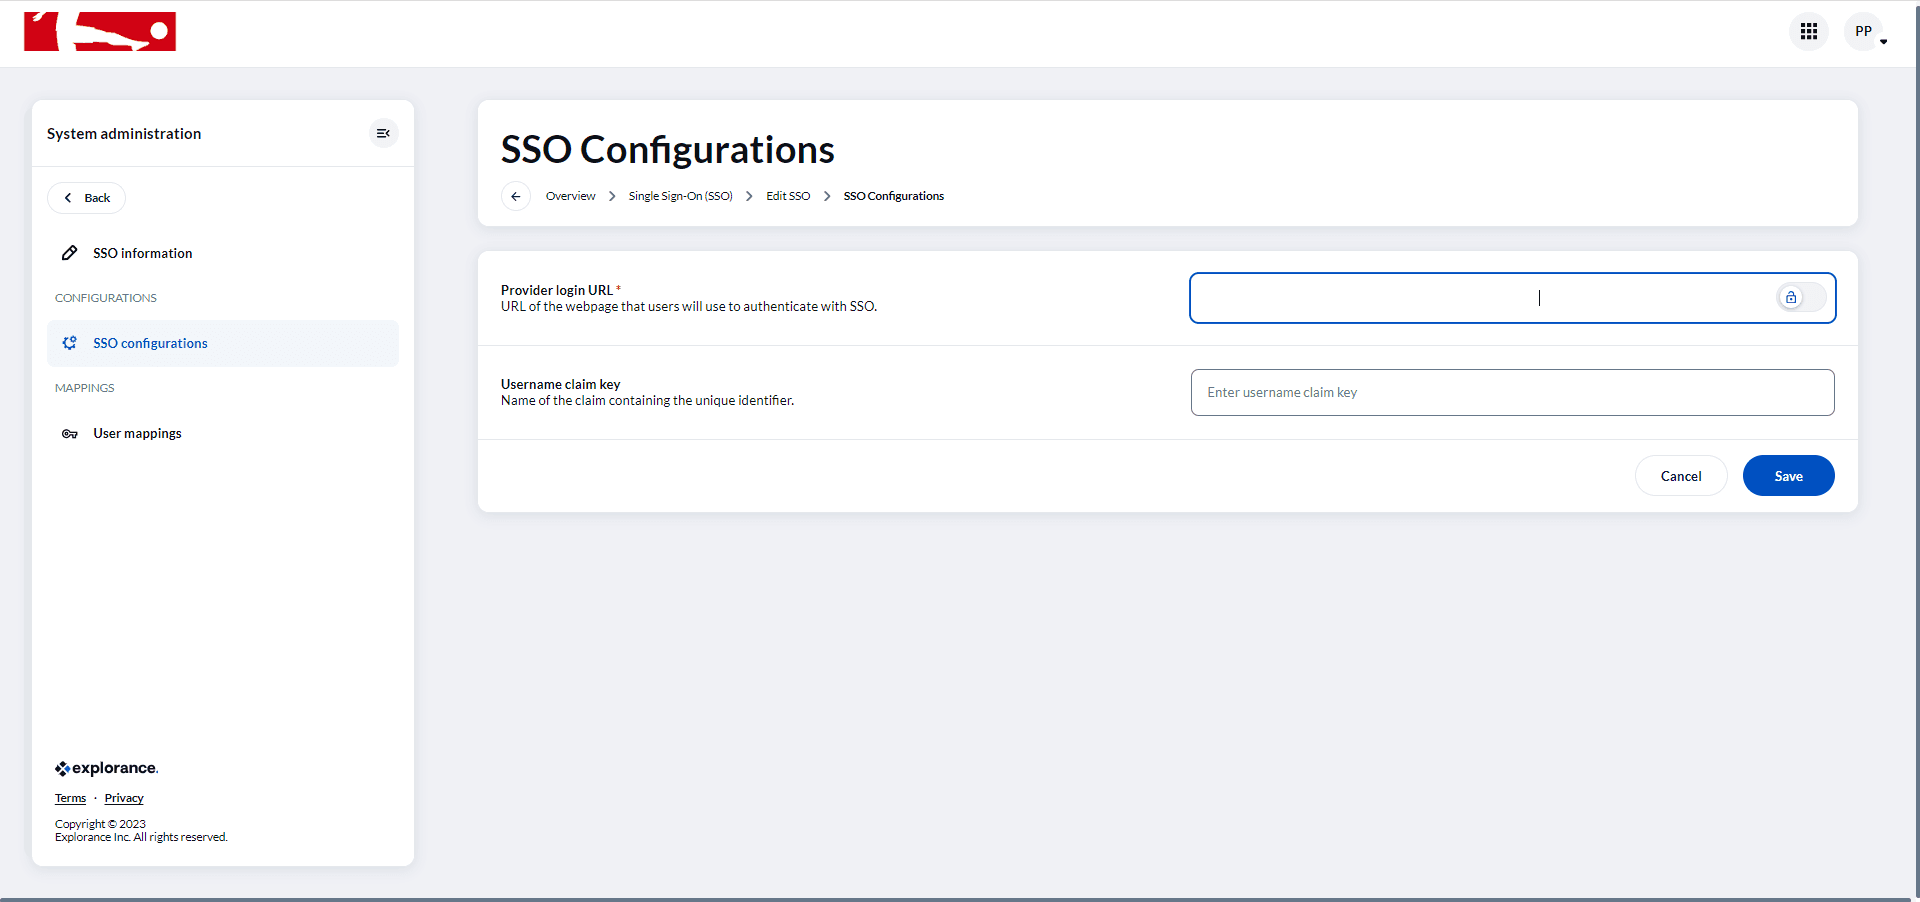
CAS SSO Provider:
Provider login URL: This is the URL where users authenticate with SSO.
Username claim key: This identifies the unique user claim.
Facebook Provider:
App ID: A unique ID obtained from Facebook.
App Secret: A confidential key/password obtained from Facebook.
Username claim key: Identifies the unique user claim.
Specific configuration parameters:
The specific configuration parameters can be viewed exclusively in SSO Configuration page when you navigate to the Single sign-on (SSO) > Edit SSO > SSO configuration.
Furthermore, there are distinct parameters for different SSO providers, including Google, Microsoft, OpenID, Okta, SAML, and WS-Federation. When configuring your SSO provider, it is crucial to carefully address these specific parameters. Ensuring the accuracy and security of the input is essential for the smooth operation of your single sign-on system. One of the specific configuration parameters available is the Username claim key. The remaining specific parameters vary depending on the SSO provider and can be found in dedicated locations corresponding to each provider.
Except for the Username claim key, you can obtain specific parameters for:
- Microsoft, Open ID, SAML, and WS-Federation from Azure.
- Okta from Okta.
- Google from Google Cloud.
- Facebook from Meta Developer.
Remember to integrate these provider-specific parameters with the previously mentioned steps to establish a robust and user-friendly authentication process within your system.
Update SSO provider settings:
'Edit SSO' enables detailed adjustments to both common and specific provider settings, ensuring precise SSO configuration.
When the "Preview Claims" feature is enabled, the Single Sign-On (SSO) system conducts a thorough verification process to ensure the accuracy of the information being sent to the system. This verification is a crucial step and should be completed before notifying users that the SSO configuration is finalized.
Once the SSO configuration has been successfully implemented, it is of utmost importance that the "Preview Claims" feature remains disabled, and its settings are not altered. This ensures the consistent and secure operation of the SSO system, preventing any unintended discrepancies in user authentication and data accuracy.
In summary, the "Preview Claims" function serves as a pre-configuration accuracy check, and it should be utilized with caution before the SSO is officially set up. Once configured, it should remain disabled to maintain the integrity of the authentication process. This best practice ensures a seamless and reliable user experience.