Canvas
Before integrating the Blue Connector with Canvas, follow the steps below. This action streamlines the integration process, ensuring optimal performance of the Blue Connector within your Learning Management System environment.
- Understanding the Blue Connector: Blue Connector seamlessly integrates Blue, a feedback management tool, with LMS platforms. Foundational concepts of Blue Connector and Basic Blue Connector setup instructions are provided in resources such as the Fundamentals of Blue Connector and Basic Configuration of Blue Connector articles.
- Utilizing the Universal Pathway: The Blue Portal Integrator (BPI) acts as the interface between Blue and LMS platforms. Within the Universal Pathway, a component of BPI which streamlines task management and data exchange, the user experience is enhanced. Detailed setup instructions for the Creation of Universal Pathway are available.
Seamless Integration of Blue Connector and Canvas
Integrating the capabilities of the Blue Connector with Canvas's unique features improves data exchange and enhances the user experience. Whether it's task assignment, notification management, or access control, the integration aims to optimize every aspect of educational interaction within the LMS environment. By following the comprehensive instructions outlined in this Blue Connector - Canvas LMS integration guide, stakeholders can ensure a seamless transition and fully leverage the potential of the Blue Connector within Canvas.
Prerequisite:
There are a few prerequisites that must be set up before the Blue Connector can be integrated with Canvas.
- The connections to Canvas must be secured HTTPS connections.
- Installed versions of Blue 7 or newer and BPI 4 or newer are set up.
- The Canvas administrator should have the ability to generate access token, to add LTI, upload and download JavaScript file in Themes.
Integration settings
The integration of Blue Connector and Canvas represents a significant advancement in enhancing Canvas's functionality and user experience. By seamlessly combining Blue Connector's capabilities with Canvas's dynamic platform, administrators and educators gain access to a comprehensive set of tools for enriching the learning environment. This integration commences with generating a Canvas token and configuring Blue Connector to establish a seamless connection with Canvas, leveraging tailored customization options. Once configured, Blue Connector enhances Canvas functionality through announcement, assignment, task reminders, and integration options, empowering institutions to tailor the learning experience. This collaborative effort streamlines administrative processes, fosters engagement, and ultimately enhances educational outcomes for students.
Gathering the prerequisites from Canvas
To enable interaction between Blue Connector and Canvas, a Canvas token is essential. This token can be generated either by an administrator or by a user with specific permissions within the Canvas site. It's crucial to ensure that the generated token has the necessary privileges for seamless integration with Blue Connector. For optimal setup, it's recommended to create a dedicated account with the specific privileges required for Blue Connector integration.
Prerequisites:
Setting up the Blue Connector will require a Canvas token created by an administrator or by a user with specific privileges.
Procedure:
Follow these instructions if you'd prefer to create an account with the specific privileges necessary for the Blue Connector rather than using an administrator account.
Step 1: Create the Role
- Log in to Canvas as an Admin.
- Navigate to ADMIN > PERMISSIONS.
- Select ACCOUNT ROLES.
- Click Add Role.
- Enter
BlueConnectoras the Role Name. - Click Save.
Step 2: Enable Permissions
Enable the following permissions:
| Permission / Feature | Homepage Pop-up | Course / Grade Blocking | Course-level Calendar Events | User-level Calendar Events | Assignments | Announcements | LTI |
|---|---|---|---|---|---|---|---|
| Users - manage login details | ✓ | ✓ | ✓ | ✓ | ✓ | ✓ | |
| SIS Data - read | ✓ | ✓ | ✓ | ✓ | ✓ | ||
| Course Content - view | ✓ | ✓ | ✓ | ✓ | ✓ | ||
| Users - act as | ✓ | ||||||
| Manage assignments and quizzes - Assignments and Quizzes - add/edit/delete | ✓ | ||||||
| Announcements - View | ✓ | ||||||
| Global Announcements - add/edit/delete | ✓ | ||||||
| Discussions - view | ✓ | ||||||
| Discussions - post | ✓ | ||||||
| Discussions - moderate | ✓ | ||||||
| Discussions - create | ✓ |
Note: Close the side panel to proceed once all the permissions have been enabled.
Step 3: Assign the Role to a User
- Navigate to ADMIN > SETTINGS.
- Select ADMINS.
- Click + Account Admins.
- Choose
BlueConnectorfrom the Add More drop-down list. - Enter the email address for the special Blue Connector user.
- Click Continue....
- Click OK Looks Good, Add This 1 User.
- Complete the user creation by opening the link in the email sent by Canvas to the Blue Connector user.
Use
For the Blue Connector to interact with Canvas, a Canvas token is required. This token can be generated either by an administrator or by a user with specific permissions.
Procedure
Follow the steps below to generate a Canvas token or create a user with the necessary permissions and then obtain the access token:
- Log in to Canvas as an administrator or as a user with specific permissions.
- Navigate to Account > Settings.
- Under Approved Integrations, select + New Access Token.
- Enter
Blue Connectoras the Purpose. - Leave the Expiration Date field blank.
- Click Generate Token.
- Copy the token and paste it into a blank text document for safekeeping.
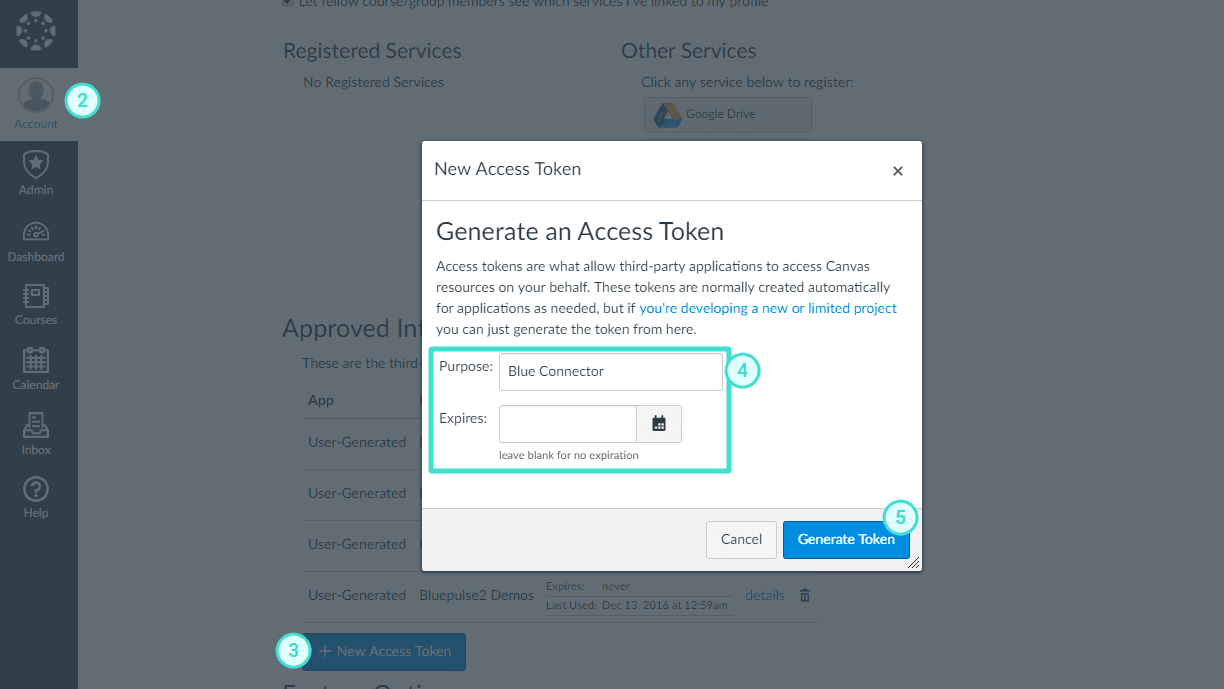
Result:
An access token is generated at the end of the procedure and if the expires field is left blank then the token has no expiration date.
Use
If the Blue Connector should merge changes with the existing Canvas JavaScript file, follow the steps below.
Prerequisite
When setting up the Canvas consumer in the Blue Connector, ensure the option to merge the current JavaScript file in Canvas with the newly uploaded JavaScript file in the Blue Connector is enabled.
Procedure
Managing JavaScript files in Canvas involves accessing the Theme Editor, selecting the desired theme, uploading or downloading JavaScript files, and exiting the editor.
Follow these steps to download the Canvas JavaScript file from the current theme:
- Log in to Canvas as an administrator.
- Select the managed account from the Admin menu.
- Navigate to Themes.
- Find the Current Theme and select Open in Theme Editor.
- Select Upload.
- Right-click the View File link in the JavaScript file area and choose Save Link As... to save the JavaScript file.
- Click Exit to leave the Canvas Theme Editor.
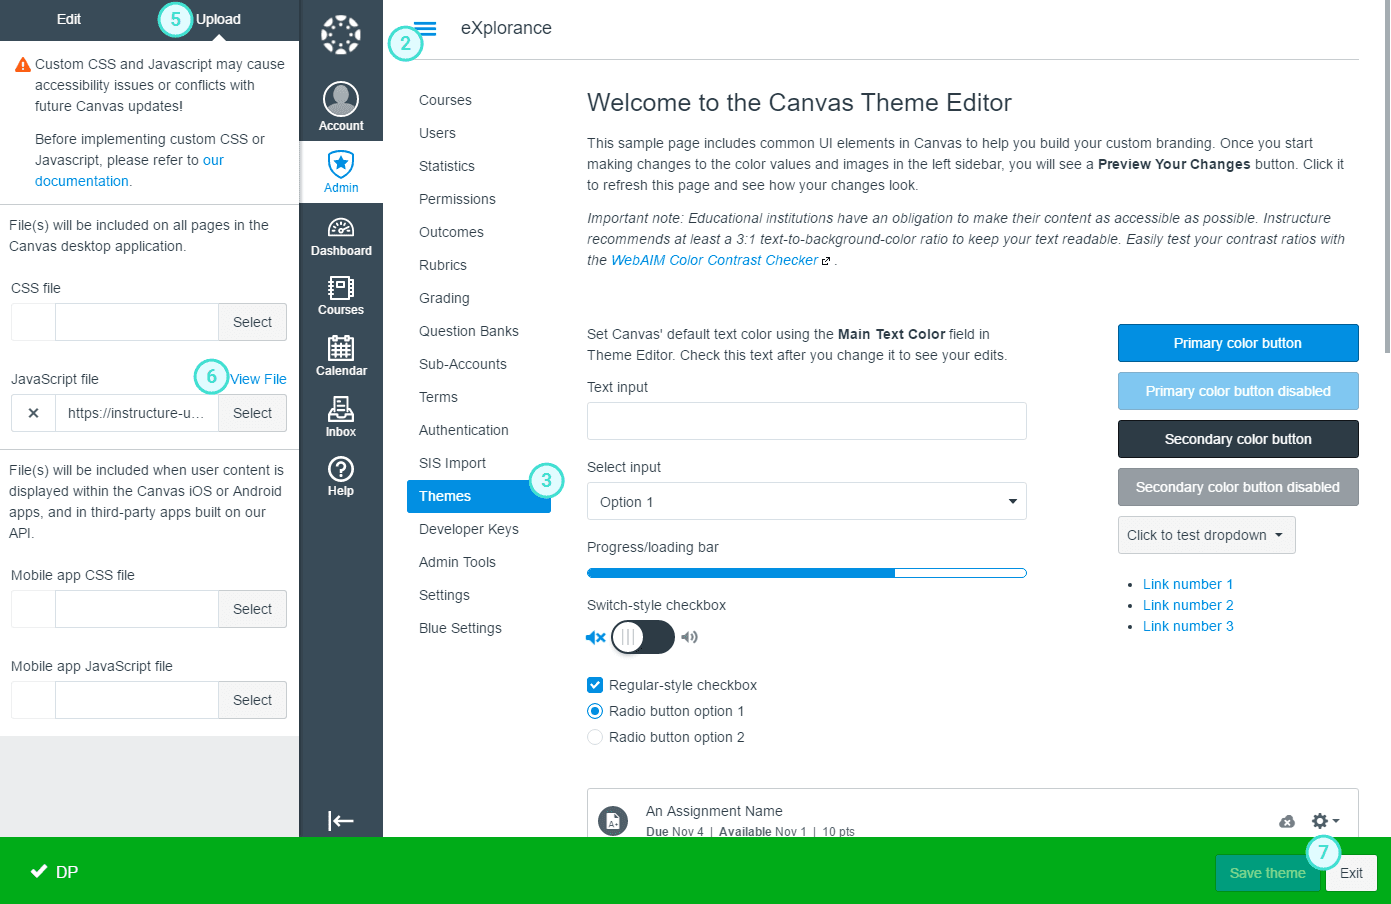
Canvas is only able to use one JavaScript file. If the Canvas installation utilizes a custom JavaScript file, then merging the existing JavaScript file with the Blue Connector JavaScript is the best option. However, if custom JavaScript is not being used, then choosing not to merge the JavaScript is a better option.
Connecting the Blue Connector with Canvas
In the Blue Connector interface, administrators set up the tool to connect with Canvas, utilizing LTI versions 1.1 and 1.3. The customization options available in the blue course evaluation setting are tailored to match Canvas's supported LMS features, ensuring compatibility across both LTI versions.
Use
The configuration steps detailed below facilitate the seamless integration of the Blue Connector with Canvas, enabling the exchange of data and functionality between the two platforms. This process enhances user experience and functionality.
Procedure
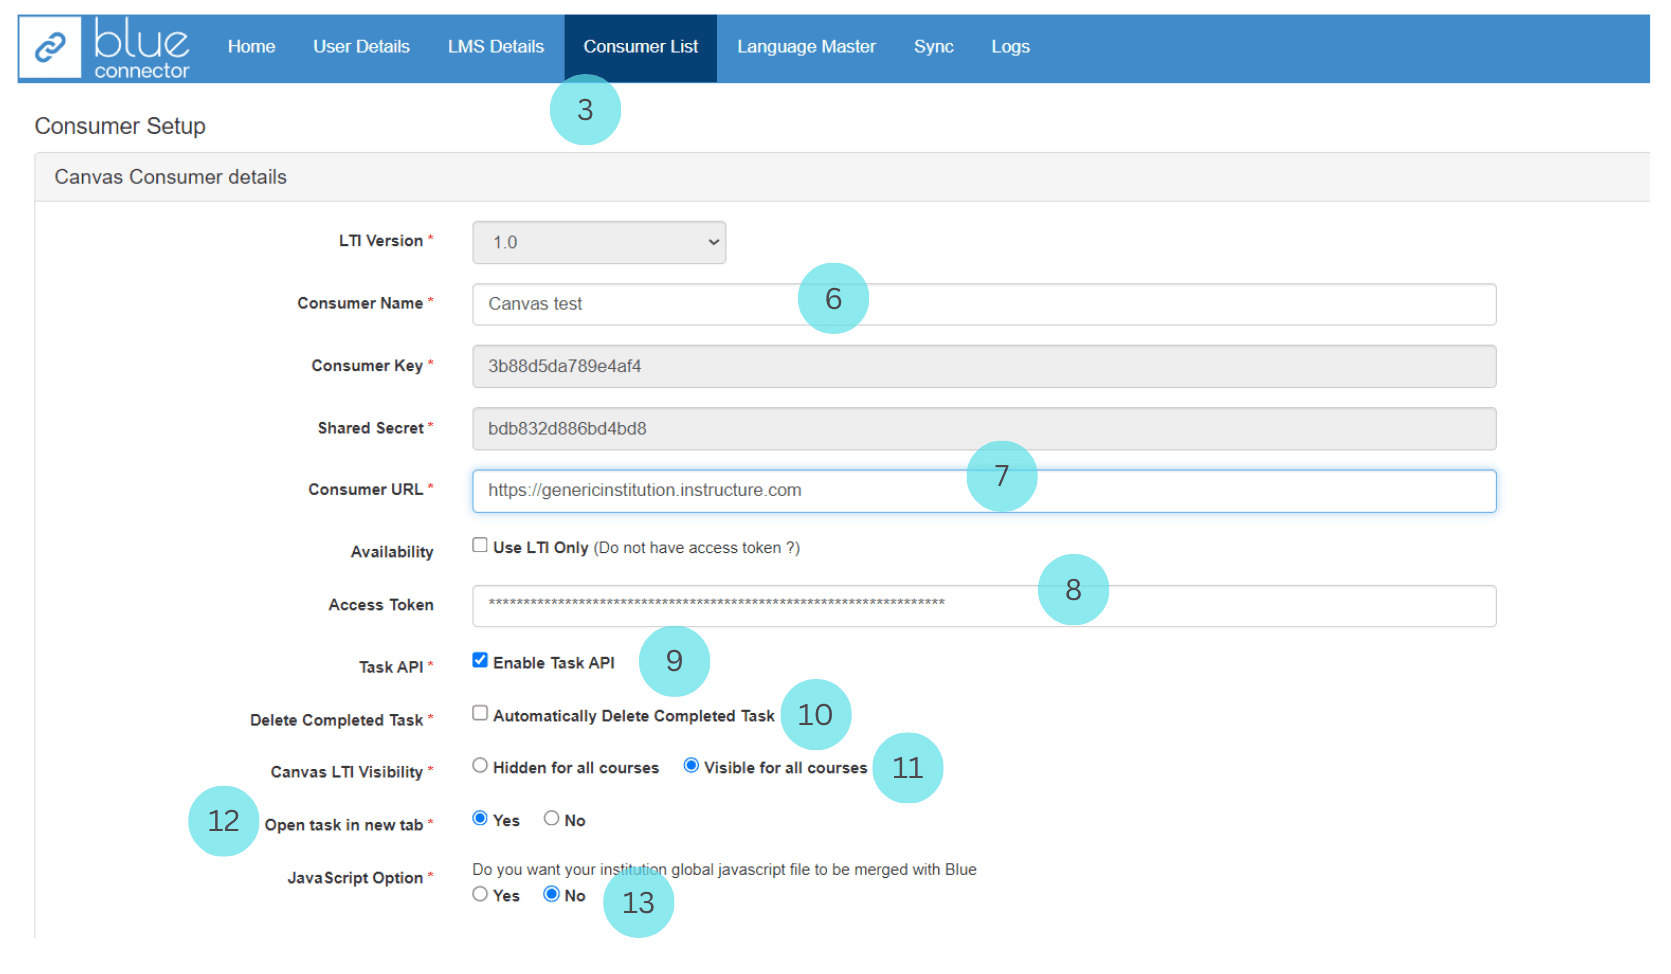
Follow these steps to configure the Blue Connector to form a connection with Canvas:
- Open a browser and navigate to the Blue Connector URL. A login screen will appear.
- Log in using the default credentials supplied by Explorance.
- Navigate to Consumer List.
- Click Create Consumer to set up LTI keys for Canvas.
- Select Canvas from the list of LMSs and click Next.
- Choose 1.1 as the LTI Version and enter a Consumer Name.
- Add the Canvas URL used to access Canvas into the Consumer URL field.
- Enter the Access Token obtained from Canvas.
- Enable the Task API (required only for MTM and BlueX integrations).
- Decide whether to enable Automatically delete completed tasks:
- If enabled, a background job will run daily to remove all completed tasks (Task status = 2) from Blue Connector, making them invisible to students/users in Canvas.
- Choose whether the Blue Connector will be visible for all courses or hidden.
- Set Open task in new tab to Yes.
- Choose whether the Blue Connector should:
- Overwrite the existing Canvas JavaScript file, or
- Merge changes with the existing file.
- If merging, upload the current JavaScript file used by Canvas.
- Select the Student ID field available in Blue:
- Either Internal Student ID or SIS Student ID.
- Select the Course ID field available in Blue:
- Either Internal Course ID or SIS Course ID.
- Choose to Disable custom data (default setting):
- Custom data is only used if there is a communication issue with Canvas.
- When enabled, a task table is created in Blue Connector for Canvas to interact with.
- When disabled, Blue data is stored directly in Canvas, but Canvas integration features like to-do items, calendar entries, announcements, and assignments will not be enabled.
- Enter the Tool Name that students will see in their course menu to access Blue tasks.
- Select the Default Language:
- This will be used for tasks, announcements, pop-ups, etc., if the student's default language is unavailable.
- Select all the languages that communications will be available in.
- Click Save & Next once all information is entered:
- The Blue Connector will validate the Canvas URL and Access Token.
- You cannot proceed until validation is successful.
- Once validated, the Blue Connector is configured and can be added to Canvas.
- Set any necessary Blue course evaluation settings and click Save.
- Click Download JavaScript and save the JavaScript file for later use in Canvas.

It is important that you configure the Blue Connector settings now before proceeding further. Learn more in this article: Basic configuration of Blue Connector
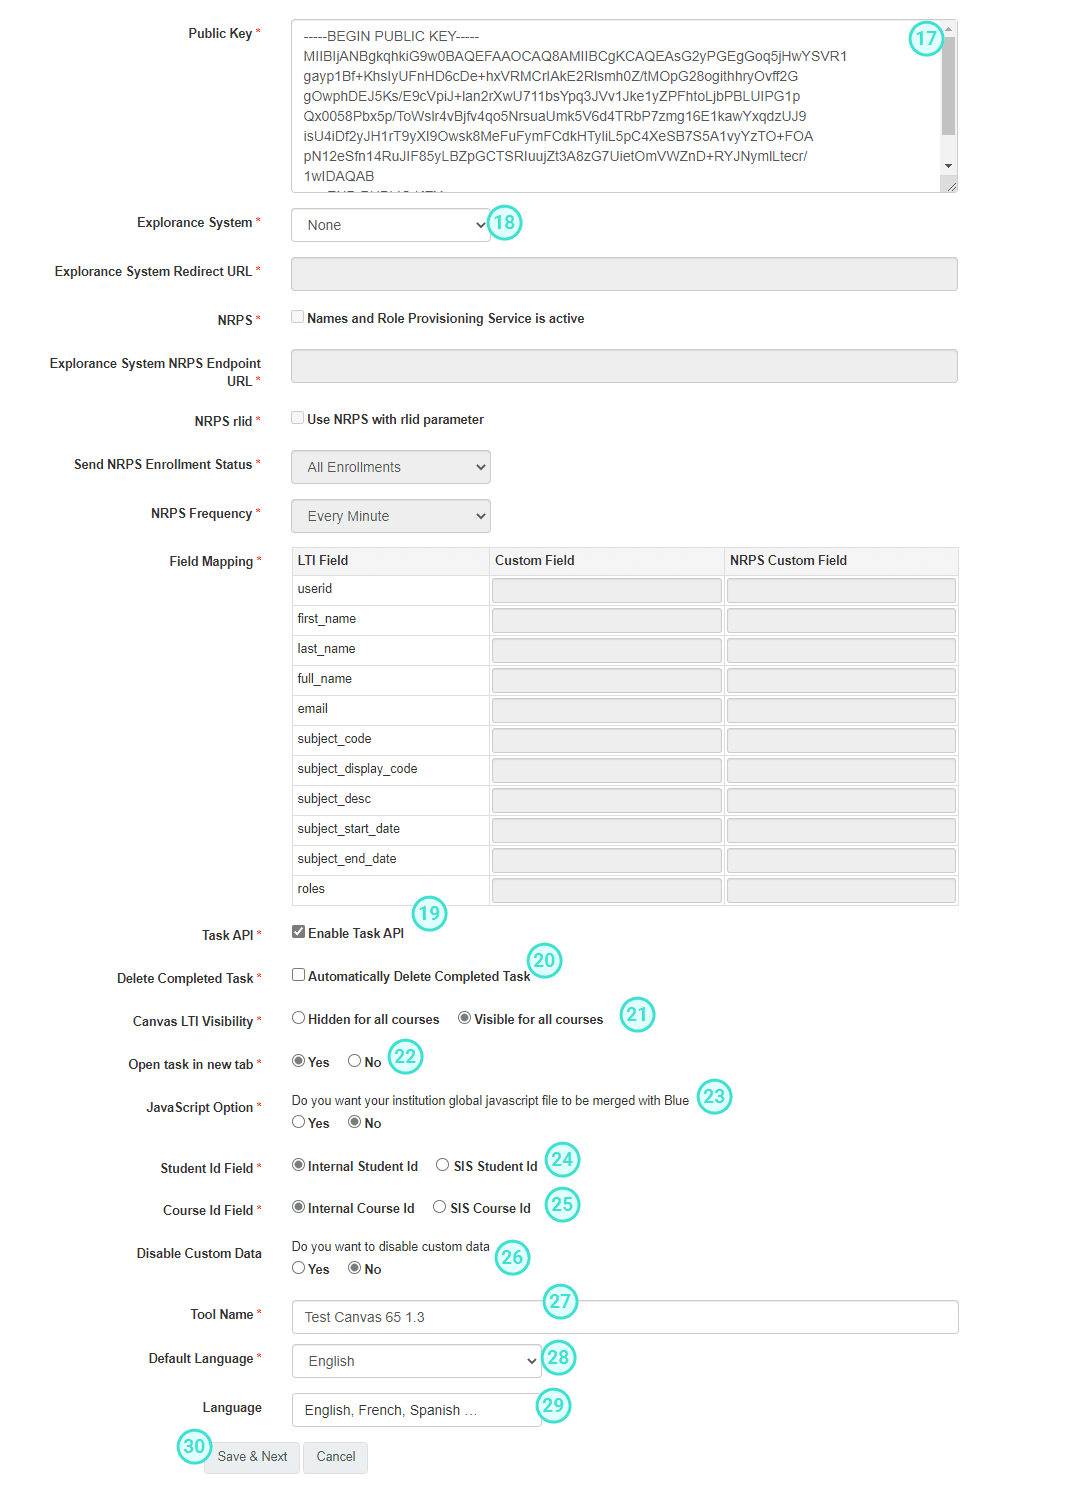
Configuring Blue Connector with Canvas (LTI 1.3)
Use
The outlined setup steps streamline the incorporation of the Blue Connector into Canvas, enabling the transfer of data and features between the platforms. This procedure enhances user experience and capability.
Procedure
Follow these steps to configure the Blue Connector to form a connection with Canvas:
- Open a browser and navigate to the Blue Connector URL. A login screen will appear.
- Log in using the default credentials supplied by Explorance.
- Navigate to Consumer List.
- Click Create Consumer to set up LTI keys for Canvas.
- Select Canvas from the list of LMSs and click Next.
- Choose 1.3 as the LTI Version.
- Enter a Consumer Name.
- Add the Canvas URL into the Consumer URL field.
- Enter the Access Token provided by Canvas.
- Enter the Consumer URL into the Issuer field. This will be one of the following, depending on your environment:
https://canvas.instructure.com(Production)https://canvas.beta.instructure.com(Beta)https://canvas.test.instructure.com(Test)
- Enter the Consumer URL into the Client ID field.
- Note: This is a temporary value and must be replaced later with the actual Client ID found in the Details column of the Canvas Developer Keys section.
- Enter the JWK Set URL as:
https://<canvasurl>/api/lti/security/jwks
- Enter the Consumer URL +/api/lti/authorize as the Authorization URL.
https://<canvasurl>/api/lti/authorize
- Enter the Consumer URL /login/oauth2/token as the OAuth URL.
https://<canvasurl>/login/oauth2/token
- Deployment ID
- Private Key
- Public Key - Enter the public key as required.
- Explorance System - Select None. This will disable many of the following fields.
- Enable Task API - Required only for MTM and BlueX integrations.20. Automatically Delete Completed Tasks - Decide whether to enable this setting.
- If enabled, a background job will run daily to remove all completed tasks (Task status = 2) from Blue Connector, making them invisible to students/users in the LMS.
- Visibility in Courses
- Select whether the Blue Connector will be visible for all courses or hidden.
- Open Tasks in a New Tab - This option must always be set to Yes.
- JavaScript File Handling
- Choose whether the Blue Connector should:
- Overwrite the existing JavaScript file used by Canvas, or
- Merge changes with the existing file.
- If merging, upload the JavaScript file currently used by Canvas (downloaded earlier from the theme).
- Choose whether the Blue Connector should:
- Student ID Field
- Select the Student ID field available in Blue:
- Either Internal Student ID or SIS Student ID.
- Select the Student ID field available in Blue:
- Course ID Field
- Select the Course ID field available in Blue:
- Either Internal Course ID or SIS Course ID.
- Select the Course ID field available in Blue:
- Disable Custom Data
- Choose to disable this setting (default).
- Custom data is only used if there is a communication issue with Canvas.
- When enabled, a task table is created in Blue Connector for Canvas to interact with.
- When disabled, Blue data is stored directly in Canvas, but Canvas integration features like to-do items, calendar entries, announcements, and assignments will not be enabled.
- Tool Name - Enter the name that students will see in their course menu to access Blue tasks.
- Default Language - Select the default language for tasks, announcements, pop-ups, etc. - This will be used if the student's default language is not available.
- Available Languages - Select all languages that communications will be available in.
- Save & Validate - Click Save & Next once all information is entered.
- The Blue Connector will validate the Canvas URL and Access Token.
- You cannot proceed until validation is successful.
- Once validated, the Blue Connector is configured and can be added to Canvas.
- Course Evaluation Settings
- Set any necessary Blue Course Evaluation Settings and click Save.
- Click Download JavaScript and save the JavaScript file for later use in Canvas.
If you use a custom/vanity URL for Canvas (i.e https://myuni.com/Canvas) then use one of the following URLs for the JWK Set URL:
- Production:
https://canvas.instructure.com/api/lti/security/jwks - Beta:
https://canvas.beta.instructure.com/api/lti/security/jwks - Test:
https://canvas.test.instructure.com/api/lti/security/jwks
If you use a custom/vanity URL for Canvas (i.e https://myuni.com/Canvas) then use one of the following URLs for the Authorization URL:
- Production:
https://canvas.instructure.com/api/lti/authorize_redirect - Beta:
https://canvas.beta.instructure.com/api/lti/authorize_redirect - Test:
https://canvas.test.instructure.com/api/lti/authorize_redirect
It is important that you configure the Blue Connector settings now before proceeding further. Learn more in this article: Basic configuration of Blue Connector
Exploring the messaging settings in Blue Connector reveals a wide array of customization options, enabling administrators to finely tune messages accompanying task reminders in Canvas. From adjusting message content to modifying button labels and checkbox messages, administrators have the flexibility to tailor communication according to specific preferences, thereby promoting engagement and productivity.
Configure Blue Connector settings for the LMS
The blue course evaluation settings is where the customization options for LMS features, that are supported by Canvas are available. It is common for both LTI version 1.1 and LTI version 1.3.
Within the Blue connector messaging settings, there exists a realm of flexibility to finely craft the message that accompanies reminders for both fillout tasks and question personalization / subject management tasks. This level of customization isn't confined solely to the body of the message; rather, users can also tailor the button labels and checkbox label messages to suit their specific needs and preferences.
The customization options offered by Blue Connector messaging settings extend beyond basic task reminders and login prompts. Blue Connector provides the ability to personalize messages for a wide range of scenarios, including activating course blocking features, disseminating announcements, and assigning tasks. This flexibility enhances engagement and productivity by aligning with the unique requirements of each institution or organization.
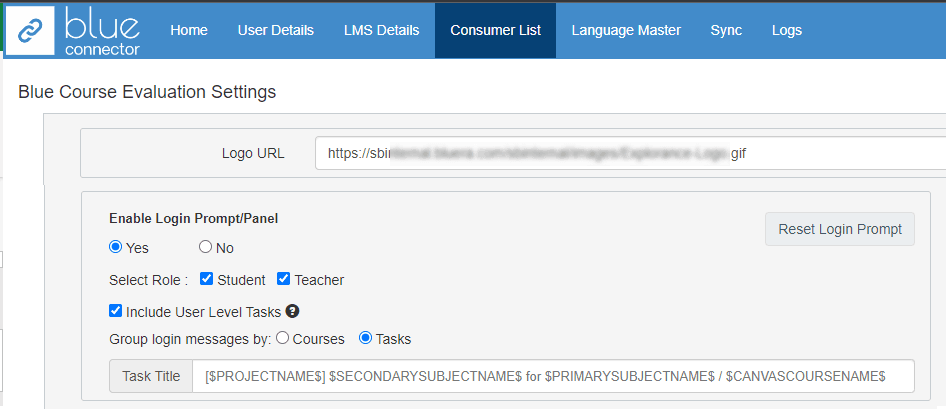
Logo URL
The logo URL should be a publicly accessible logo of the institution or other appropriate imagery that is approximately 450px wide by 75px tall. This logo will appear on the login prompt as well as the course, grade, and all course blocking prompts.
Enable Login Prompt / panel
When enabled the login prompt will cause a message box to appear when a user logs in to the LMS, if they have any open tasks. Several options can be configured for this feature including:
- Select Role - choose which roles the login prompt will be enabled. Either the student, the teacher, or both can be selected. When the student is selected, the prompt will appear if the student has open evaluation tasks. When the teacher is selected, the prompt will appear if the teacher has Question personalization or Subject management tasks open.
- Include User Level Tasks - when this option is enabled, the prompt will appear if the user has user level tasks open as well as any course tasks.
- Group login messages by - choose whether tasks on the login prompt will be grouped by course or task type.
- Task title - Create a customized task title that will be displayed for each task on the login prompt.
- Reset Login Prompt - if any users have chosen to hide the login prompt, selecting this button will reset that flag for all users meaning that the prompt will display for any user if they have an open task.
The image below displays the customization options for login prompts in the Blue connector.
The image below displays the impact of these customizations on the login prompt within the Canvas. The tasks for the user are displayed course wise.

The image below displays the impact of these customizations on the login prompt within the Canvas. The tasks for the user are displayed task wise.

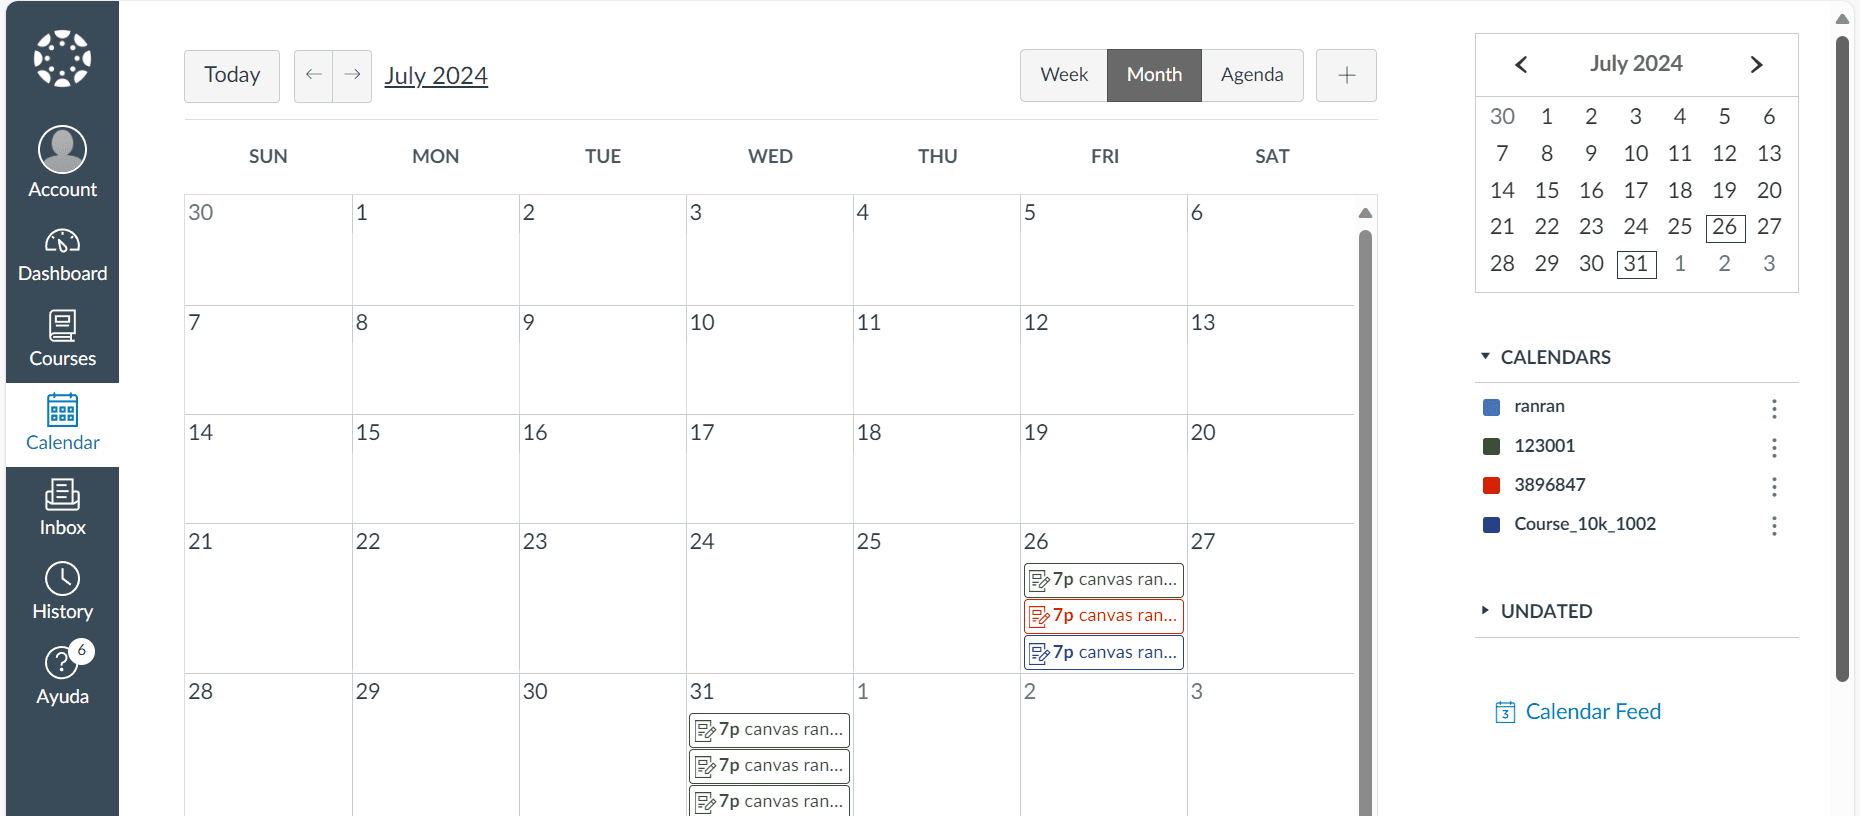
Enable Assignments, Calendar and To-do (Canvas only)
When the 'Enable Assignments, Calendar and To-do' feature is enabled for all, it will generate an assignment, a calendar item, and a to-do item for open evaluation tasks. Additional options that are available only when Enable All is selected are:
Assignment due date: This feature allows for reminders to be set a specified number of days before the task's end date. In the Canvas LMS, students can submit their assignments up until the 'assignment due date', which is referred to as the 'available until' date. This 'available until' date typically extends a few days beyond the actual due date, serving as a grace period for completing the assignment.
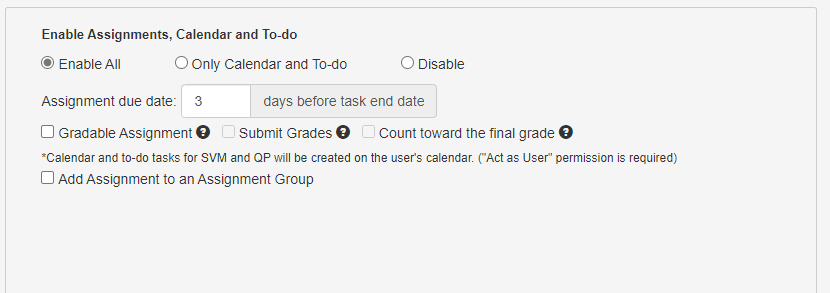
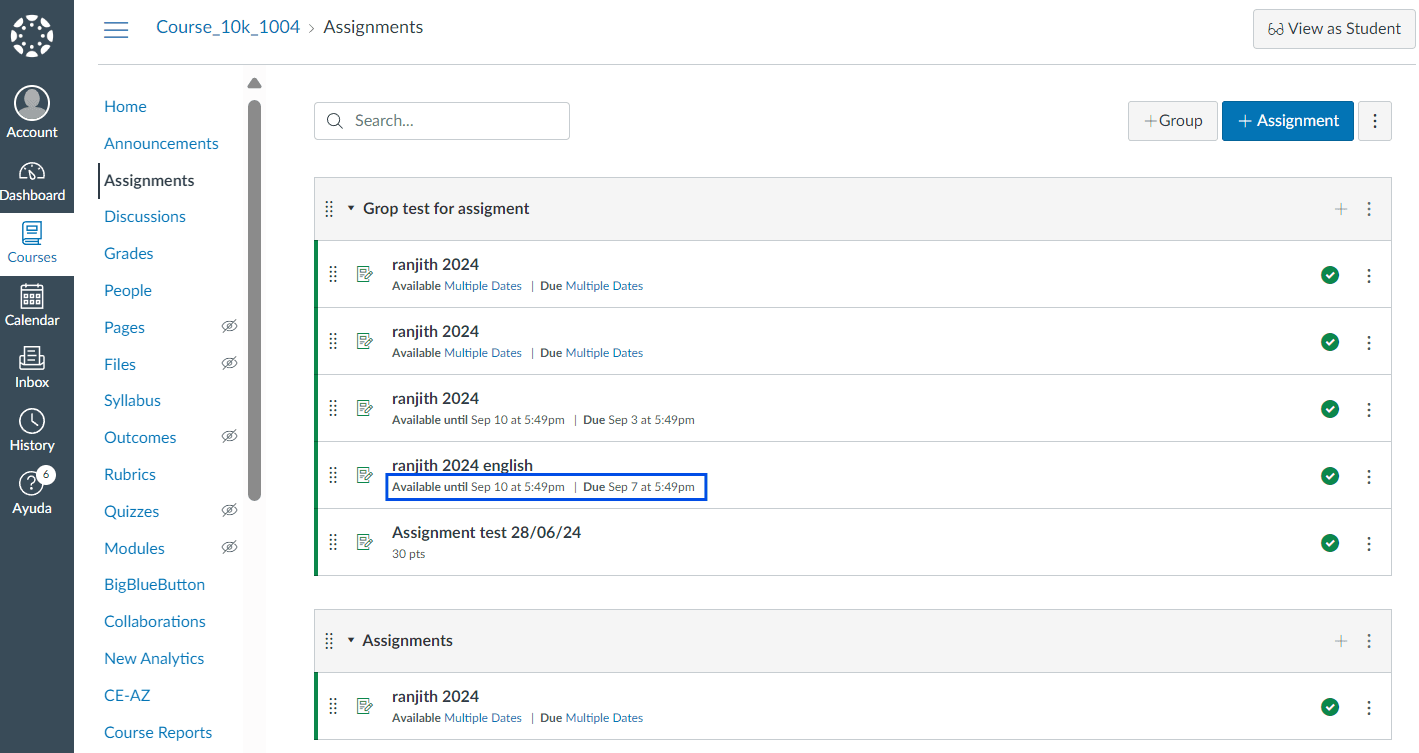
In the illustration given below, the 'available until' date is set for 3 days after the due date. Therefore, the assignment is available until September 10th, whereas the due date is September 7th. This allows students to submit their work until September 10th.
- Gradable Assignment - allows the instructor to manually award the completion of this task a certain number of grade points.
- Submit Grades - allows the instructor to preset the number of grade points in BPI that can be earned by completing the task and Blue will automatically awards those points once the task is complete (only available for gradable assignments).
- Count toward the final grade - when enabled, the assignment contributes to the final grade for the students (only available when submit grades is enabled).
For the Enable All setting, events for the fillout task will be created in the course calendar only.
If Add Assignment to an Assignment Group is enabled then
- Assignment Group Name - is the name of the assignment group that should be created for new assignments. It is a mandatory field if the Add Assignment to an Assignment Group is enabled. It has a maximum length of 255 characters.
- Group Position - select one of two values Add Assignment group to the top or Add Assignment group to the bottom. The default is Add Assignment group to the top.
Before a new assignment is created in a course, Blue Connector should check the assignment groups of the course, and if the Assignment Group Name is not found, a new assignment group is created.
The image below displays the Enable All options for the Canvas consumer assignments, calendar, and to-do in the Blue connector.

When Only calendar and to-do is enabled, only calendar items and to-do items will be created for the fill out task.
An additional option makes it possible to specify whether these events will be created in the course calendar or in the user calendar.

The images below display the impact of enabling the assignment and calendar options in Canvas.

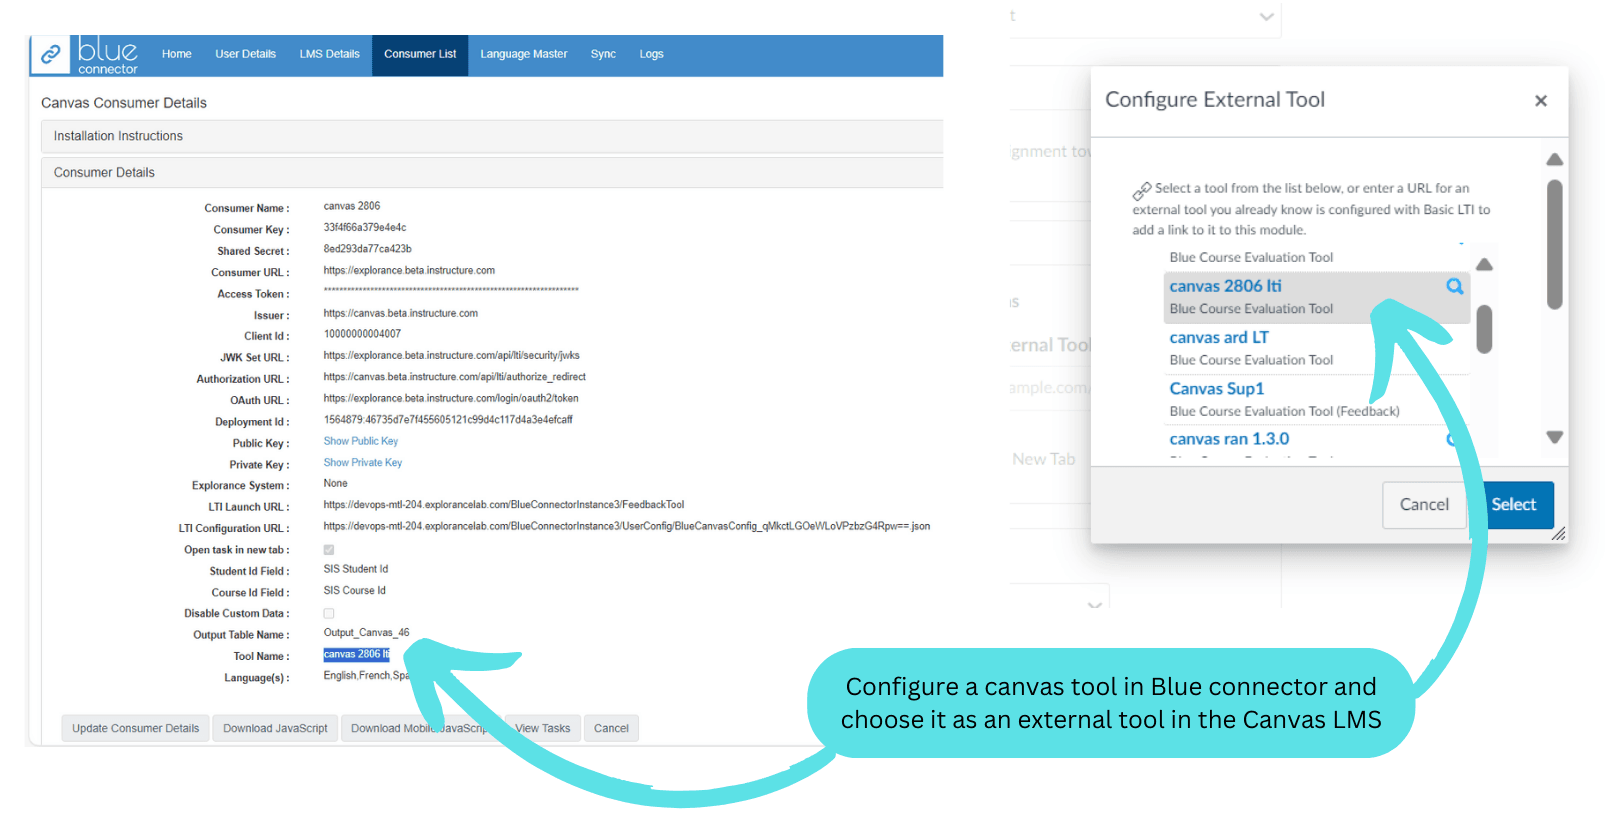
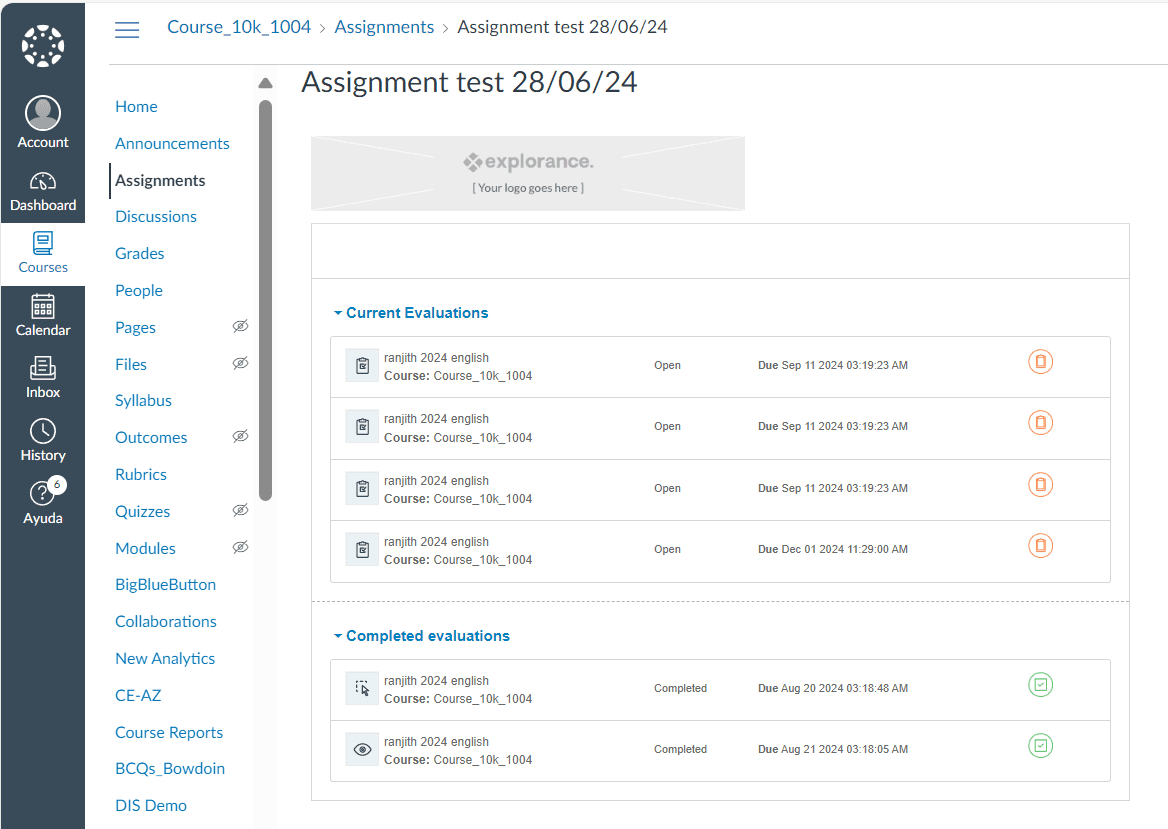
Canvas administrators and teachers can designate Blue as an LTI tool submission type, enabling direct linkage to Blue projects during assignment setup. This enhancement allows assignments to be established at the beginning of the semester rather than waiting for course evaluations. For students, assignments will feature the Blue Connector LTI tool, displaying only relevant tasks from the linked Blue project, thereby improving navigation. Once Blue project tasks are completed, assignments can be submitted, ensuring accurate grading for students.
The first step in the process of adding an LTI assignment is to configure a Canvas tool in Blue Connector and choose the same tool as an external tool in the Canvas LMS.
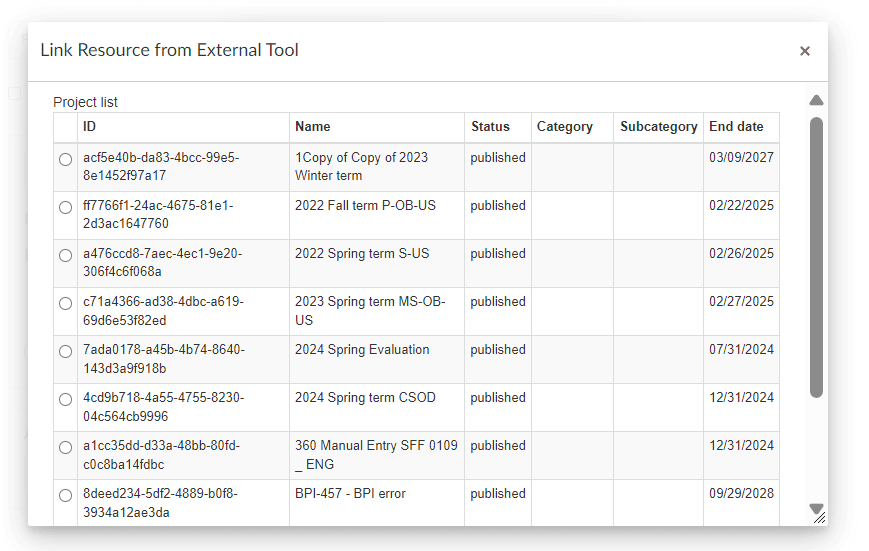
The next step is to choose the project and create an assignment with grade points. This assignment will appear in the list of tasks that the student has to complete. Once the student completes the assignment, designated grade points can be allocated.

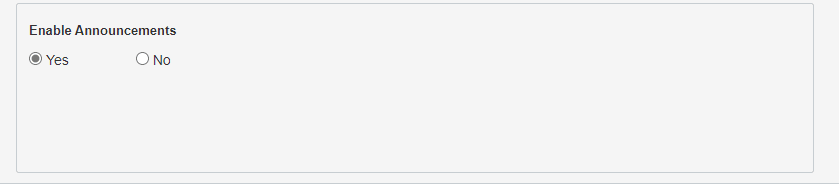
Enable Announcements (Canvas only)
Canvas announcements can be created automatically when a user is assigned a task. Both the title and the message of the announcement can be customized. Announcements are added to the Canvas Announcements section on the task start date.
The image below displays the enabling or disabling options for the Canvas consumer's announcements in the Blue connector.
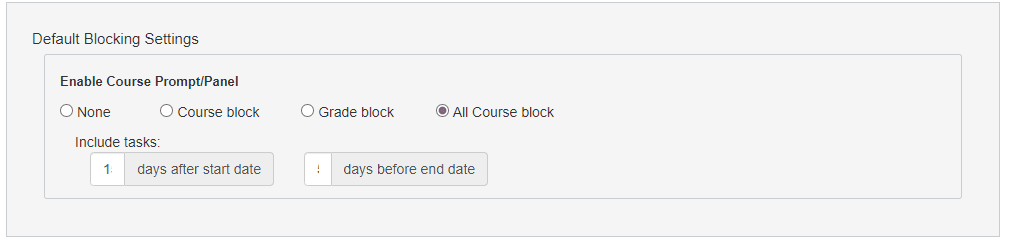
Default Blocking Features
These settings control how the LMS behaves when an open Blue Connector task exists for the user. The default blocking features section establishes if blocking will take place and when.
Enable Course Prompt / Panel
When enabled and a user has an outstanding task, i.e. a task that is still open, a prompt will appear that prevents the user from continuing until they have completed their outstanding tasks. The prompt can be configured to appear at different times:
- None - the prompt never appears.
- Course block - a student will not be allowed to access any course resources until they have completed all of their Blue evaluation tasks for that course.
- Grade block - when enabled prevents the user from accessing their grades until they have completed all of their Blue evaluation tasks for that course. (Canvas only)
- All course block - the prompt appears whenever a user tries to access a course when any tasks are incomplete
Blocking only applies to courses that are indicated to prevent access. Several options can be configured for the feature including:
- Days after start date - enables blocking a given number of days after the task start date.
- Days before end date - enables blocking a given number of days before the task end date.
The image below displays the customization options for course block in the Blue connector.
The images below display the impact of these customizations on the course block in Canvas.


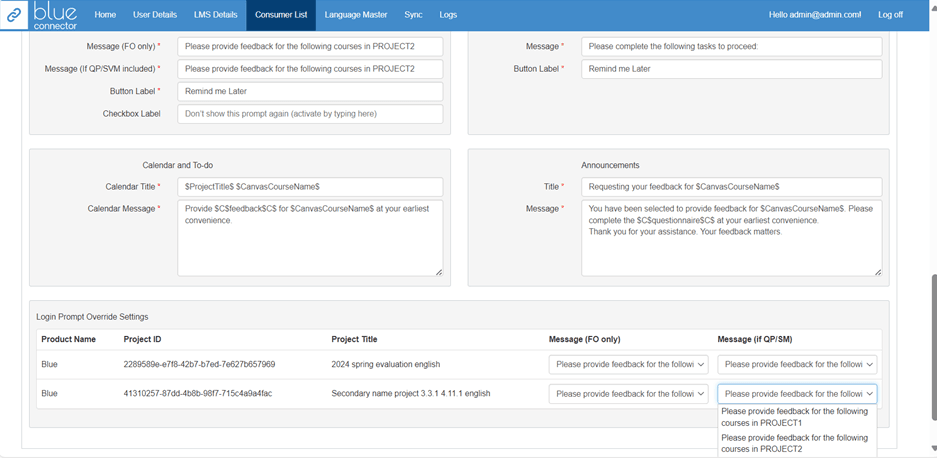
Project override settings
The project override settings allow you to specify for a particular project all of the blocking settings including the type of blocking that applies and the number of days before the end date of the task or after the start date of the task.
The second half of the Blue Connector settings page is where all of the messaging can be customized. Messages that will be displayed in the LMS, can be customized in languages beyond the traditional English, French, Spanish, and Portuguese, ensuring inclusivity and accessibility for users worldwide. This global reach fosters a truly international community, breaking down linguistic barriers and facilitating seamless communication across diverse cultural contexts.
The image below displays the customization options for messaging in the Blue connector.
Language Support
The Blue Connector supports multiple languages. Languages can be customized by switching between available tabs on the page.
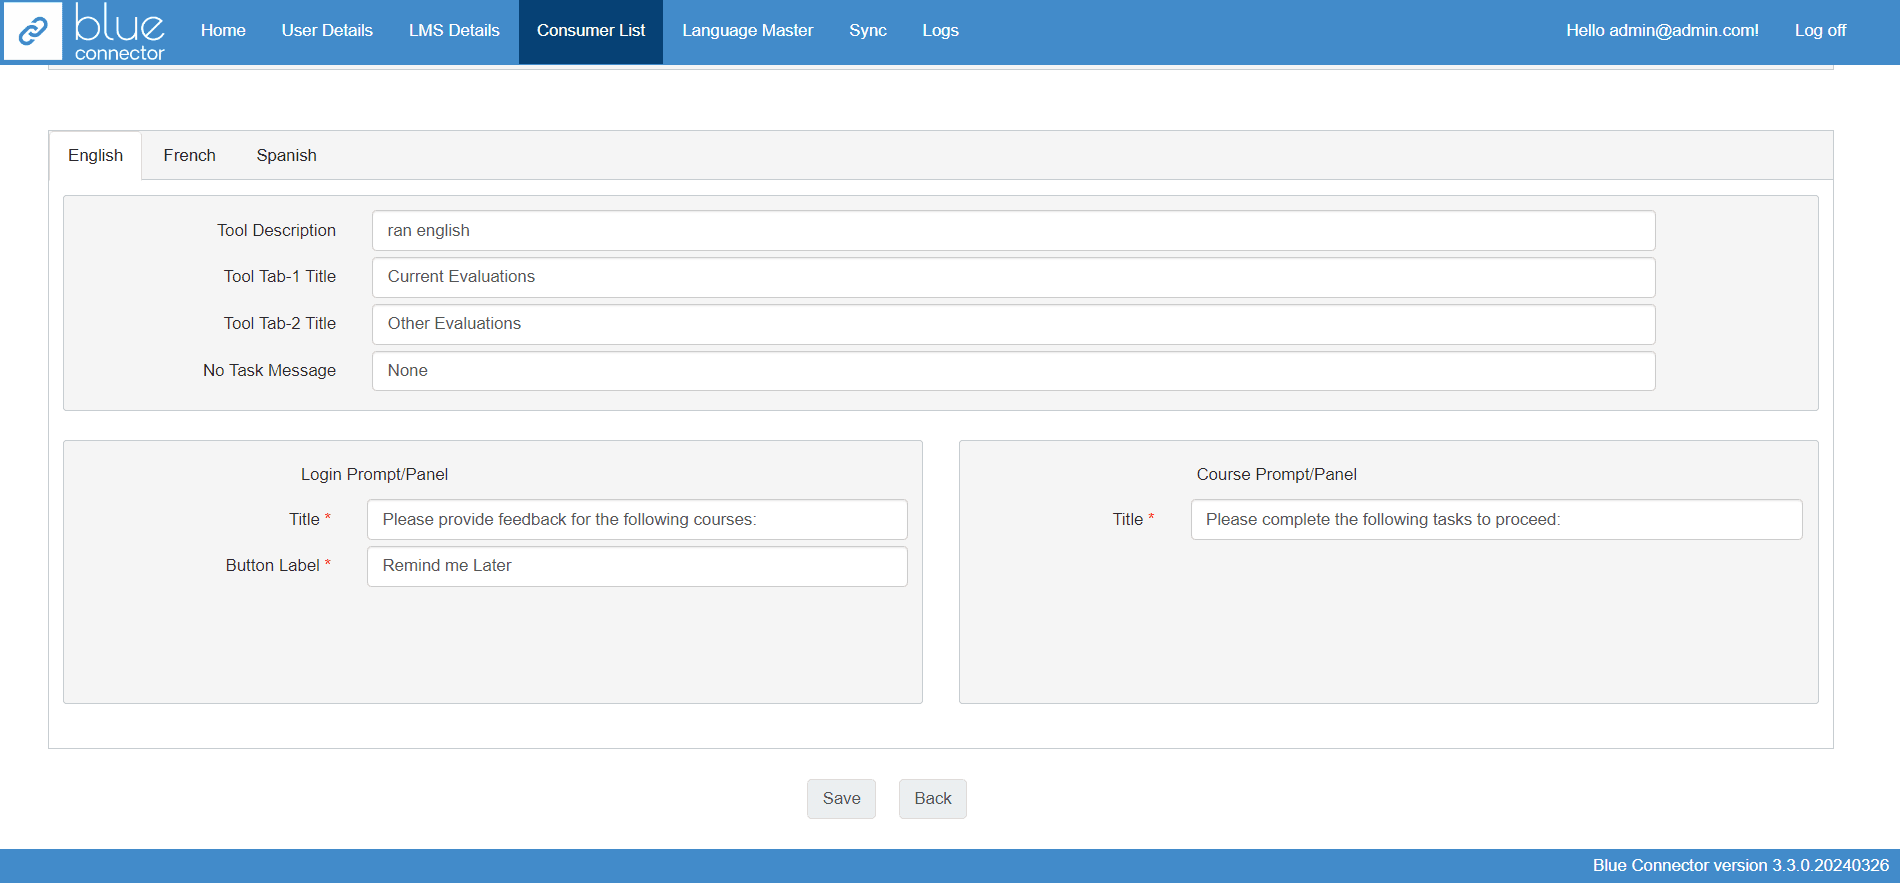
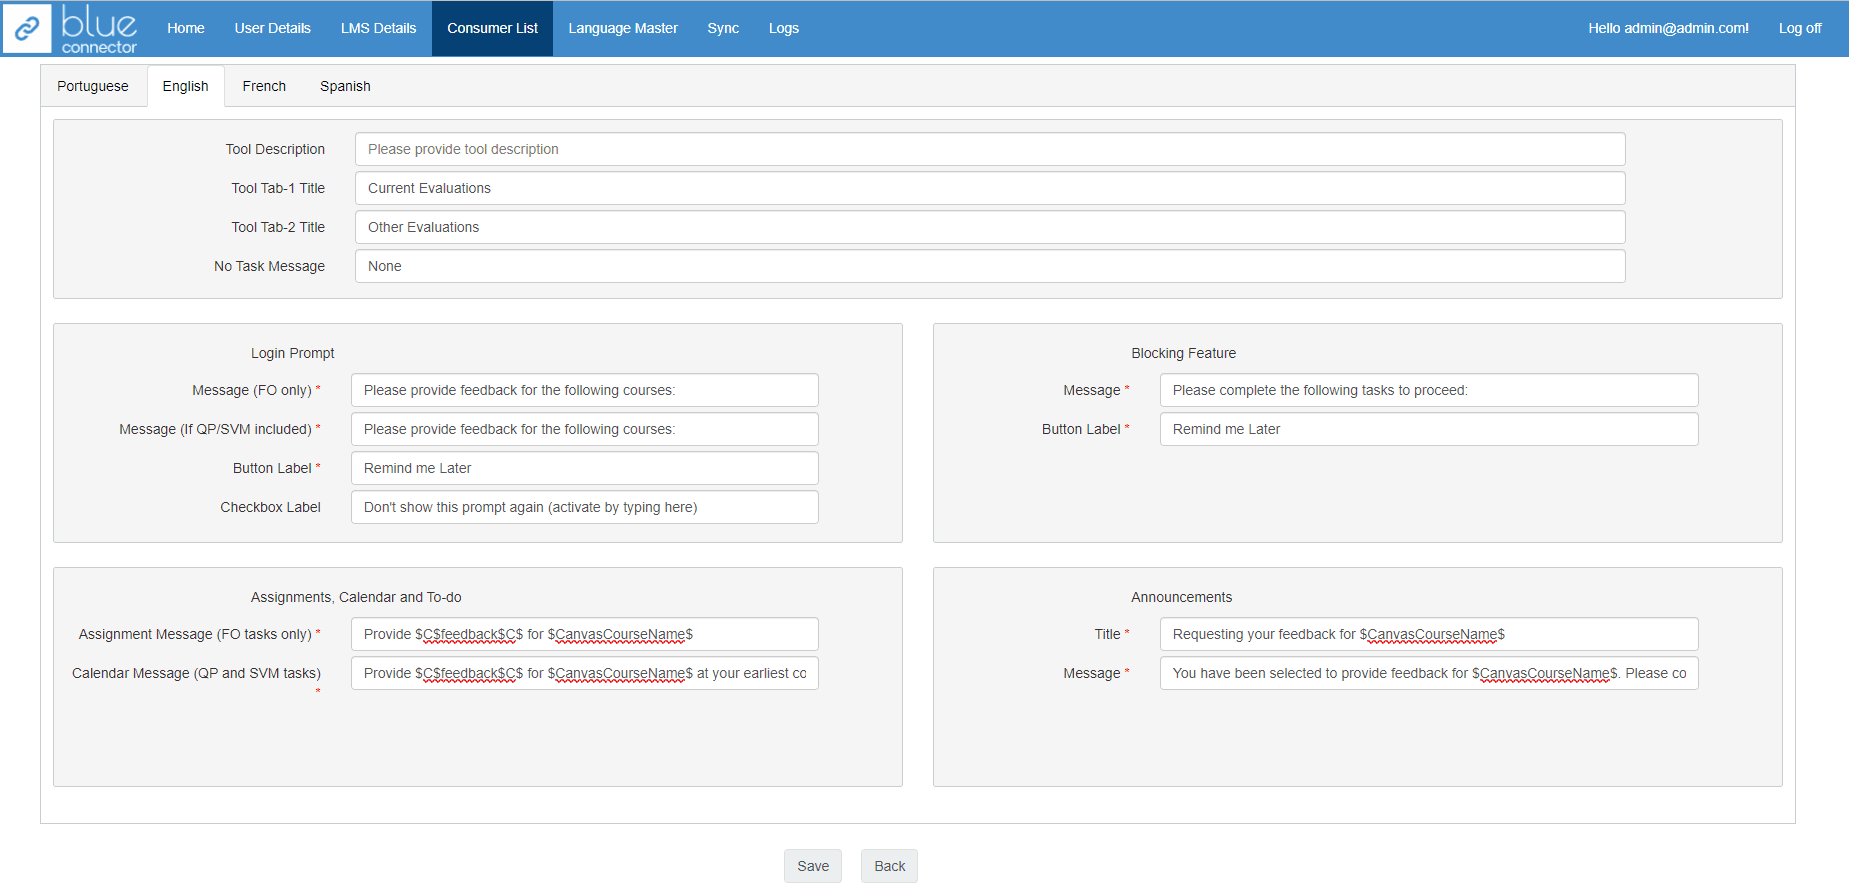
General
- Tool Description - a brief description of the Blue Connector tool that will be added to the LMS and seen by all users.
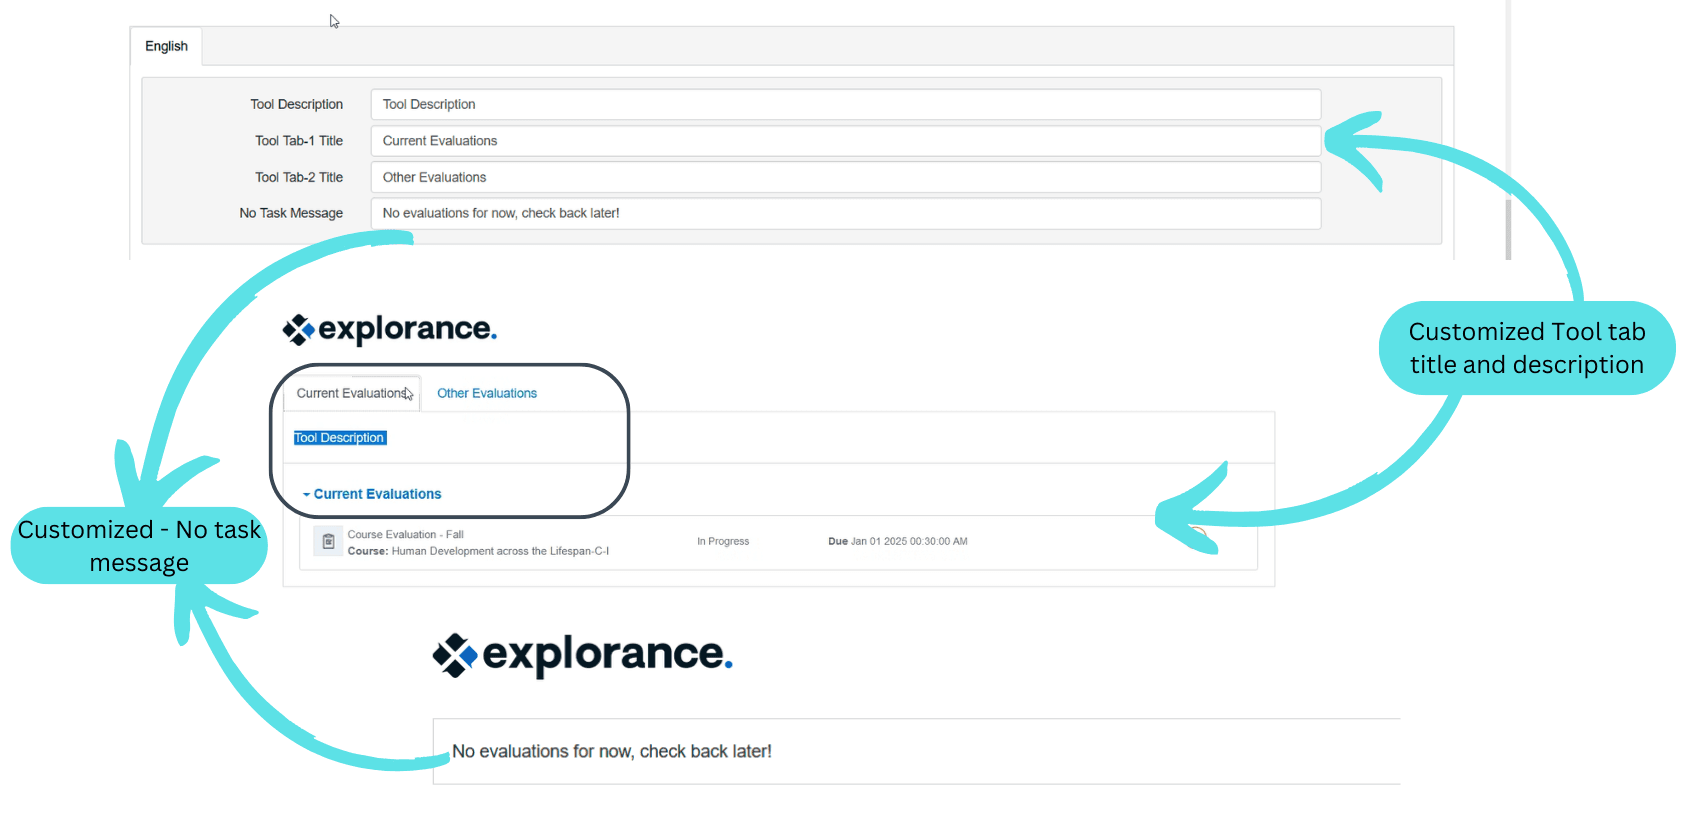
- Tool Tab 1 - Customize the caption for the primary tab displayed in the Blue Connector block. The primary tab contains all course related tasks
- Tool Tab 2 - Customize the caption for the second tab displayed in the Blue Connector block. The second tab contains all non-mapped course specific tasks.
- No task message - the message that appears in the Blue Connector tool when there are no tasks assigned to the user.
The illustration below demonstrates how the tool tab's title, description, and message can be tailored within the blue connector. Furthermore, it illustrates how these customizations impact the tool tab within the Blackboard Ultra.
Login prompt
Messages related to the login prompt that appears upon first entering the LMS.
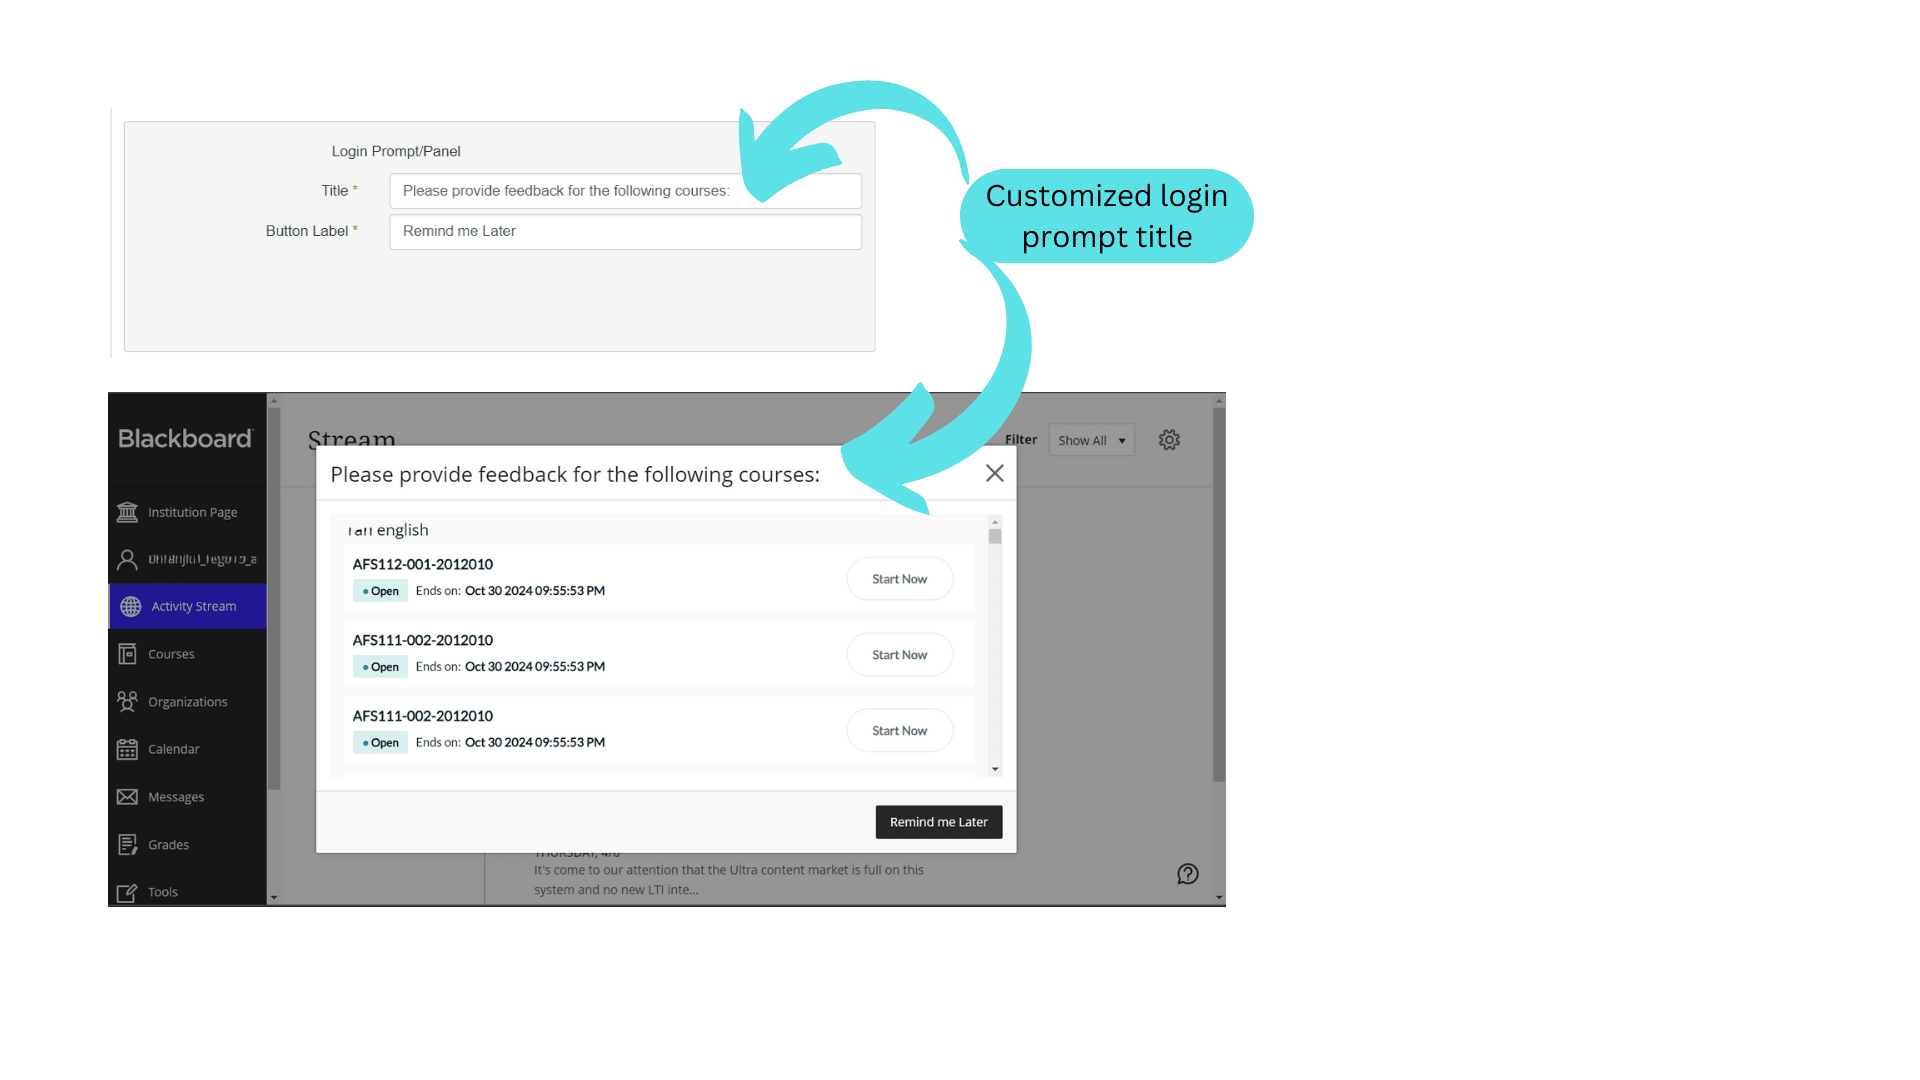
- Title - the text of the message that appears if the user has open tasks.
- Button Label - the text of the affirmative button that is included in the prompt that appears when users have open tasks.
The illustration below demonstrates how the login prompt's title, and button label can be tailored within the blue connector. Furthermore, it illustrates how these customizations impact the login prompt within the Blackboard Ultra.
Blocking features
These are the messages and other text customizations available that are related to the blocking feature.
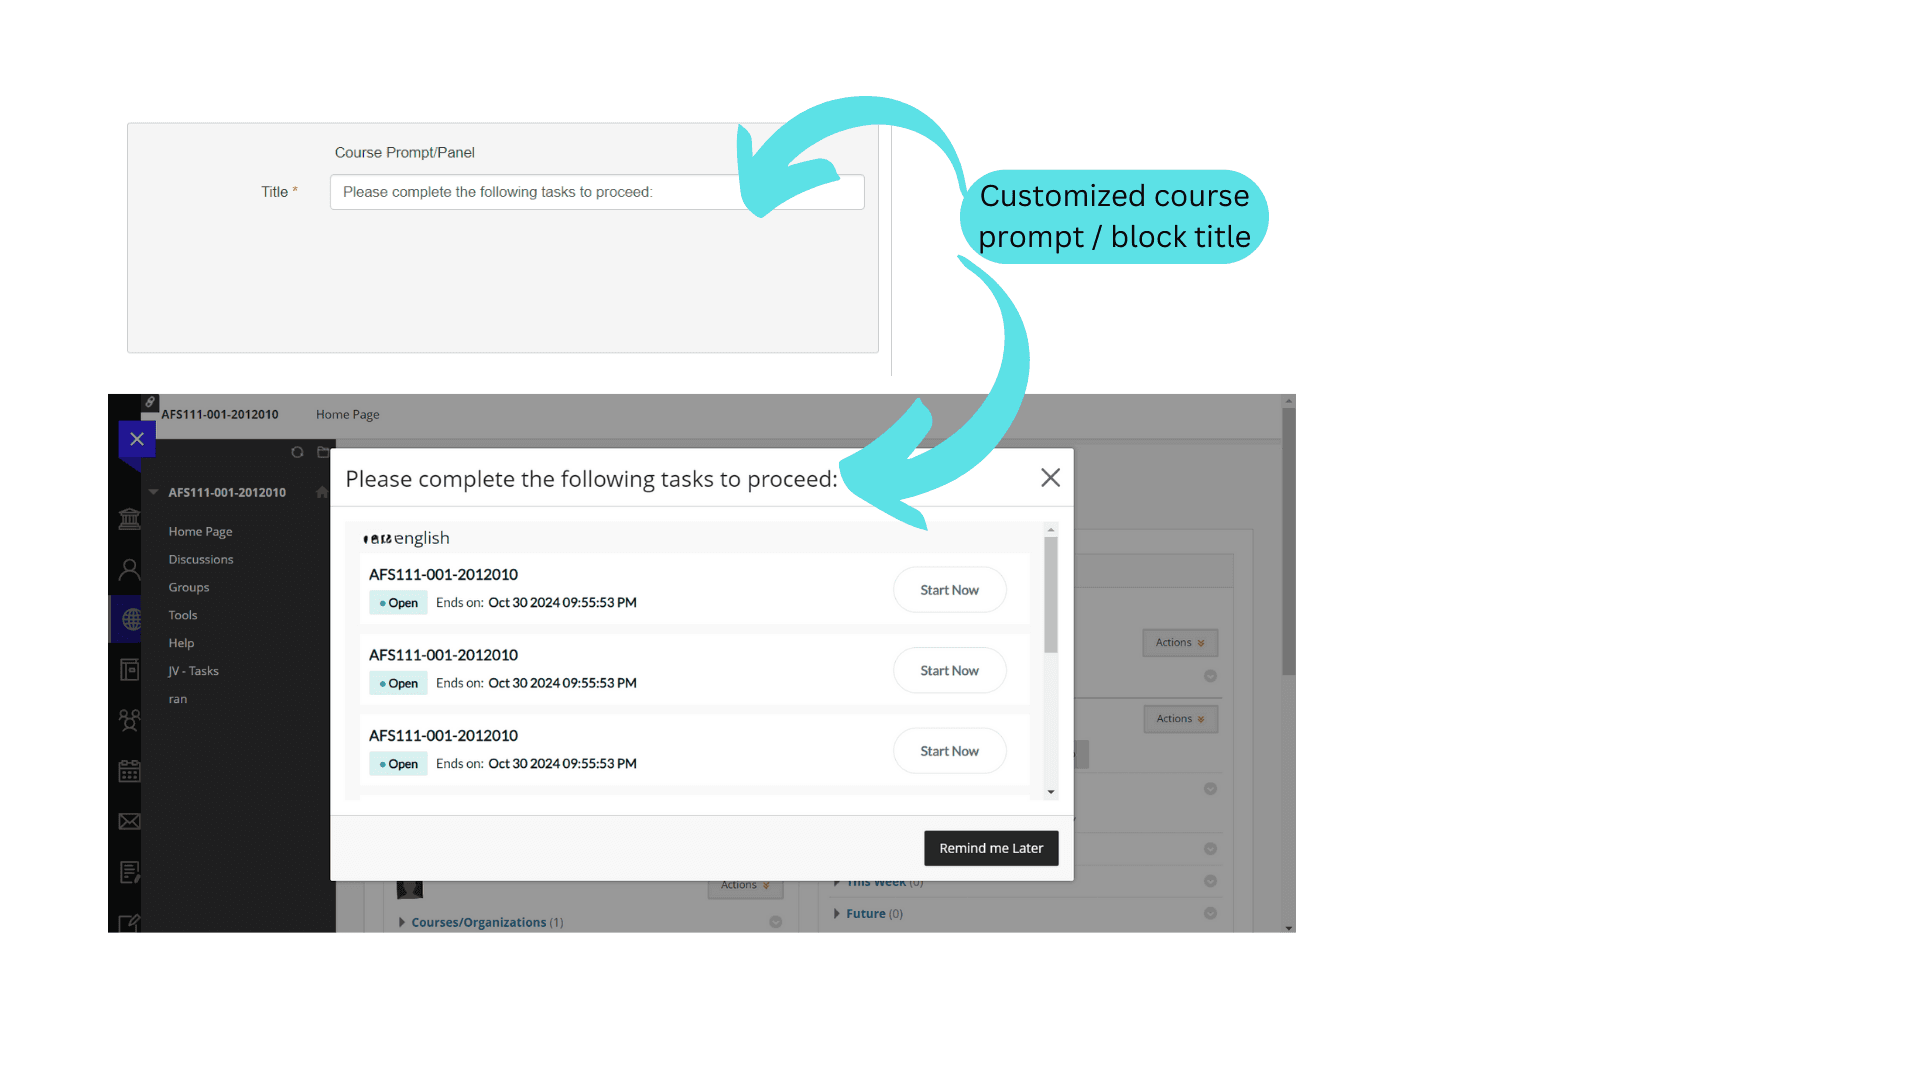
- Title - the text of the message that appears if the user has open tasks.
The illustration below demonstrates how the course prompt's title can be tailored within the blue connector. Furthermore, it illustrates how these customizations impact the course prompt within the Blackboard Ultra.
Language Support
The Blue Connector supports multiple languages. Languages can be customized by switching between available tabs on the page.
Field Mapping Symbols (Canvas only)
Several field mapping symbols are supported in all the message text.
Built-in Blue Connector field mapping symbols
- $C$<entertexthere>$C$: Replace
with a word or phrase that when seen by the end user will appear as a hyperlink that will open the evaluation list.
Example: You have a$C$course evaluation$C$that needs to be completed soon.
Result: You have a course evaluation that needs to be completed soon.
Availability: Canvas Blue Connector - $CANVASCOURSENAME$: Wherever this field mapping symbol is used, it will be replaced with the course name for the evaluation that the student must complete.
Example: You have a course evaluation for$CANVASCOURSENAME$that is due this week. Why not complete it now?
Result: You have a course evaluation for Algebra 101 that is due this week. Why not complete it now?
Availability: Canvas Blue Connector - $PROJECTNAME$: Brings in the project name that created the task.
Example: You have been assigned tasks for$PROJECTNAME$
Result: You have been assigned tasks for Spring 2023 course evaluation.
Availability: Canvas Blue Connector - $PRIMARYSUBJECTNAME$: Brings in the name of the primary subject that the task has been created for.
Availability: Canvas Blue Connector - $SECONDARYSUBJECTNAME$: Brings in the name of the secondary subject that the task has been created for.
Availability: Canvas Blue Connector
General
- Tool Description - a brief description of the Blue Connector tool that will be added to the LMS and seen by all users.
- Tool Tab 1 - Customize the caption for the primary tab displayed in the Blue Connector block. The primary tab contains all course related tasks
- Tool Tab 2 - Customize the caption for the second tab displayed in the Blue Connector block. The second tab contains all non-mapped course specific tasks.
- No task message - the message that appears in the Blue Connector tool when there are no tasks assigned to the user.
The illustration below demonstrates how the tool tab's title, description, and message can be tailored within the blue connector. Furthermore, it illustrates how these customizations impact the tool tab within the Canvas.
Login prompt
Messages related to the login prompt that appears upon first entering the LMS.
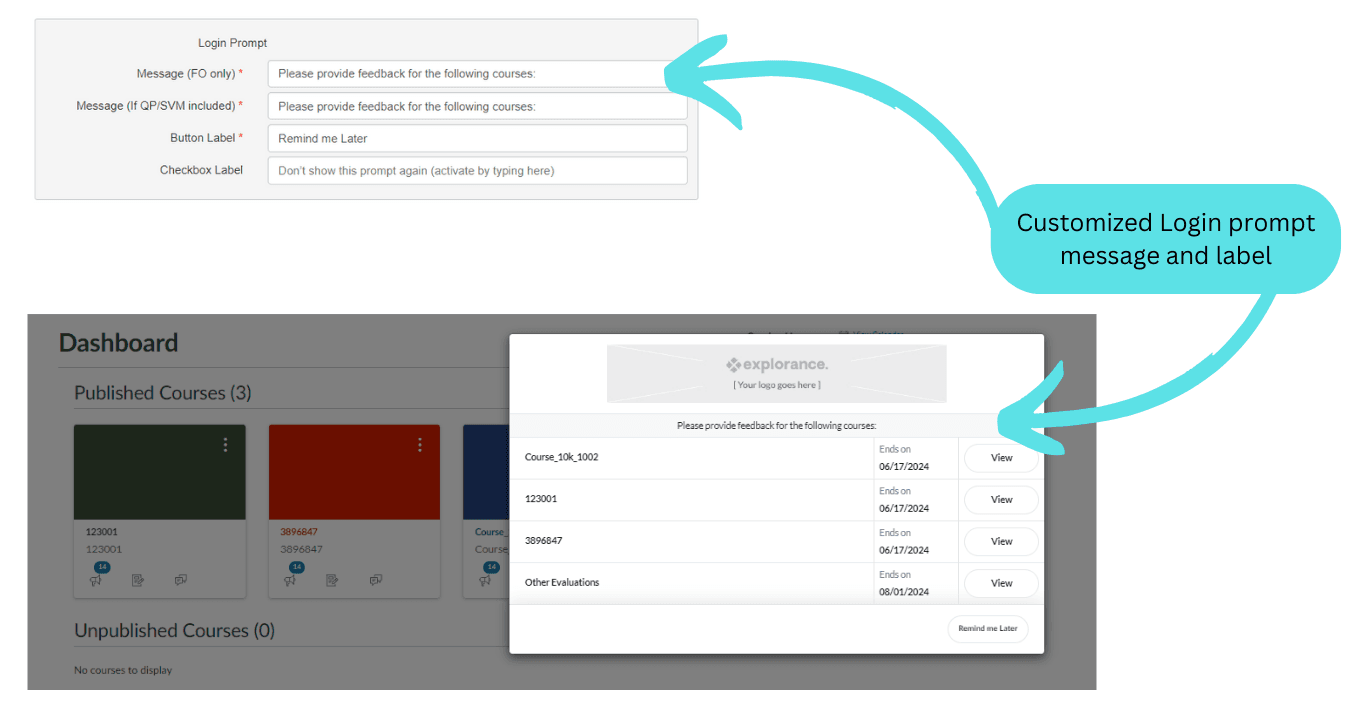
- Message (FO Only) - the text of the message that appears if the user has open fillout tasks.
- Message (If QP/SVM included) - the text of the message that appears if the user has open question personalization and subject management tasks.
- Button Label - the text of the affirmative button that is included in the prompt that appears when users have open tasks.
- Checkbox Label (Canvas Only) - the text of the checkbox that allows the user to hide the login prompt entirely. If no text is provided, the option to hide the login prompt is not available.
The illustration below demonstrates how the login prompt's message, check box label and button label can be tailored within the blue connector. Furthermore, it illustrates how these customizations impact the login prompt within the Canvas.
Blocking features
These are the messages and other text customizations available that are related to the blocking feature.
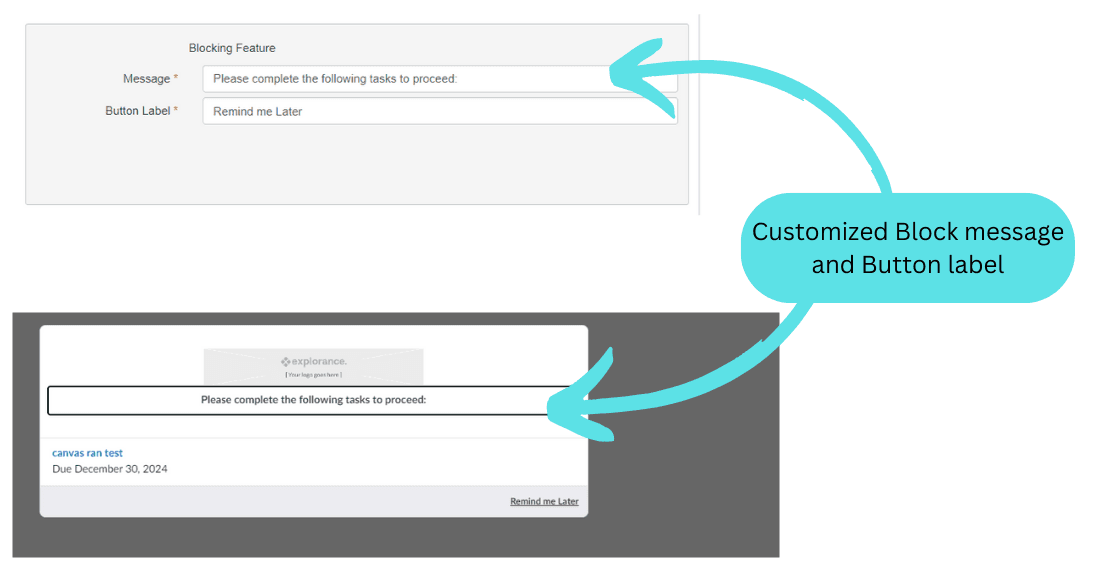
- Message - the message that appears on the pop up that prevents the user from viewing their grades or courses.
- Button Label - the text on the button that is included in the blocking pop up.
The illustration below demonstrates how the course block's message and button label can be tailored within the blue connector. Furthermore, it illustrates how these customizations impact the course block within the Canvas.
Assignments, Calendar and To-do
Messages that appear in the assignments, calendars, and to-do lists in the LMS.
- Assignment Message (FO tasks only) - the message that appears in the assignment that is created by the Blue Connector
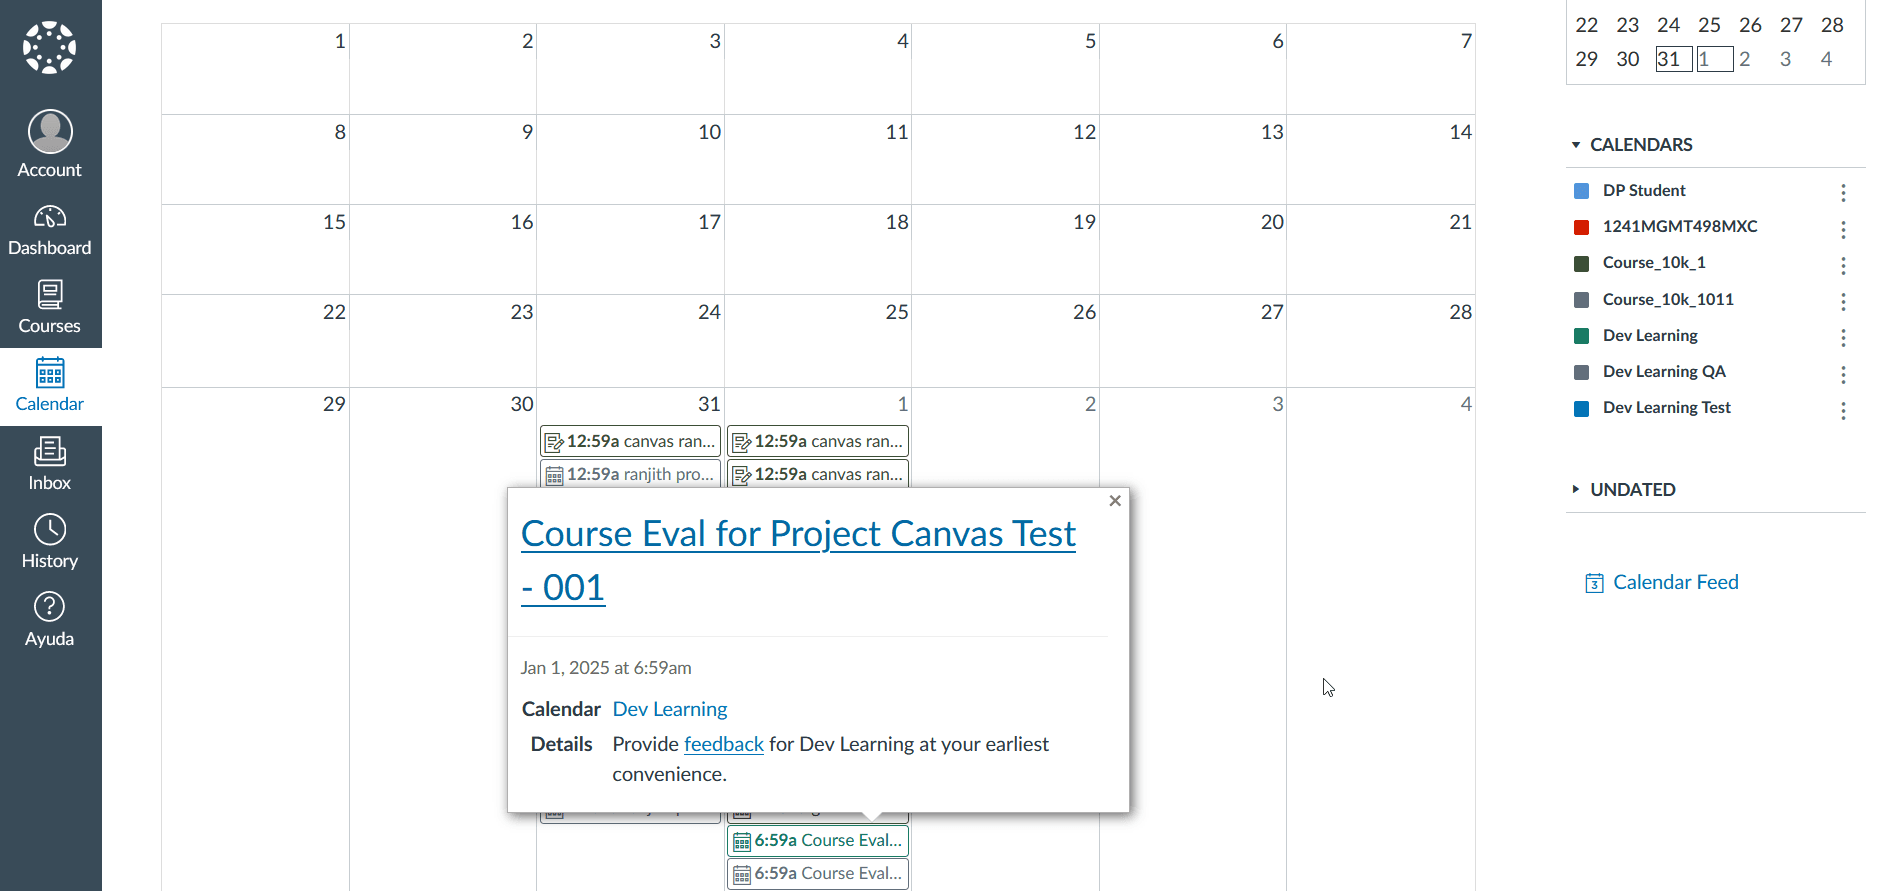
- Calendar Message (QP and SVM tasks) - the message that appears in the calendar in the LMS that is created by the Blue Connector.
Admins can configure calendar event titles using both the course name and the project name. Calendar titles can be up to 255 characters, and calendar messages can be up to 4,000 characters. This benefits the Blue Connector Admins and end users, offering a clearer and more customizable calendar experience, especially when users have multiple tasks with the same project title.
The illustration below demonstrates the incorporation of the course name into the title, first in Blue Connector and then in Canvas.
Announcements
- Title - the title of the announcement created by Blue Connector
- Message - the content of the announcement created by Blue Connector
Note: Limited HTML can be used in both the announcement title and message. This can help your content stand out, but thorough testing is required to ensure proper formatting.
Captions should be provided for every language that has been enabled.
Follow these steps to set up the Blue Connector so that it will apply to all courses in Canvas.
- Log in to Canvas as an administrator or as a user with specific permissions.
- Select the managed account from the Admin menu.
- Navigate to Settings.
- Navigate to Apps.
- Choose View App Configurations.
- Select + App to open the Add App form.
- For the LTI version 1.1 change the Configuration Type to By URL then:
- Enter the Tool Name from the Blue Connector as the name for the app.
- Copy the Consumer Key generated by the Blue Connector.
- Enter the Shared Secret from the Blue Connector.
- Copy the Configuration URL provided by the Blue Connector into the Config URL.
- Select Submit to create the app in Canvas.
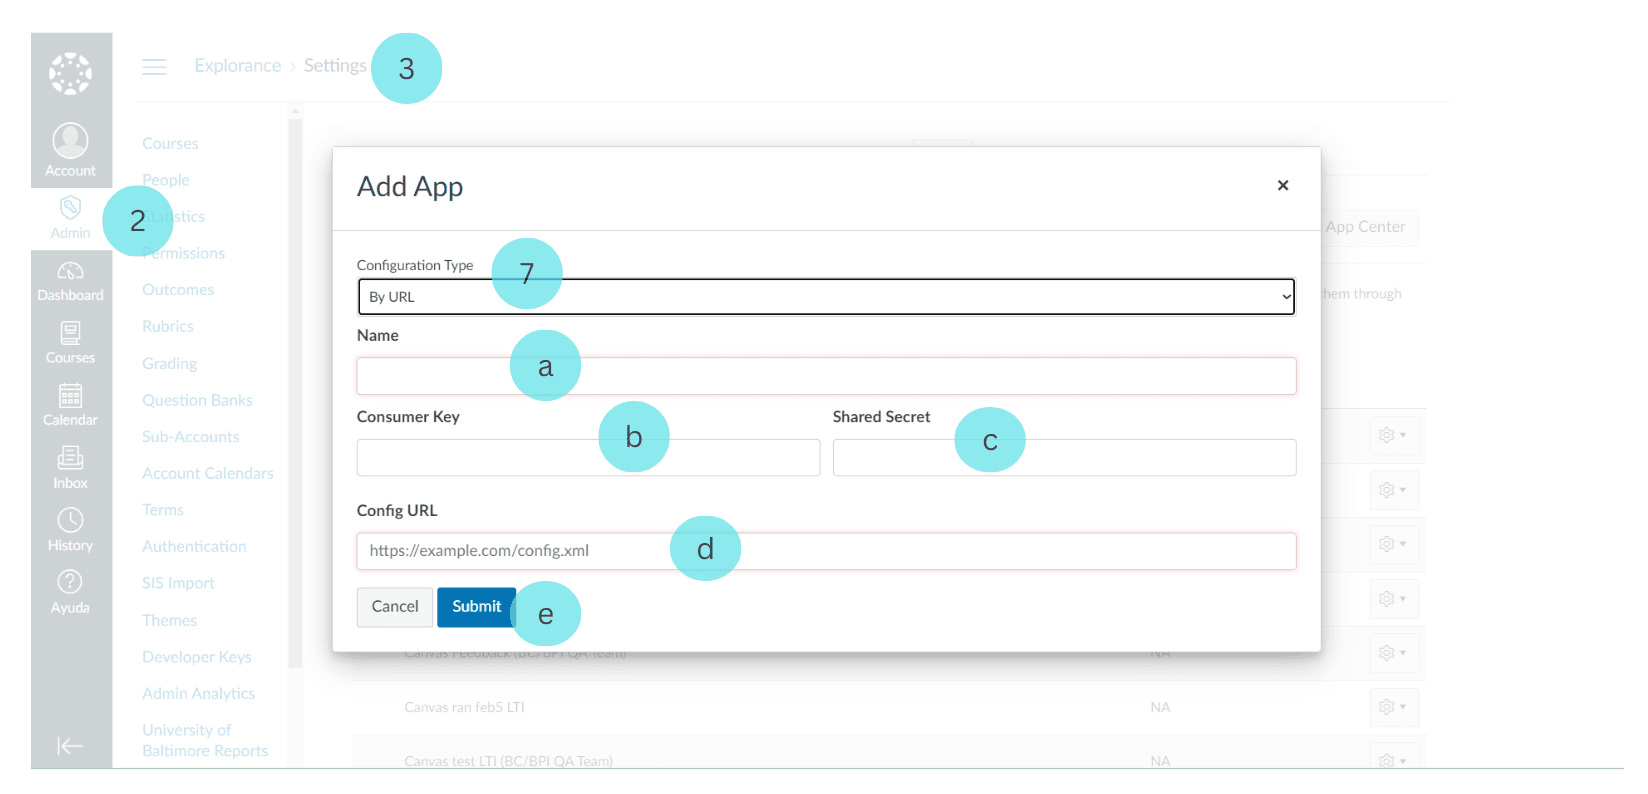
The External App Name is case-sensitive and must be identical to the Tool Name entered in the Consumer Setup of the Blue Connector.
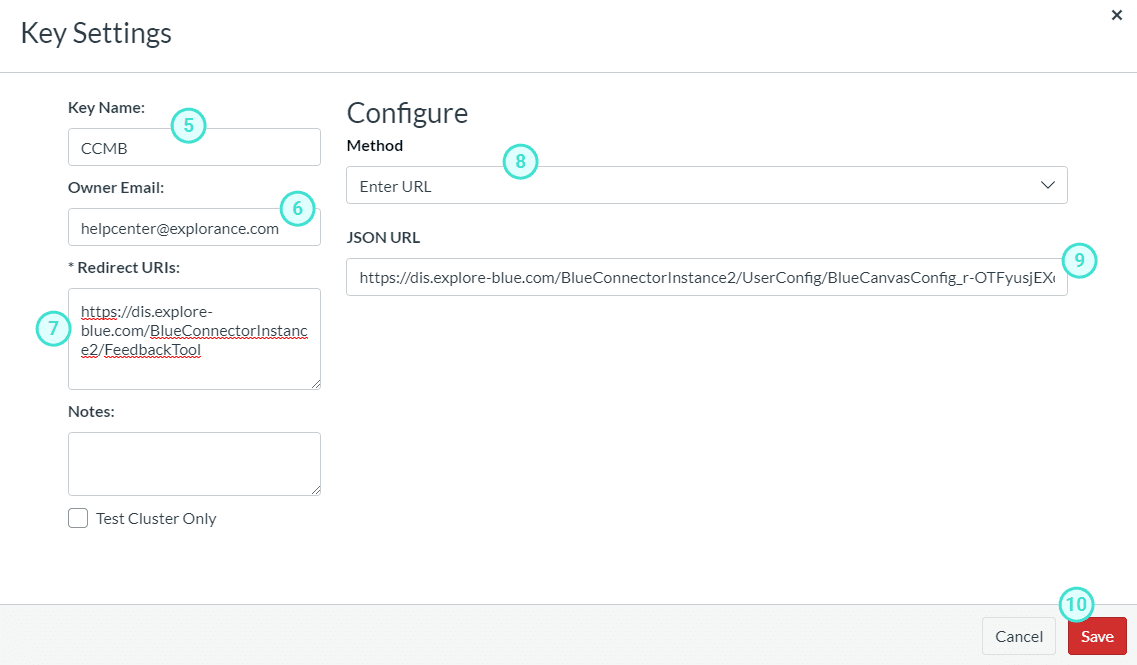
Before adding the Blue Connector LTI 1.3 to Canvas, you must first add a developer key. Follow these steps:
- Log in to Canvas as an administrator or as a user with specific permissions.
- Select the managed account from the Admin menu.
- Navigate to Developer Keys.
- Select + Developer Key and then choose LTI Key from the drop-down list.
- In the Key Name field, enter the Tool Name from the Consumer Details.
- Add an Owner Email address.
- Copy the LTI Launch URL from the Consumer Details and paste it into the Redirect URIs field.
- From the Method drop-down list, select Enter URL.
- Copy the LTI Configuration URL from the Consumer Details and paste it into the JSON URL field.
- Click Save. The LTI tool will appear in the list.
- Turn on the tool (toggle to enable it).
- Copy the Client ID from the Details column in Canvas and paste it into the Client ID field in the Blue Connector. Save your changes.
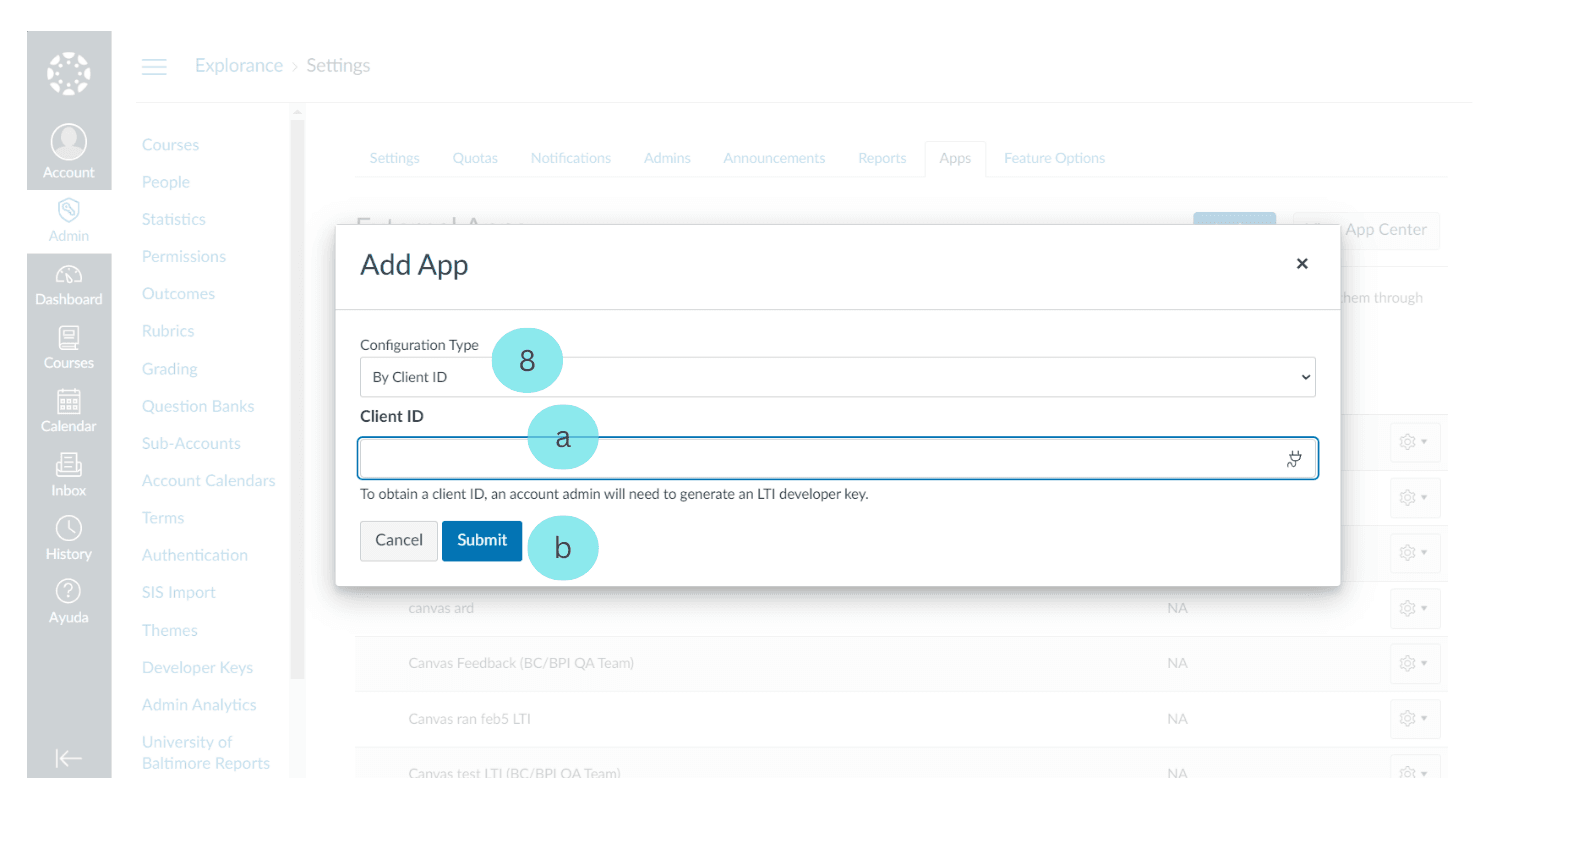
Follow these steps to configure the Blue Connector LTI 1.3 for all courses in Canvas:
- Log in to Canvas as an administrator or as a user with specific permissions.
- Select the managed account from the Admin menu.
- Navigate to Settings.
- Navigate to Apps.
- Choose View App Configurations.
- Select + App to open the Add App form.
- For LTI version 1.3, change the Configuration Type to By Client ID.
- Once configured to By Client ID:
- Copy the Client ID from the Blue Connector and paste it into the Client ID field.
- Select Submit to create the app in Canvas.
The Blue Connector Integrated JavaScript enhances Canvas functionality by providing customizable settings and integration options. Administrators can tailor Canvas to specific needs and preferences by integrating this JavaScript file, optimizing the platform's capabilities for enhanced educational outcomes.
Using the Blue Connector Integrated JavaScript
The Blue Connector Integrated JavaScript enhances Canvas functionality by providing customizable settings and integration options. This integration allows administrators to tailor Canvas to specific institutional needs and preferences.
Procedure: Adding the Settings Panel to the Admin Menu
Follow these steps to integrate the Blue Connector JavaScript file:
- Download the JavaScript file from Consumer Details.
- Log in to Canvas as an administrator.
- Select the managed account from the Admin menu.
- Navigate to Themes.
- Locate the Current Theme and select Open in Theme Editor.
- Select Upload.
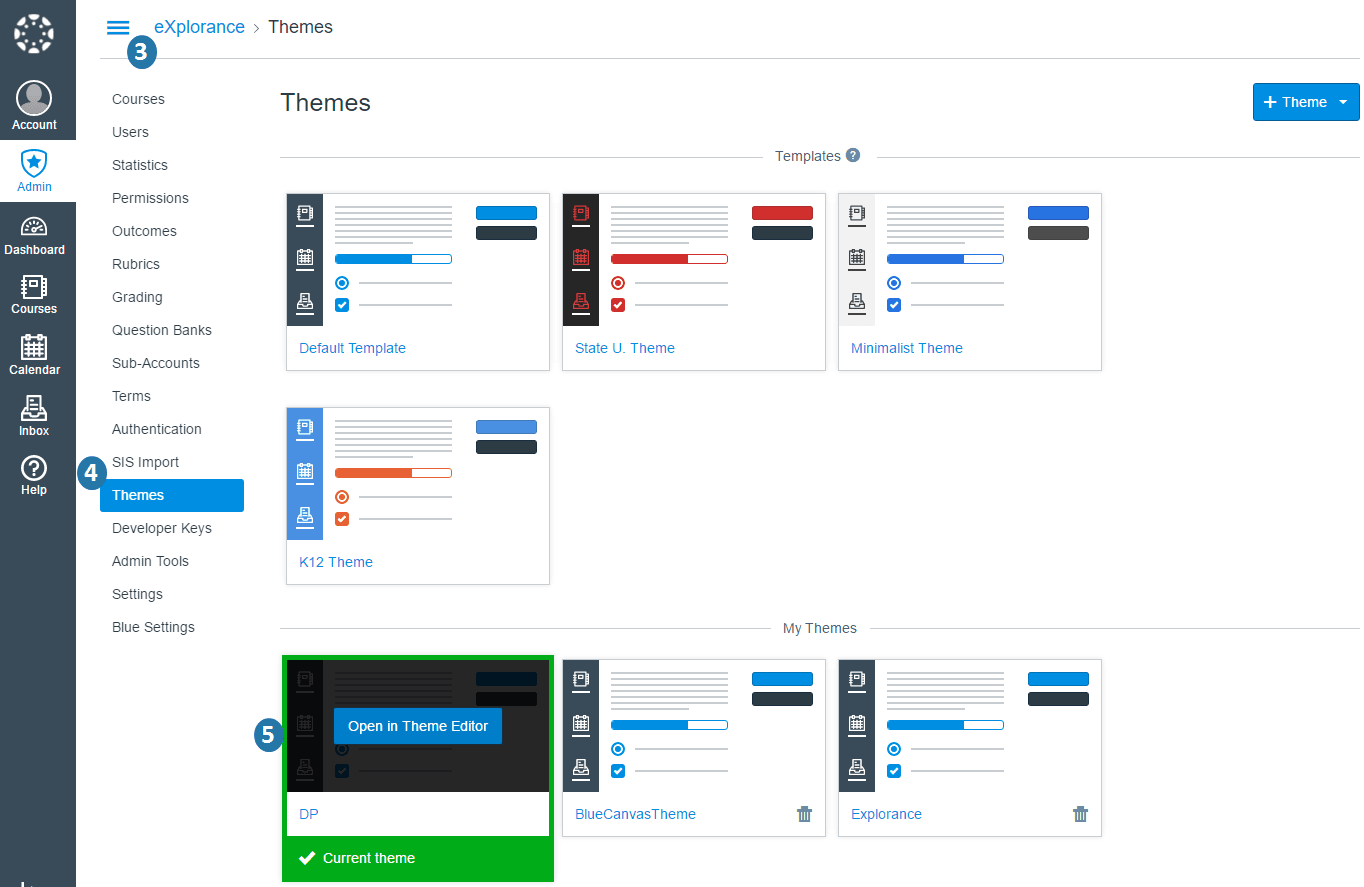
- Upload the JavaScript file:
- Click + Select a file (or similar)
- Choose the file downloaded from the Blue Connector
- Select Preview Your Changes to verify the integration.
- Save the changes using the Save button on the right side of the page.
- Apply the theme by clicking Apply on the left side.
- Exit the Canvas Theme Editor when complete.
Key Notes:
- Ensure you have admin privileges before starting.
- Previewing changes (Step 8) is recommended to avoid unexpected behavior.
- The theme must be applied (Step 10) for changes to take effect.