Modify a published survey (create versions)
After your form is published, you can modify and publish it again. This process creates a new version of your form. The original has been sent out, therefore you can only modify the form for the respondents that have not yet accessed it. The link remains the same.
- Every time you create, discard, or publish a new version, the action will be captured in the version history automatically.
- To keep a record of modifications, select the comments icon (
 ) under Version history to annotate this version with pertinent information. You can only add comments to unpublished versions (i.e. still being edited).
 - Create a new version based on an older version - navigate to an old version of the survey and enable editing. A comment indicating which version is currently used will be added automatically to the version history comments.
- If your survey is already published (passed its publish start time), but you are still editing a new version, you can also use the multi-version icon (
 ) from the Survey list.
About version control
Navigate to version control from a published survey to select a version to edit without affecting the active form. BlueX keeps a record of the different versions. You will be able to edit, review changes, and navigate through different survey versions.
You can edit most of the content in a published survey, such as the form, email campaign, and respondents. However, there are certain limitations, which are set to help you protect the collected data:
- The Distribution type of a survey cannot be modified once it is published (e.g. you cannot change from "Public" to "Private").
- The Allow modify responses after submission check box cannot be reverted.
- The start time of the Response collection period cannot be modified once it has been reached.
- The email schedule cannot be modified. For example, if the reminder email has already been sent, its date can no longer be changed.
Always be cautious when deleting content in a new version, because logic and variables can potentially break.
Create a new version
Your published survey is available in read-only mode. In order to modify it, you need to create a new version.
- Open the published survey.
- Select Enable editing. A new version will be created and saved in the version history.
- Edit the content as necessary.
- Select Save.

A new version will be finalized after you save changes. You can then go to Publishing and publish the new version which will be made available to your respondents.
When you open a survey with multiple versions, the newest version will be displayed by default. You can also use the version history icon ( ) to navigate to another version.

Modify respondents in a new version
Modifying respondents is different from editing the survey content, because respondents data contains demographic information that may be included in your form as logic conditions or variables. If the new respondent file upload is done incorrectly, it could break these links.
We recommend the following process for updating your respondents list.
- Open the survey that you want to modify and navigate to Respondents.
- Select Enable editing. A new version will be created and saved in the version history.
- Select Export data to download the current respondents list.
- Locate the downloaded file on your computer and modify this file.
You can upload a new respondents file instead of downloading the current one, however, make sure the new file contains the same columns with the same headings as the previous file. New columns can be added, but ideally none should be removed.
With your new respondents file ready, upload it to the survey.
- Go back to the Respondents page and select Upload new file.
- Choose the file you just modified.
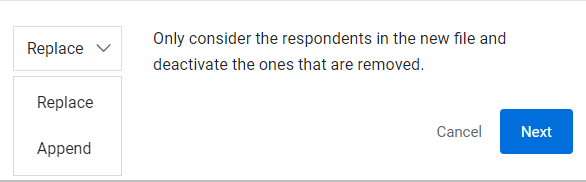
- Select Replace from the drop-down if you want to only use the respondents from the new file. This will remove all previous respondents and their data.
- Select Append if you want to add the respondents in the new file to the list, while keeping all previous respondents.
Respondents are recognized by their unique identifier - the mandatory field that you mapped to a column when you first defined respondents.
- Select Next to continue.
- Match the demographic fields between the current version and the new version.
- The first column shows the fields that exist in the current version.
- Select one of the columns in the drop-down list to match to the existing field.

- Select the data format for the new columns. The ones that are already defined in the previous version will be automatically processed.
- Select Next to continue.
- Assign the unique identifier and primary email fields. Assign the name fields if needed.
- Map every field that exists in the current version to a column in the new file to avoid breaking logic actions and variables linked to respondent data.
- The asterisk fields are very important to identify and communicate with respondents. Always assign them to the same field as the current version.
- The data format of a demographic field affects how the logic condition can be built.
- The data format of mandatory fields cannot be modified between versions.
- If you did not change the header of the columns, but only added or removed a few rows, BlueX will recommend how to map the fields.
- You can only discard a version that has never been published.
Discard a version
If you are not satisfied with the changes you made in a version, you can discard it, then create another version to continue your work.
- Open the Version history ().
- Hover over the target version and select the trash bin icon (
 ).
). - Put a comment for reference.

- Select Discard to finish.
Terminate a survey immediately
You suddenly realize something went wrong and you need to stop your survey immediately. Take a deep breath and follow the instructions below:
For a private survey
- Open your survey and go to Survey management.
- Open the Task management tab.
- Select all the tasks and choose opt-out from the bulk action drop-down. This will prevent the respondents from accessing the questionnaire and prevent emails from being sent.

For a public survey
- Open your survey and go to Survey management.
- Go to the survey editor, choose enable editing to create a new version.
- Go to the Publishing page and change the End of the Response collection period to today's date.
- Publish the new version.