Share an analysis
Introduction to sharing
Share analyses to quickly implement MLY at scale across your organization to provide, in mere minutes, actionable insights at the fingertips of every single instructor, manager, administrator, and academic or business leader, helping them increase their agility to meet today's challenges and improve performance. There is no limit to the number of Guest users that can be added and there is no additional Guest user cost for your organization’s user licenses.
The sharing feature allows you to provide a copy of your analysis to other analysts and/or guests so that you can either:
- collaborate with these users to further explore the topics, sentiments, recommendations and alerts to determine which insights are actionable OR,
- share a filtered copy of your analysis, containing only the insights needed by individuals or groups of users so that they can take action.
It is so easy to get started!
| Action | Description |
|---|---|
| Add users | Determine who will receive shared insights and add them to MLY as guest users or additional analysts. |
| Share insights | Distribute the right insights to the right individuals or groups so that they can quickly take action to solve issues and improve outcomes. |
| Collaborate | Work together with various stakeholders throughout the institution or organization to fully explore an analysis and determine which insights matter most. |
Roles and permission levels
Access privileges vary depending on the role and permission level selected for the user receiving the shared analysis. View the table below for details:
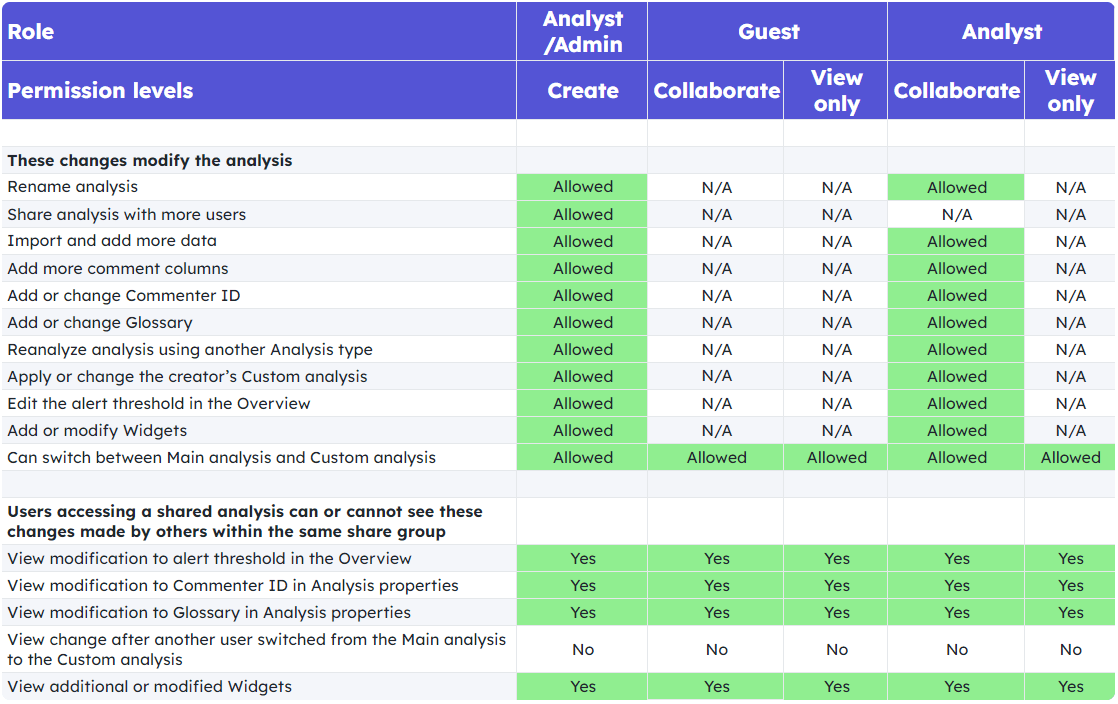
For roles and permissions relating to redaction, see Redact an analysis.
- Administrators have full access to all analyses and are not limited, even if restrictions are applied when a user adds an admin to their shared analysis.
- By default, users with a permission level of View only will see one or several of the following components of the analysis: Summary, Overview, Widgets, Topic explorer, Comments explorer and if enabled, the ability to Export data as displayed in the Comment explorer.
- Users with a permission level of Collaborate will have full access to the analysis and their saved changes are seen by the other collaborators.
Share an analysis - Step-by-step guide
Getting started: Navigate to share
- From your My analysis page, locate the analysis you want to share.
- Access the Share analysis option by either:
- Hovering to the right of your analysis name and selecting "Share analysis" from the drop-down menu, or
- Double-clicking on the analysis name, then clicking the drop-down at the top center of the screen and selecting Share
or
- Click "Share setup" to begin configuring your shared analysis.
NOTE: The sharing configuration is organized into tabs that guide you through each step: User Selection, Content and Access, Data and Privacy, and Redaction Settings.
Tab 1: User selection
In this section, you'll create a named group and select which users will receive access to the shared analysis.
Create and configure your group
- In the "Group name" field, enter a descriptive name for this group.
TIP: Use names that identify the audience, such as "Department Heads - Fall Semester" or "Regional Managers - Q1 Survey" - Click "Share setup" to access the complete list of users in your system.
- Select users to include in your group by clicking the checkbox beside each user's name.
- To locate specific users:
- Enter a name in the Search box, OR
- Click "Filter by user demographics" to select multiple users who match specific demographic criteria
- Click "Apply" to save your filters and view the matching user list
- Review your selections:
- Each "Selected user" appears below the user list
- To remove a user from the group, click "Deselect" beside their name
- When your user selection is complete, click "Next" or navigate to the "Content and Access" tab to continue.
IMPORTANT: All users in a group will see the same shared analysis configuration, including the same content, data filters, and permission level.
Tab 2: Content and access
The Content and Access step allows you to control exactly what insights and pages recipients can view in the shared analysis. This ensures you share only the most relevant information for your audience's needs.
Select available insights
- In the "Available insights" section, you'll see toggles for each insight type:
- Alerts
- Polarity
- Recommendations
- Topic Sentiments
- Topic Recommendations
- By default, all insights are selected (toggled on).
- To exclude an insight from the shared analysis, toggle it off.
WHAT HAPPENS WHEN YOU TOGGLE OFF AN INSIGHT:
When you toggle off an insight, any pages that depend on that insight will display a grey cross icon, indicating that insight is unavailable for that page.
Select pages to share
- In the "Pages to share" section, select which pages recipients can access:
- Summary
- Overview
- Widgets
- Topic Explorer
- Comments Explorer
- By default, all pages are selected.
- Click the checkbox to deselect any pages you don't want to include.
IMPORTANT VALIDATION RULES:
- At least one page must be selected for sharing to be valid
- If you attempt to deselect the last remaining page, an error message will appear and the checkbox will turn red
- The system will prevent you from proceeding until at least one page is selected
Understanding Page icons and content availability
As you toggle insights on and off, watch the page icons to understand the impact:
- Standard page icon: All selected insights are available for this page
- Grey cross icon: One or more insights have been toggled off for this page
IMPORTANT: If you toggle off all insights for a specific page, recipients can still navigate to that page, but an empty screen will be displayed instead.
Automatic Saving
Every change you make in the Content and access tab is automatically saved to your sharing draft. If you exit and return to this sharing configuration before finalizing, your content selections will be preserved.
Next Steps
- Review your content and page selections to ensure they meet your sharing goals.
- Click "Next" or navigate to the "Data and privacy" tab to continue configuring your shared analysis.
NOTE: Content selection applies to both Collaborate and View Only permission levels. However, users with Collaborate permissions will have full access to modify the analysis within the selected content boundaries, while View Only users can only view the shared content.
THINGS TO KNOW ABOUT CONTENT SELECTION
- All insights and pages are selected by default when you begin sharing
- Content selection works in combination with your data and demographic filters
- All recipients in a group see the same shared configuration
- Only Admins and Analysts can configure content selection
- Recipients cannot modify the content selection configuration
- Shared content respects all existing access and data restrictions
- When you toggle off an insight, affected pages show a grey cross icon
- Changes to Content and Access are automatically saved to your sharing draft
Tab 3: Data and privacy
The Data and pivacy tab controls what data recipients can see and which comment demographics are visible. This is essential for protecting respondent privacy and ensuring users only see relevant data.
Select comment columns
The column selection feature allows you to control which demographic and metadata columns appear in the Comments explorer for recipients.
- Click the "Select columns" dropdown to view all available columns from your original analysis setup.
- By default, all columns are selected.
- Select or deselect columns based on:
- Privacy considerations (e.g., exclude columns containing student emails or other personally identifiable information)
- Relevance to the recipient group
- Your organization's data governance policies
- Click "Apply" to save your column selection.
IMPORTANT VALIDATION RULES:
- At least one column must be selected for sharing to be valid
- The "Apply" button will be disabled if no columns are selected
- If a previously selected column was removed during re-analysis, an error message will appear and the dropdown will turn red until you select at least one available column
TIP: Carefully consider which columns expose individual information about respondents. Excluding identifying columns helps protect respondent privacy while still allowing meaningful analysis.
THINGS TO KNOW ABOUT COLUMN SELECTION
- Column selection helps protect respondent privacy by excluding identifying information
- Exclude columns containing emails, names, or other personally identifiable data
- At least one column must always be selected for sharing to be valid
- Column selections are saved automatically when you click "Apply"
- If a column is removed during re-analysis, you'll need to update your sharing configuration before sharing again
Apply demographic filters
To filter the comments displayed to the group of users, click "Select demographic filters." Choose filter(s) to only show results based on the selected demographics. This feature applies to all users receiving this shared analysis.
Add custom conditions
Click "Add custom condition" to filter user demographics to match the data to the users.
For example, to ensure that each Faculty member only views the comment data for their Faculty/School, select "Faculty/School" from the drop-down menu beside "Only show the comment data." Then select the same demographic after "equals to users".
THINGS TO KNOW ABOUT DATA AND USER DEMOGRAPHICS
When uploading user and comments data, carefully consider the filters you'll apply. Ensure that the view-only analyses are relevant to the custom conditional filters. For example, link a data demographic filter, such as the respondent's location, with the user demographic location. This way, view-only users will see analysis results and comments specific to their locations.
Automatic Saving
Every change you make in the Data and privacy tab is automatically saved to your sharing draft as soon as you click "Apply". If you exit and return to this sharing configuration before finalizing, your data and privacy selections will be preserved.
Next Steps
- Review your column selections and demographic filters.
- Click "Next" or navigate to the "Redaction Settings" tab to continue.
Tab 4: Redaction settings
The Show Redaction rule set section provides you with several options for applying redactions to an analysis.
Configure redaction rules
- Click on the "Show Redaction rule set" drop-down menu and select a redaction rule set which will be applied to all comments in your analysis.
OR - To create a custom condition for a Redaction rule set, click "Add custom condition." Then select a comment demographic that matches a specific user demographic to apply the redaction rule set.
Select comment redaction permissions
Select one of the Comment redaction permissions from the 3 available choices:
- Users cannot redact comments: The redaction icon will not appear beside any comments in the Comment explorer section of the shared analysis.
- Users can submit redaction requests: Users click on the redaction icon beside the comment and submit a request to either hide comment and keep insights or remove the comment from the analysis.
- Users can redact comments: This option allows the users to redact comments directly in the shared analysis.
Enable Comment Flagging
- Click the check box beside "User can flag comments" to enable users to create or select Categories and Tags to organize the comments in their shared analysis.
Configure Permission Levels
After configuring content, data, and redaction settings, you'll assign a permission level that determines what recipients can do with the shared analysis.
Choose between two permission levels:
Collaborate permission
Select "Collaborate" from the Permission level drop-down menu when you want recipients to:
- Have full access to the entire analysis (within the content boundaries you've set)
- Make changes and modifications to the analysis
- See updates made by other collaborators in real-time
- Work together to explore topics, sentiments, recommendations, and alerts
When changes are made to the analysis, all selected users will be able to view the updated analysis.
IMPORTANT: Users with Collaborate permissions have full access to all analysis features within the selected content. They are not restricted by the Content and Access, Data and Privacy, or Redaction settings you configured - these settings apply primarily to View Only users.
View only permission
Select "View only" from the Permission level drop-down menu when you want recipients to:
- View a filtered copy of your analysis
- Access only the specific insights, pages, and data you've selected
- Take action based on the shared insights without modifying the analysis
- Export data as displayed in the Comments Explorer (if enabled)
View only users will see analysis content exactly as you've configured it through the Content and access, Data and privacy, and Redaction settings tabs.
By default, users with View only permission will see the components you selected in the Content and access tab, which may include: Summary, Overview, Widgets, Topic explorer, and Comments explorer.
NOTE ABOUT ADMINISTRATORS:
Administrators have full access to all analyses and are not limited, even if restrictions are applied when you add an admin to your shared analysis.
UNDERSTANDING PERMISSION LEVELS AND CONTENT SELECTION
- Content and access settings apply to both Collaborate and View only users
- However, Collaborate users have full access to modify the analysis within the content boundaries you've set
- View Only users can only view and cannot make changes to the analysis
- Administrators always have full access regardless of sharing restrictions
Preview and share
Before finalizing your shared analysis, use the Preview feature to see exactly what each recipient will experience.
Preview the Shared Analysis
- Click the "Preview" button to enter preview mode.
- In the top left corner, click the user selection dropdown.
- Select any user from your group to view their personalized experience.
- Navigate through the analysis to verify:
- Only selected insights are visible
- Only selected pages are accessible
- Page icons correctly reflect available/unavailable insights
- Demographic filters are working as intended
- Column selections appear correctly in Comments Explorer
- Redaction settings are applied properly
- Test the experience for multiple users, especially if you've applied custom conditions that create different views for different users.
- Click "Close preview" to return to the sharing configuration.
FEATURES NOT ENABLED IN PREVIEW:
The following features are not functional in Preview mode, although they may be available to recipients in the actual shared analysis:
- Change Alert Threshold in the Overview
- Create new Widgets
- Export comment analysis
Make final adjustments
If you need to make changes after previewing:
- Click "Back to user selection" to modify the group members
- Navigate to any tab to adjust content, data, or redaction settings
- Preview again to verify your changes
Finalize and share
- When you're satisfied with the configuration, click "Share analysis" (for Collaborate permission) or "Share to group" (for View Only permission).
- The shared analysis will be automatically sent to each group member by email.
- Recipients will receive access according to the permission level and content configuration you defined.
UPDATING AN EXISTING SHARE:
- To modify an existing shared analysis, return to the Share configuration
- Any changes you make to Content and access, Data and privacy, Redaction settings, or Permission levels will update what recipients see
- The shared link always reflects the latest saved configuration
- All recipients will see the updated configuration immediately
NOTE:
Once accounts have been created for Guest users or when these users first receive a shared analysis, the process enabling them to access MLY can be automated using email notifications.
Click Guest user experience - shared analyses to learn more.