User management
Introduction
This section describes several administrative features of MLY including roles, password requirements, user management, user profile settings, and authentication. You must have an Administrator role to access this functionality.
User management
Roles
There are three types of users who can access the MLY dashboard:
- Administrator - can create, update, view, and share all analyses and create and manage users.
- Analyst - can create, update, view, and share their own analyses.
- Guest - can access analyses shared with them.
All users have access to their own profile regardless of their role. They can update their first name, last name, and password. See Getting started with the MLY dashboard for more details.
Password requirements
The following is a list of recommended password requirements for access to MLY:
- At least one upper case letter
- At least one lower case letter
- At least one special character
- At least one number
- At least 8 characters long
User list
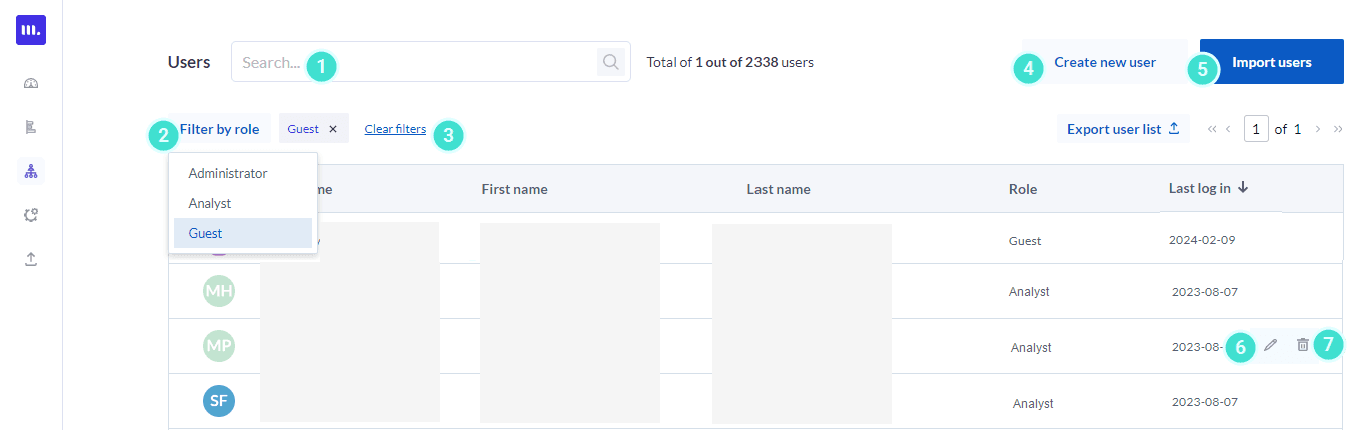
The User list allows administrators to:
- Search the User list to locate a user (this feature will search the Username, First Name and Last Name columns).
- Sort the User list using Filter by role.
- Clear filters if needed.
- Create new user. Role options include: Administrator, Analyst, and Guest.
- Import users using CSV or XLSX file to bulk import multiple users simultaneously.
- Edit user.
- Delete user.
User creation
Once you have clicked on the Create new user button, the following screen will be displayed:
- Enter the user’s email address as the Username.
- Enter their First name.
- Enter their Last name.
- Click on the down arrow of the Roles field to select a role for this user (Administrator, Analyst or Guest).
- Select the user’s Preferred language for the MLY Dashboard interface from the following options: English or French.
- If your organization does not use SSO for authentication, click
 to activate Basic authentication.
 - Alternatively, select an SSO provider and enter the users SSO ID to allow them to use their SSO credentials to access MLY.
- Add the user’s Demographics using the selection drop-down menus in the User demographics section. If a value(s) is missing in the drop-down menu, simply type the value into the demographic field and click on Create "xxxxxxx" displayed below.
- To Notify user by email click the checkbox.
- Click Create user.

Additional demographic fields cannot be created in an individual user's profile.
To add a demographic field that will be accessible in all user profiles, click on Export user list to obtain a copy of the existing user list and add a column for that demographic field. Bulk update your existing users in the file with the new demographic values, if needed, and save your file. Then navigate to the Import users feature to re-upload your users file to MLY. The new demographic field will appear in all individual user profiles for manual updates.
Import multiple users
Users along with their demographic data can be bulk imported into MLY.
- From the homepage, click on the Users
 icon.
icon. - Click on Import users.
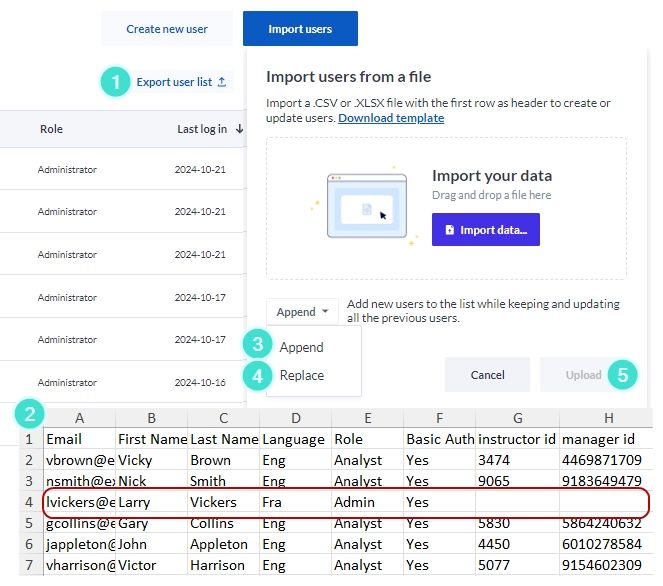
- In the pop-up window Import user list from file either
- drag and drop your file, or
- click on Import data to retrieve your file for import.
- Select one of the following options:
- Append to add new users to your list while keeping and updating all the previous users.
- Replace to remove all existing users and replace them with the users in the new file.
- Click Upload

File guidelines for importing multiple users in bulk
If this is the first time you import users to MLY, a sample template is available by clicking on Download template
Alternately you can follow these specifications to set up your own file:
- The header row is the first row and cannot be duplicated.
- The mandatory columns are First name, Last name, Email, Role, Language, Basic Authentication. Non-mandatory columns include SSO Activation (Provider name) and SSO ID (Provider name), Email notification, and User Demographics. These columns in the headers row can be in any order.
- The mandatory Role column must have one of the following values: Admin, Analyst, or Guest.
- The mandatory Language column must have one of the following values: Eng (for English) or Fra (for Français).
- The mandatory Basic authentication column must have one of the following values: Yes or No. If the column is left empty the default value No will be applied.
- The Email notification column must have one of the following values: Yes or No. If the column is left empty, the default value No will be applied.
- To include additional SSO providers add these columns: SSO Activation (Provider name) and SSO ID (Provider name).
- To enable an authentication type for a user, enter the user’s SSO ID and enter Yes in the (SSO) activation column.
- To disable an authentication type for a user, enter No in the (SSO) activation column and the corresponding SSO ID will be ignored.
- This file cannot exceed 50 columns.
- Columns headers cannot exceed 255 characters in length.
- The values entered for any columns cannot exceed 255 characters in length.
- This file can contain up to a maximum of 20,000 rows.
The bulk user upload will fail during the import process if the file is not setup as described above, if it exceeds any of the limits on columns, rows, or characters, or if any mandatory values are missing.
Update or modify a user profile
If you have clicked on the Edit user![]() icon beside a user in the user list, the following screen will be displayed.
icon beside a user in the user list, the following screen will be displayed.
- To update an email address in the Username field, please contact support@explorance.com.
- Correct or change the user’s First name and / or Last name as necessary.
- Select a new role from the Role drop-down menu, if needed.
- Update the user’s Authentication.
- Update or add more Demographics for this user.
- Click Update to save the new user information.
- Click Resend email invitation to allow the user to re-log into MLY.

Once accounts have been created for Guest users or when these users first receive a shared analysis, the process enabling them to access MLY can be automated using email notifications. Click Guest user experience - shared analyses to learn more.
Manage authentication
When Single Sign On (SSO) has been deployed in your user environment, you can add SSO credentials to the user profile to allow them to use SSO to log on to MLY
- When using the Create new user feature, add the new user’s SSO ID in the Authentication section to allow this user to log on to MLY using SSO. The user will see the SSO option in the login pop-up window below the username and password fields.
- To disable SSO for this user, click the icon and it will remove SSO authentication for this user.

- If using a bulk user import file, add the new user’s SSO provider name and SSO ID in the appropriate column.
- To enable an authentication for a user, add Yes to the SSO activation column.
- To disable an authentication for a user, add No to the SSO activation column.

Multiple authentication methods can be used simultaneously, for example, an organization could use different SSO providers for different locations and Basic authentication for users without SSO.
Export user list (to review, append or replace your user list)
This feature is used to:
- review,
- append (update your list by adding or removing users) or
- replace your existing list with a new list.
The first step is to download your current user list:
- Click on Export user list. An .xlsx file will be automatically created for you to download..
- Open your file to review the users.
- You can modify multiple fields, add and delete users, and re-upload the revised list by clicking on Import users and selecting Append. This option will keep your existing list and update the fields you have changed.
- To create a new user list and upload it, click on Import users and select Replace. This will overwrite the current user files.
- Click Upload to complete this process.