Data Integrity Gateway (DIG) power guide
Introduction
Data Integrity Gateway (DIG) is a dynamic tool that helps you increase the accuracy of your organization's data for survey and evaluation automation. With DIG, data clean-up can be distributed to a wide group of users minimizing the burden on any one individual. Typically, users that are already familiar with their organization's data are assigned to review the data.
DIG seamlessly integrates with any information system and allows you to:
- Automate processes - Automate data integrity projects from start-to-finish.
- Maintain integrity - Ensure enrollment data is accurate, up-to-date, and error-free.
- Expand data - Add additional data to expand current data set.
- Enrich analytics - Leverage complete, valid data for new insights.
Why do I need DIG?
Today, more than ever, organizations are faced with complex data issues in their information system (SIS, LMS, HRIS, ERP, CRM, etc.). The sheer volume of information, coupled with 'dirty' data, poses some very costly challenges. Data is often inaccurate, incomplete, or not up-to-date, making it impossible to make informed decisions. Critical information may be missing such as primary subject details, user information, relationship details, and more. The result is a steady decline in data quality and the need for time-consuming cleanup. DIG helps you to ensure the accuracy and completeness of your organization's data, helps you augment your data for better reporting.
How does DIG work?
DIG supplies your data preparers with a staging environment where they can easily review, correct, or supplement records with certain constraints. Data preparers may mark records as successfully validated and ready to be used in their survey and feedback gathering campaigns.
If you wish to see a more detailed visual and explanation of the DIG process and data flow, please refer to the appendix section.
What can I do with DIG?
- Access the DIG user interface in my preferred language.
- Verify demographic data.
- Modify demographic data (one record at a time or in bulk).
- Add or remove relationships between users (e.g., instructors, students, employees, etc.) and the subject(s) being evaluated (e.g., courses, departments, etc.).
- Combine two or more subjects to be evaluated into one (Merge).
- Create new subjects to be evaluated from an existing subject (Split).
- Mark data as verified (Published).
- Delegate the above privileges to people within your organization (Data preparers).
- Set rules to ensure demographic data is valid.
- Automate reminders to your DIG data preparers to complete their tasks.
- Automate the data flow to your evaluation projects.
Some examples in Higher Education:
- Demographic verification and modification for courses, instructors, students and more
- Splitting: Creating new courses / course sections from existing courses
- Merging: Combining courses (e.g., cross-listed) into a new course
- Modifying student-course enrollments
- Modifying instructor-course relationships
- Modifying instructor’s role per course
Some examples in Enterprise:
- Demographic verification and modification for employees and departments
- Modifying employee-department relationships
- Modifying employee-manager relationships
Who can use DIG?
DIG can be used by various stakeholders within the organization such as:
- Central administration (e.g., HR, IR, IT, etc.)
- Department or cohort representatives
- End users (e.g., instructors, employees, etc.)
Which data types can be treated in DIG?
You can treat the following data types:
- Date/time
- String
- Numerical value
- Regular expression (email addresses, phone numbers, postal codes, etc.)
- List
Common terms in DIG
Depending on your region, the terms used in your organization may vary. Common terms that are used in DIG:
Course evaluation - The typical course evaluation refers broadly to the student end of class summative survey in a college/university. Other common terms used for course evaluation include "student evaluation", "learning feedback", "student feedback", "paper evaluation", "module evaluation", and "teaching effectiveness survey".
Course - Course refers to a unit of teaching that typically lasts one academic term. Other terms used for course include “class”, “module”, and “paper”.
Datasource - Also known as a table or “view”, a datasource is a dataset that is applied towards a survey campaign. It can contain the survey respondent information, including students’ or instructors’ names, email addresses and other demographic data that will be useful in the analysis (user datasource). A separate datasource can contain items to be evaluated, such as a list of courses in course/subject evaluations (object datasource).
Demographics - Demographics refer to the characteristics and attributes of individuals, groups or subjects within a datasource. These characteristics often include but are not limited to name, age, location, education, job title, and any other pertinent information that helps define and categorize subjects and users within Blue.
Delegation module - A delegation module is a software component or system feature that allows users to delegate certain tasks, responsibilities, or permissions to other users within a system. In Blue, delegation modules are used to request certain individuals or groups to prepare an aspect of the evaluation process. Examples of delegation modules in Blue are assigned tasks such as DIG, Rater Selection (RS), Question Personalization (QP), and Subject Management (SM).
Blue evaluation project - A Blue evaluation project involves the collection, aggregation, and analysis of feedback data related to student performance, course effectiveness, teaching methodologies, and other relevant metrics. Other terms used for Blue evaluation project include “survey campaign”, “feedback campaign”, and “feedback module”.
DIG project - A DIG project involves the automation and delegation of data preparation tasks to a group of users within an organization.
Data preparer - A person within the organization who is assigned to review, edit, and publish data (DIG task owner).
Transformed data - Data that has been verified and marked as published in the DIG user interface.
Merged course - A merged course refers to a combined entity that integrates course material, student enrollment, and administrative functions of two or more individual courses.
Split course - A split course refers to the division of a single course into multiple distinct sections or components.
Planning
Blue and DIG offer many solutions to prepare you for your survey campaigns. To get you thinking of the best approach, let’s review a series of questions about your organization's needs and what level of delegated control will best serve your requirements to automate the data flow to your evaluation projects.
DIG versus other delegation modules in Blue
Should I use DIG or Rater Selection?
| Capabilities | DIG | Rater Selection |
|---|---|---|
| Select multiple raters for multiple evaluations on one form | YES | NO |
| Create new external users | YES | YES1 |
| Set min and max limits per group | NO | YES |
| Set maximum quota of rater invites | NO | YES |
| Users can drag and drop raters into specific groups | NO | YES |
| Users can filter on demographics | YES | YES |
| Set a limit to select raters with subject's matching demographics | NO | YES |
Recommendation: Use the flexibility of DIG to let HR validate certain data known centrally ahead of Rater Selection. Use Rater Selection to allow employees or managers to complete the picture unknown to HR (e.g., who are my peers, clients, etc.) with rules, such as minimums/maximums per group and allow selection only within the employee's office.
Should I use DIG or Question Personalization?
| Capabilities | DIG | Question Personalization |
|---|---|---|
| Set questions for the courses | YES2 | YES |
| Set questions for the instructors | YES2 | YES |
| Set min and max limits per group of questions | NO | YES |
| Delegate specific question personalization to certain members for specific subjects | YES | YES |
| Apply questionnaires to multiple subjects at once (copy, bulk) | YES3 | YES |
| Copy questions from previous evaluations | NO | YES |
Recommendation: Use the flexibility of DIG to centrally set parameters that can be used to trigger certain questions to be displayed or hidden. Use Question Personalization to make it easy for users to select or add questions to their specific evaluations based on the min/max limits you set.
Should I use DIG or Subject Management?
| Capabilities | DIG | Subject Management |
|---|---|---|
| Change evaluation dates | YES | YES |
| Opt-in/opt-out of evaluations | YES | YES |
| Opt-in/opt-out associated instructors | YES | YES |
| Assign paper or online evaluations | YES4 | YES |
| Choose between scheduled or manual evaluation timing | YES5 | YES |
| View and/or edit demographic data | YES | NO |
| Perform bulk actions for all subjects | YES | NO |
Footnotes
- Can be achieved with DIG by creating external users for each rater group (combining users selected from a list and manually entered users) whereas with Rater Selection, external users can only be added to groups designated for manual entry. ↩
- Can be achieved with demographic filters. ↩ ↩2
- Can be achieved by setting a parameter with triggers to display questions. ↩
- Can be achieved using two different projects with a filter for paper or online evaluations. ↩
- Can be achieved using two different projects with a filter for scheduled or manual evaluation timing. ↩
Recommendation: Use the flexibility of DIG to centrally set parameters that will affect the timing and modality of the evaluation. Use Subject Management to make it easy for users to opt-in or out or to set the evaluation timing within certain constraints.
Conclusion
Consider if you need a combination of delegation tasks. The DIG data preparation phase typically serves as a precursor, facilitating the delegation to big-picture stakeholders with greatest flexibility. It is used to review or edit multiple records at once. Blue's delegation modules (i.e., Rater Selection, Question Personalization, Subject Management) are purpose-built, making it easy for users to make their selections within your specified parameters. Most organizations will consider using both DIG and Blue's delegation modules in sequence to achieve the best results.
Demographic fields
Which fields should I make available to view or edit?
Share fields that are helpful to your data preparers while adhering to the data privacy rules set by your organization. Keep in mind that certain non-editable fields may be useful reference points for data preparers modifying certain fields. While less is usually recommended, data preparers can easily hide fields that they find less useful in the DIG user interface.
What if I only want data preparers to modify some of the data?
DIG supports a hybrid approach to data modification. Certain fields can be automatically synchronized with your datasource without being displayed or affected by any work done in DIG. This is also true of relationships. For instance, you may choose to synchronize course-student enrollment relationships directly with your SIS but allow data preparers to modify only the course-instructor relationships.
Furthermore, you may choose which subset of records to include for review or modification in your DIG project.
Why would I use DIG rather than change data at the source (SIS, HRIS, etc.)?
At times, modifying the source data may not be feasible due to it containing sensitive information beyond what you wish to share with others. Additionally, the data within the data source often serves a very specific purpose that may not align with the objectives of the survey campaign, making it difficult to format evaluations and ensure results are properly analyzed. By using DIG, you can simplify the evaluation process, ensure comprehensive analysis, and enjoy the added benefits it offers.
Why would I use DIG rather than change the data in Blue using Record Management?
Unlike DIG, Record Management is designed for handling individual data changes rather than bulk modifications. Also, changes made in Record Management may be overwritten by subsequent data imports. Manual data management is a key feature of Record Management, and it does not offer functionalities such as setting validation rules available in DIG.
Relationships
Can I modify teaching roles with DIG?
Yes. With DIG, you may display course-instructor relational demographics such as teaching roles per course and contact hours. These demographics can be configured to be editable in the DIG user interface.
Can I add instructors to the evaluation who are outside of the system?
Yes, you may add external instructors to the evaluation process using DIG. This means you can include one-off seminar presenters or guest speakers in your evaluations if you wish to. This can be done by creating a new member within the group for the course.
Dates
Should I set my evaluation dates directly in DIG, program the evaluation timing based on existing dates, or let the users decide?
There are three methods for managing dates in Blue. Depending on your needs, you may choose to use one or a combination of the following three methods: 1) Task Schedules, 2) DIG dates, and 3) Subject Management.
- Method 1 - Task Schedules - Complete automation with the flexibility to define rules for evaluation start and end dates based on various criteria, such as percentage of duration between two dates or fixed and relative dates. However, it's centralized and can only be configured by administrators.
- Method 2 - DIG dates - DIG evaluation start and end dates, providing a centralized approach to managing evaluation timelines within the platform.
- Method 3 - Subject Management - Subject Management, specifically for dates required for Fillout task.
| Method | Pros | Cons |
|---|---|---|
| Method 1 - Task Schedules | Complete automation Flexibility to define rules for evaluation start and end dates based on various criteria (fixed, relative, % of duration, etc.) | Centralized task (non-delegated) Only administrators can configure Task Schedules |
| Method 2 - DIG dates | Centralized delegation management Most flexibility to delegate unique timelines for each subject Ability to validate dates before evaluation | Dependency on others |
| Method 3 - Subject Management | Simple interface Allows opt-in/opt-out option Ability to validate dates before evaluation | The only modifiable dates are evaluation start and end dates |
Throughout the evaluation process in Blue, it's common to use all three methods for managing dates. By employing these methods collectively, administrators can efficiently manage evaluation timelines and ensure consistency across all evaluations.
Cross-listed subjects
Institutions often assign multiple course IDs to the same course. For instance, a mathematics course might be identified as BUS345 in the School of Business and as ENG318 in the School of Engineering. Despite the different IDs, these represent identical courses attended by both business and engineering students. Depending on the reporting requirement, data may need to be reported separately for each course listing, or it may be aggregated for the course as a whole. Such courses are commonly referred to as cross-listed courses within institutions.
Assuming I want combined results in reporting, at what point in the evaluation process should I merge courses together?
In Blue, there are three methods for managing cross-listed subjects. Depending on the complexity of your data, you may choose one of the following three methods: 1. merging subjects in reports, 2. merging subjects directly in DIG, 3. leveraging course-student relationship demographics in the datasource.
- Method 1 - Merge subjects in reports - Merging subjects in reports allows for analyzing courses individually or as combined courses. To learn more, see Merge subjects (Cross-listed courses) in reports.
- Method 2 - Merge subjects directly in DIG - Merging subjects directly in the DIG task centralizes the management of DIG task delegation. To learn more, see DIG data preparer task guide.
- Method 3 - Leverage course-student relationship demographics - All courses are already merged, and the distinctive cross-listed IDs are included in the course-student relationship demographics (and displayed to students only when completing their surveys). To learn more, see Leverage relationship demographics (Cross-listed courses).
| Method | Pros | Cons | Timing | Recommendations |
|---|---|---|---|---|
| Method 1 - Merge subjects in reports | Flexibility to analyze classes individually or as combined courses Student enrollment changes can synchronize throughout all phases of the evaluation | Increased administrative work if using other delegation modules since courses need to be handled separately when delegated Not supported by project mapping in reports | Merge occurs after the evaluation has ended | If there is no task delegation or response rate monitoring required of cross-listed courses If enrollment data needs to be synchronized throughout the evaluation period (e.g., no course drop deadline) |
| Method 2 - Merge subjects directly in DIG | Centralized delegation management Simplified administration when delegated | Courses can only be analyzed as one unit Student enrollment changes may not synchronize once merged (Recommended: Only merge after course drop deadline) | Merge occurs before the evaluation during the DIG task | If there is a concern that instructors will have too many cross-listed courses to manage |
| Method 3 - Leverage course-student relationship demographics | Prevents direct handling of the course data Supported by project mapping in reports | Data preparation may be challenging for some organizations | Merge occurs before the DIG task and evaluation start date (datasource level) | If the DBA is able to structure the data in the required format |
What if I want to evaluate the same course and instructor multiple times?
You may do this by splitting a course with DIG. Splitting a course allows you to create as many new courses as needed based on the original course, with distinct demographics and enrollment data for each if needed.
Another non-DIG solution is to create separate evaluation projects using the same data and setting different timelines per project.
Final evaluation project configurations
How does my evaluation project know when to consume the DIG data?
Once the DIG task is successfully published, a built-in field called 'Transformed' will go from 'No' to 'Yes'. Apply a Transformed=Yes filter in your evaluation project (Definition > Subject filter) to only accept records that have been successfully published.
DIG project types
The following four DIG project scenarios and settings presented in this section are provided solely as examples. This section will list all the steps to implement DIG into your institution, you have the option to duplicate any of the DIG project scenarios to serve as a template and then customize the settings according to your organization's requirements.
Type 1 – Courses only
If you wish to have a DIG project with only courses as the primary subject, this is what you will need.
| Datasource name | Type | Contents | Automatic Relationship Sync |
|---|---|---|---|
| Courses | Object | Courses being evaluated | Not applicable |
| Users | User | Students, instructors, coordinators, and academic leaders | Not applicable |
| Definition value | Groups & link types | Modifiable course fields | Required course fields | Data rules |
|---|---|---|---|---|
| Definition type: DIG | ||||
| Subject Source: Courses | Data preparers (Links to type) | Course name Course end date School Department Sub department Evaluation start date Evaluation end date | Course name Course end date School Department Sub department Evaluation start date Evaluation end date | Add/remove instructors and students from datasource Date conditions for evaluation start and end dates List conditions for school, department, and sub department Regular expression condition for email |
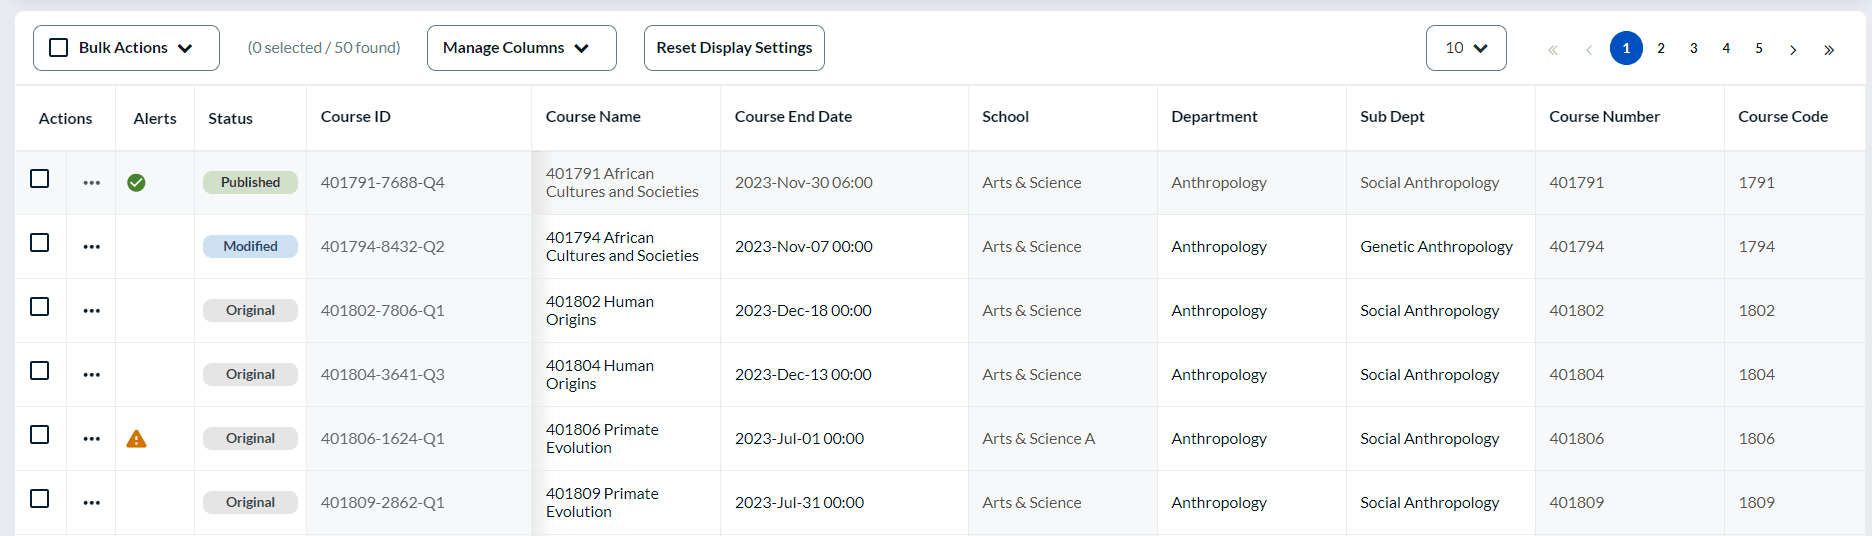
Example of DIG project type 1 task:
Type 2 - Courses, instructors & students
If you wish to have a DIG project with courses as the primary subject and instructors as the secondary subject, this is what you will need.
| Datasource name | Type | Contents | Automatic Relationship Sync |
|---|---|---|---|
| Courses | Object | Courses being evaluated | Not applicable |
| Users | User | Students, instructors, coordinators, and academic leaders | Not applicable |
| Course-Student | Relationship | How students are linked to courses | Enabled |
| Course-Instructor | Relationship | How instructors are linked to courses | Disabled |
| Definition value | Groups & link types | Modifiable course fields | Required course fields | Data rules |
|---|---|---|---|---|
| Definition type: DIG | ||||
| Subject Source: Courses | Data preparers (Links to type) | Course name Course end date School Department Evaluation start date Evaluation end date | Course name Course end date School Department Sub department Evaluation start date Evaluation end date | Add/remove instructors and students from datasource Date conditions for evaluation start and end dates List conditions for school, department, and sub department Regular expression condition for email |
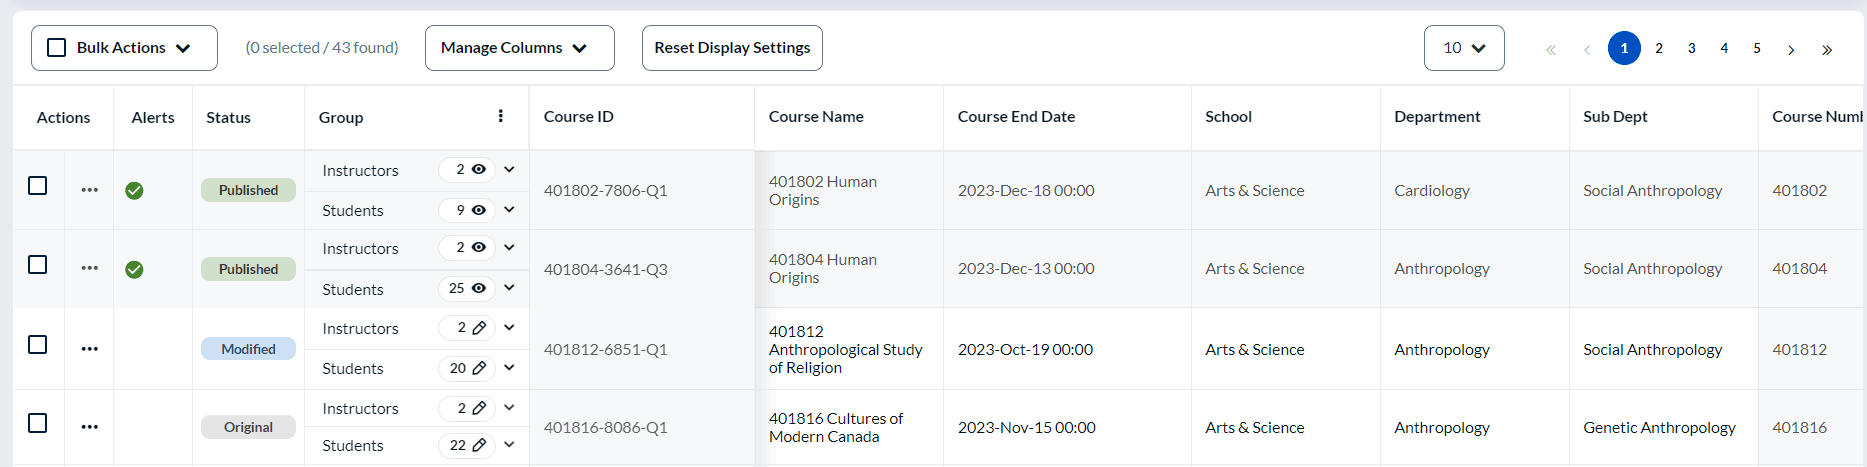
Example of DIG project type 2 task:
Type 3 - Courses, instructors & students (with splits & merges)
| Datasource name | Type | Contents | Automatic Relationship Sync |
|---|---|---|---|
| Courses | Object | Courses being evaluated | Not applicable |
| Users | User | Students, instructors, coordinators, and academic leaders | Not applicable |
| Course-Student | Relationship | How students are linked to courses | Enabled |
| Course-Instructor | Relationship | How instructors are linked to courses | Disabled |
| Definition value | Groups & link types | Modifiable course fields | Required course fields | Modifiable course-instructor fields | Data rules |
|---|---|---|---|---|---|
| Definition type: DIG | |||||
| Subject Source: Courses | Data preparers (Links to type) | Course name Course end date School Department Evaluation start date Evaluation end date Cross-listed ID Cross-listed name | Course name Course end date School Department Sub department Evaluation start date Evaluation end date | Teaching type | Add/remove instructors and students from datasource Date conditions for evaluation start and end dates List conditions for school, department, and sub department Regular expression condition for email Split condition for courses Merge condition for courses Sub-groups for instructor teaching types (main lecturer, guest speaker, lab technician, teaching assistant) List condition for sub-groups |
Example of DIG project type 3 task:
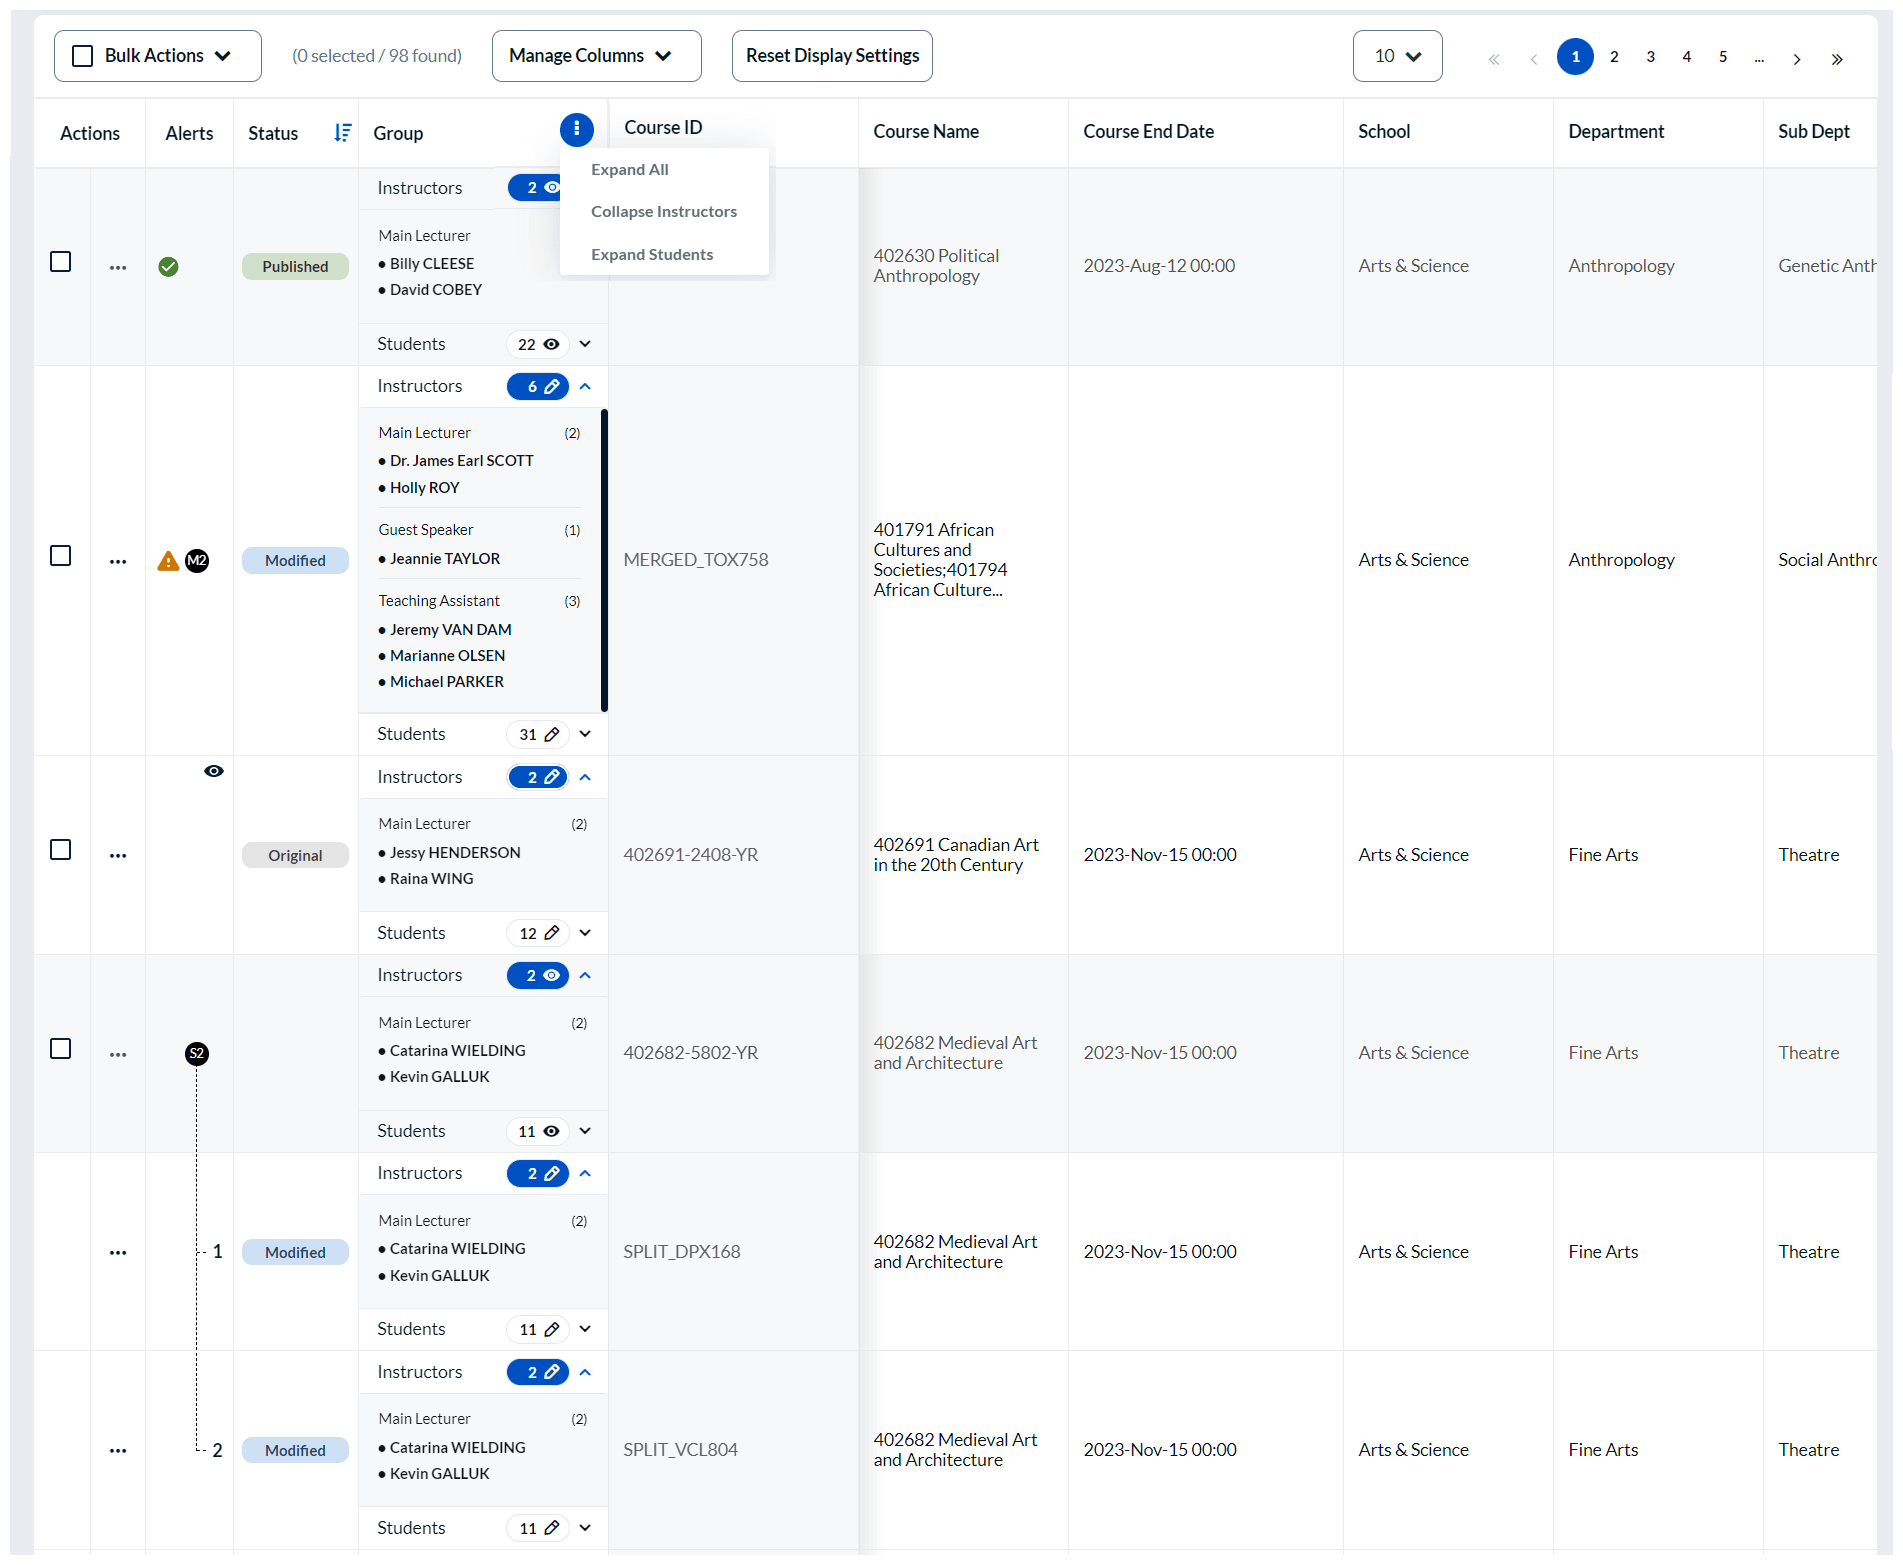
THINGS TO KNOW ABOUT SPLITS, MERGES, AND STANDARD SUBJECTS
Project bar The progress bar reflects the number of selectable rows rather than the number of original subjects.
- Each split row counts as its own selectable item
- A merged subject counts as a single selectable item
- Original subjects count as one selectable item each
This ensures the loading denominator always matches the visible grid.
Bulk editing subjects, splits and merges
DIG supports a unified bulk-edit workflow across all row types—standard subjects, merged subjects, and split subjects. All rows display selection checkboxes, and users may apply bulk operations such as:
- Editing demographics
- Assigning group members
- Unassigning group members
- Creating new group members
Type 4 - Employees (360 relationships)
| Datasource name | Type | Contents | Automatic Relationship Sync |
|---|---|---|---|
| Employees | User | All employees | Not applicable |
| Data Preparers | User | Employees assigned the DIG task | Not applicable |
| Employee-DataPreparer | Relationship | How employees are linked to data preparers | Disabled |
| Employee-Self | Relationship | How employees are linked to themselves | Disabled |
| Employee-Manager | Relationship | How employees are linked to managers | Disabled |
| Employee-Peer | Relationship | How employees are linked to peers | Disabled |
| Employee-DirectReport | Relationship | How employees are linked to direct reports | Disabled |
| Definition value | Groups & link types | Modifiable employee fields | Required employee fields | Data rules |
|---|---|---|---|---|
| Definition type: DIG | ||||
| Subject Source: Employees | Data preparers (Relationship datasource) | First name Last name Email address Department Region Evaluation date | First name Last name Evaluation date | Add/remove managers, peers, and direct reports from datasource Date condition for evaluation date List conditions for department and region Regular expression condition for email |
Example of DIG project type 4 task:

Implementing DIG
To set up a DIG project and process in your institution, there are four main stages which, when completed, will automate the process of assigning data preparation tasks to the appropriate users.
The following sections provide step-by-step instructions for setting up DIG. The instructions are broken down into 4 stages which are listed in the table below. The end result of this implementation will enable you to set up and manage a DIG project to validate data before launching a survey campaign for your organization.
For preparation guidelines and concepts, refer back to the Planning section above.
| Stage | Process | Description |
|---|---|---|
| Stage 1 | Create the DIG datasource(s) and definition | Include and establish the data for the subjects being evaluated, the people involved in the feedback process, and their relationships to each other. |
| Stage 2 | Configure the DIG project | Create and configure the DIG project's data structure, validation rules, and notifications to the DIG task. |
| Stage 3 | Manage the DIG project | Assigned users will perform the DIG task and prepare the survey data by reviewing and validating. |
| Stage 4 | Configure the Blue evaluation project | The validated data from the DIG project will be consumed by the survey campaign. |
Stage 1 - Create the DIG datasource(s) and definition
1) Creating the DIG datasource(s)
DIG requires special datasources that differ from standard Blue datasources in that two copies of the data are created, an original working copy and a published prepared copy. The original working copy is the focus of a DIG project and controls all of the data that is modified during DIG. The published prepared copy is immediately available for use in Blue projects even before any data has been published via the DIG tasks. After data has been published in a DIG task, automated updates are immediately propagated to the prepared copy used by Blue, based on user defined rules which ensures that the work done during DIG isn't lost once data is imported again.
- A DIG datasource can be either a User, an Object, or a Relationship datasource.
- Existing user, object and relation datasources can be converted into DIG datasources, but a DIG datasource cannot be converted into a standard Blue datasource.
- Enable for Manual Entry is not available when creating a DIG datasource.
- If creating a user datasource that will be used as a primary subject in a DIG project, the Blue role must be imported as either Subject, Project Assistant, Project Manager or Administrator.
- When creating a new data block for a DIG datasource, an additional column of check boxes labeled Prevent Updates is available in the field selection area.
- An additional field called 'Transformed' is added to every record in a DIG datasource. It is a read-only field that is set to YES or NO by Blue. When the value of the Transformed field is set to YES then the record has been manually verified and published using DIG tasks. This field is only visible from Blue, and only when using DIG datasources.
- 'Published' in the DIG task is equivalent to Transformed in Blue.
- Prevent Updates ensures that the marked fields that have been manually modified will not be updated during the automatic update imports.
- When converting a datasource to a DIG datasource, it must be imported at least once before it can be used to create tasks in a DIG project.
- DIG user datasources have the first name and last name of users preselected by default.
2) Create the DIG definition
A definition establishes a relationship between subjects in one datasource and users in a different datasource. Filters can be applied to both the subjects and the users to refine the definition.
- The Data preparation privilege is the only privilege that can be assigned to a group.
- Shared groups are not available.
- Manual entry and hierarchy link types are not available for groups in DIG definitions.
- The relationship between a primary subject and secondary subject is established in the data structure. To learn more, see Establish the Data Structure.
If you have already created a DRA (Dynamic Role Access) relationship file and would like an alternative to link members hierarchically to your courses, use that very same file as a relationship block to link it to the courses datasource. You may still create a relationship file to link departments to data preparers, although the following method will save you time in creating the file. To view specific steps on how to add relationship blocks, see Manage data block relationships.
Example of DRA relationship datasource
| Department ID | Data Preparer ID |
|---|---|
| ENG | jchafer |
| NURS | tleghorn |
| SOC-W | tipwell |
| PUB-H | estrank |
| MED | blilly |
| ANTHR | jscott |
| FIN-ART | nbrack |
| CIV-ENG | rjuggins |
| SOC-ANTHR | aabade |
Example of courses datasource
| Course ID | Course Name | Department ID | Department Name | Data Preparer ID |
|---|---|---|---|---|
| 01198 | Transportation Engineering | ENG | Engineering | jchafer |
| 25678 | Research Methods | NURS | Nursing | tleghorn |
| 35467 | Psychology | SOC-W | Social Work | tipwell |
| 01645 | Bacteria II | PUB-H | Public Health | estrank |
| 98754 | Biology | MED | Medicine | blilly |
| 73546 | History of Science | ANTHR | Anthropology | jscott |
| 51777 | Graphics | FIN-ART | Fine Arts | nbrack |
| 74657 | Thermodynamics | CIV-ENG | Civil Engineering | rjuggins |
| 82378 | Evolution | SOC-ANTHR | Social Anthropology | aabade |
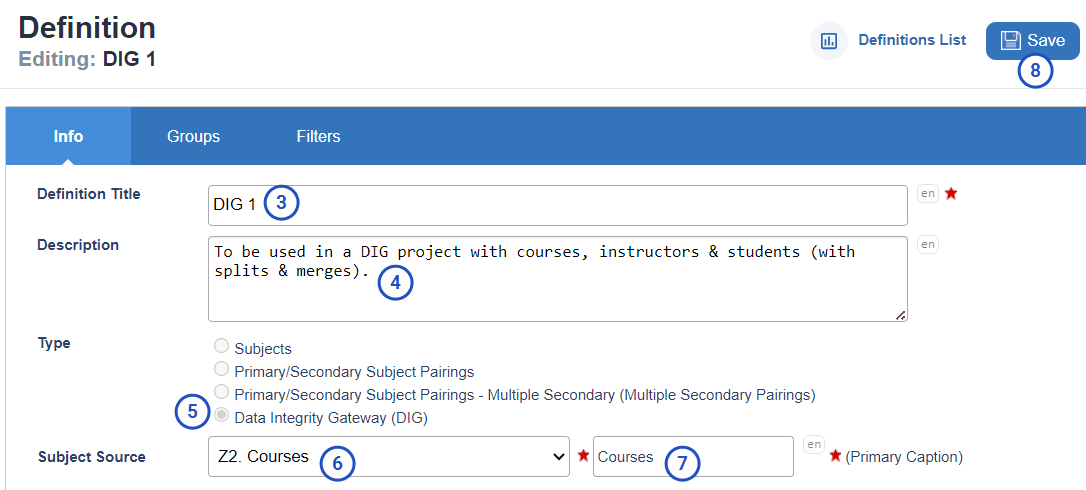
- Navigate to Definitions.
- Select Create Definition.
- Enter a Definition Title.
- Add a short Description.
- Select DIG as the Type.
- Choose a Subject Source from the available list.
- Include an easy to recognize name.
- Select Save to create the definition.
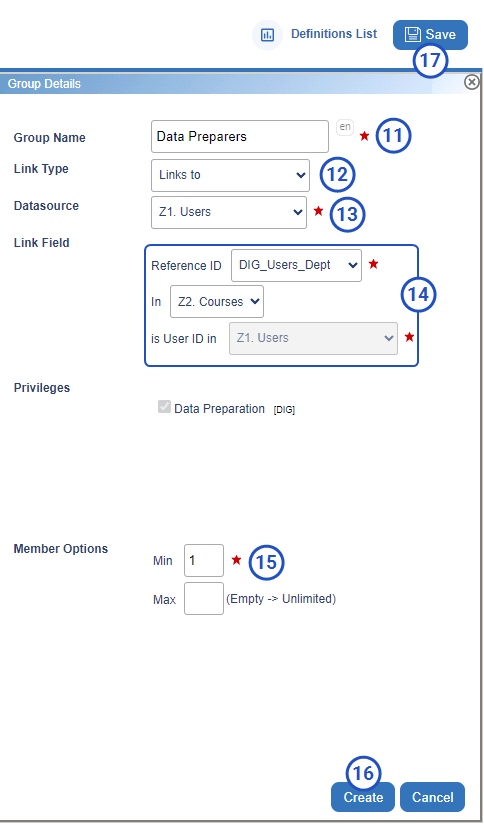
- Navigate to Definitions - Groups.
- Select add to create a group.
- Enter Data Preparers as the Group Name
- Choose Links to in the Link Type drop-down.
- Choose the Datasource you previously added that contains user data.
- Set Reference ID to User ID in the Link Field drop-down. The users datasource chosen in the group will be automatically selected.
- Keep default values in Member Options (min, max, etc.).
- Select Create.
- Select Save at the top right of the page to finalize the creation of the group.
Stage 2 - Configure the DIG project
1) Create a DIG project
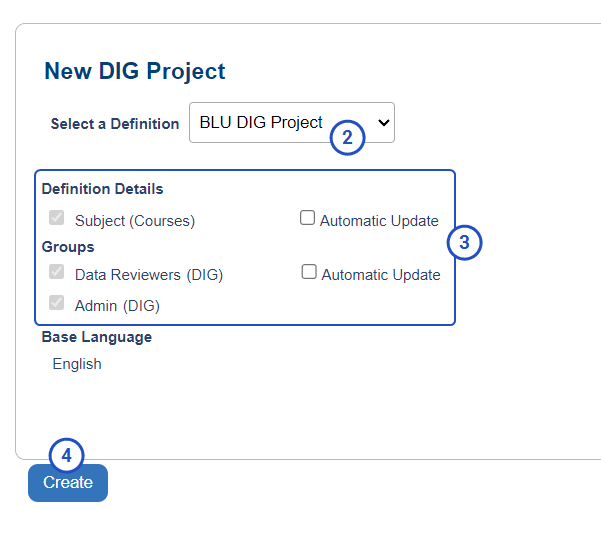
- Navigate to DIG Projects and create a new project.
- Choose one of the available DIG definitions.
- Decide if Automatic Update should be enabled for either the subject or any of the existing groups. When enabled, additions and modifications to the subject datasource or group datasource will be included in the project even after the project has been published.
- Click Create to establish the project and begin adding information.
2) Add basic DIG project information
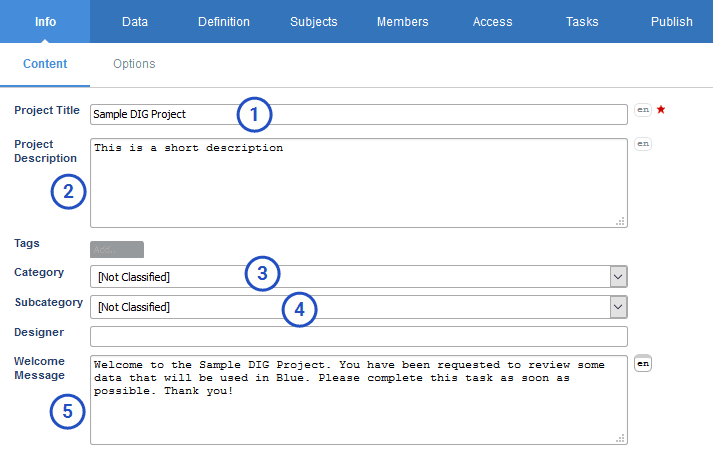
Before going any further, your DIG project needs a name and some basic information. This information may appear in user tasks and reports, but Project Description, Category, Subcategory and Designer are primarily used within Blue to easily locate the project.
- Name the project.
- Provide a brief description of the project.
- Select a Category and Subcategory as necessary.
- Create a custom Welcome Message by using HTML markup and field mapping symbols. The welcome message is displayed at the top of the first page of the DIG Task.
- Save the project before proceeding.
If you have enabled Automatic Update for your subject or groups, then this is a good time to navigate to Info - Options to control member removal in the subject datasource or group datasource.
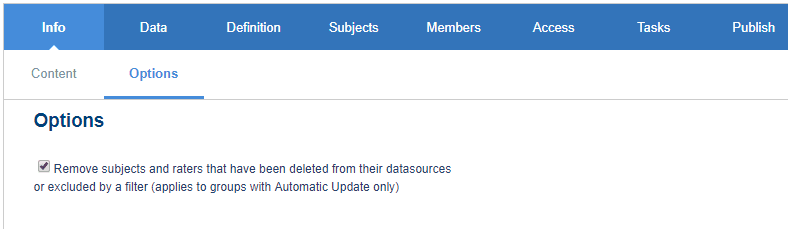
3) Add multilingual support
Administrators across different regions can configure the DIG User Interface (IU) in multiple languages to improve accessibility, reduce errors caused by language barriers, and enhance the overall user experience.
By accessing the Info > Options feature, Admins can choose which DIG interface languages will be available for their DIG project. Emails and notifications in DIG will follow the same multilingual behavior as a standard Blue project, automatically respecting both the project-level and the user-specific language preferences.
A language pack must be installed for every language offered. If the Available Language checkbox for a language is greyed out, contact Explorance to discuss adding the required language pack to your account.

Once additional languages have been added to DIG, the Admin must also update the following text fields with the translated text for each language.
Translate project titles, internal project title, project description and welcome message by clicking on the language icon to the right of the field. A pop-up will be displayed with tabs for each language to enter the translated text.

Similar language icons are displayed in the following screens that require fields to be translated.
- Data Structure – secondary subject display name(s)
- Definition – definition title, description, subject source
- Tasks – invitation email subject and message, subsequent email subject and message
Once the project is saved, any fields that still require translation will be indicated in the error log.
DIG’s multilingual capabilities also support:
- Right-to-left languages
- XML keys to override built-in keys: to display a different term such as changing a column header
- Calendar display: in user’s preferred language
- Email preferences: Email content is sent in the user’s preferred language. If no preferred language is set--or if the preferred language is not one of the selected languages--the email is sent in all available project languages.
- DIG task: The DIG task page is displayed in the user’s preferred language. If no preferred language is set--or if the preferred language is not one of the selected languages--the project’s default language is used.
NOTE: DIG does not support multilingual data storage or importing/exporting language XML files.
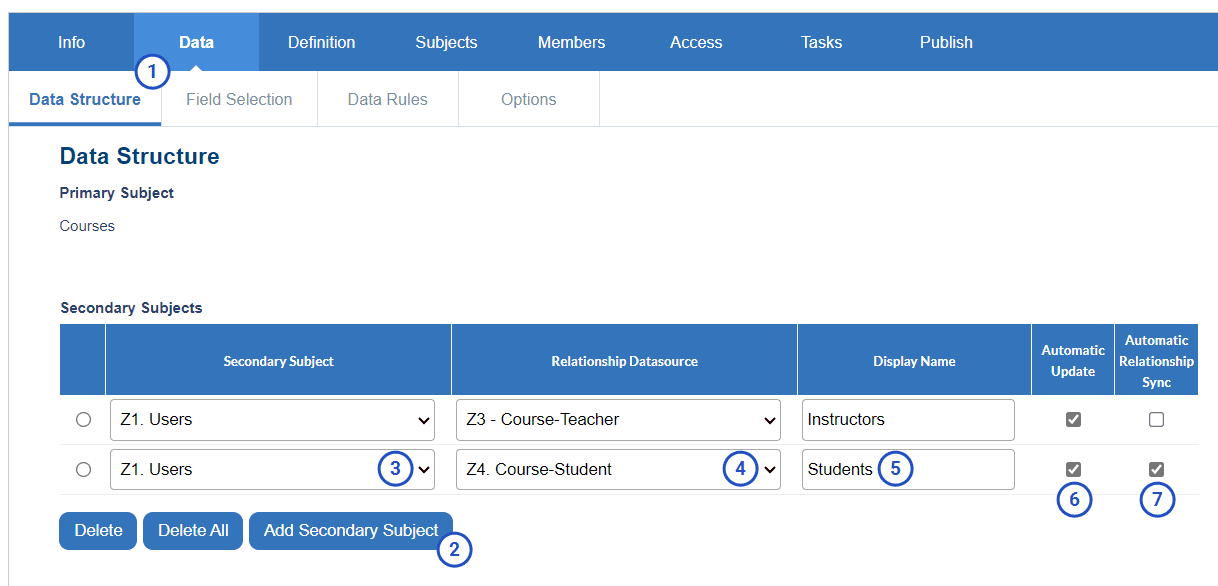
4) Establish the DIG data structure
The data structure is based on the project definition, but allows the project manager to choose the secondary subjects that are relevant to the primary subject (based on the chosen definition) for this project. Secondary subjects can be anything or anyone that has a direct relationship with the primary subject.
Choose the secondary subjects relevant to this DIG project
- Navigate to Data - Data Structure for the project.
- Click Add Secondary Subject.
- Select one of the available Secondary Subjects.
- Choose the appropriate Relationship Datasource.
- Enter a descriptive name for the secondary subject in Display Name. Users assigned a DIG task will see this name, so it should be recognizable to them.
- Enable Automatic Update to ensure that the unpublished and unverified subjects and secondary subjects in the DIG task are updated when the datasource is synced. Subjects that have already been published will not be updated.
- Enable Automatic Relationship Sync to provide up-to-date relationship connections between the subjects and secondary subjects. The relationship between subjects and secondary subjects is updated regardless of whether or not they are published. The actual subject and secondary subject are not affected, only their relationship.
After publishing your DIG project, do not enable/disable the Automatic Relationship Sync checkbox under any circumstances. This may result in a loss of data updates.
- Save all changes.
NOTE: Administrators can configure the default columns displayed for each DIG project, including sort order. End users may also customize their view during the task.
Example of DIG project type 4 data structure:

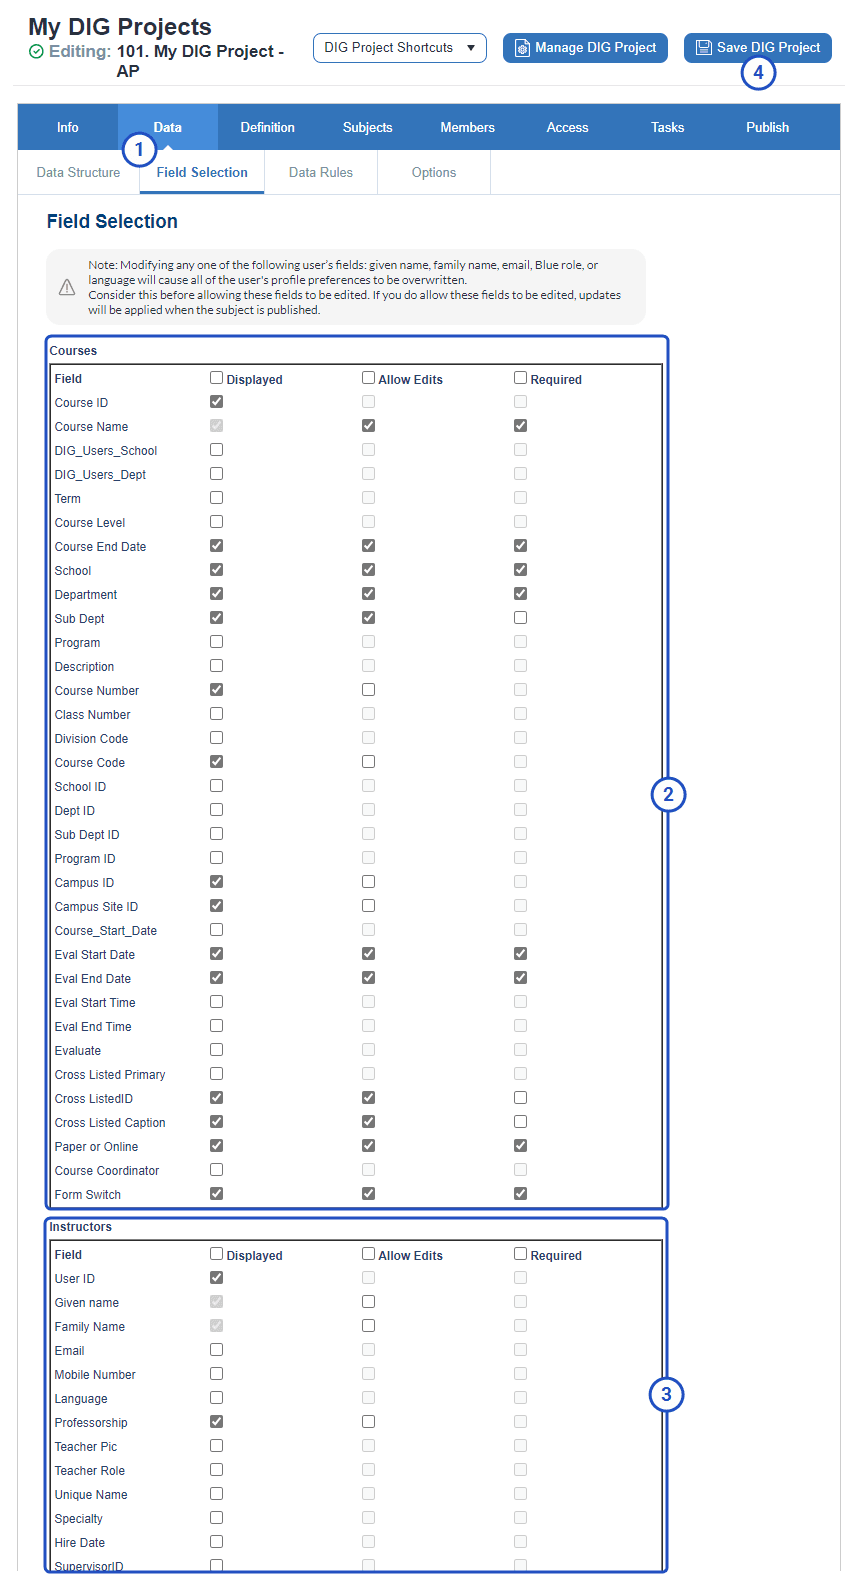
5) Select data fields for the DIG end user task
Field Selection allows the project manager to choose which primary subject and secondary subject fields will be seen by users preparing the data, which fields the users will be able to modify, and which fields must contain information before a record can be published. Primary subject fields appear at the top of the page followed by all secondary subjects.
- All dropdown menus open automatically when clicked, regardless of whether the underlying row is active. This applies to the main grid, modal views, and subject creation pages.
- Any required field must also Allow Edits.
- Any editable field must first be Displayed.
- The unique identification fields like User ID can only be displayed.
- The number of fields that are displayed and that can be updated does have an effect on performance.
- The entire contents of a truncated field (i.e Bachelor of Eng...) can be copied directly from the grid even when the field is read-only.
DIG also includes advanced search and filtering features:
- In-line search inside any dropdown containing more than seven items.
- A clear-search “X” shortcut for all search fields.
- Default filter operator set to Is.
- A new filter type, Type, that enables filtering by Default, Split, or Merged subjects.
These options are available through the DIG workflow,
If you wish to grant your DIG task owners the ability to merge courses, then the 'Course Name' field should have the Allow Edits and Required check boxes enabled before creating validation rules.
Select data fields that will be displayed, can be edited and/or are required.
- Navigate to DIG Projects - Data - Field Selection.
- Select fields for the primary subject that will be shown to the users preparing the data, select fields that can be altered by those users, then select fields that are required before the records can be published.
- For each of the secondary subjects (established in the Data Structure), select the fields that will be seen by the users preparing the data, select fields that can be modified by users, then select fields that must be completed before the records can be published.
- Save all changes.
6) Select subjects for the DIG project
Subjects are the people, places, or things that form the focus of the project.
- When a project is created with automatic update enabled for subjects, Blue will add and remove subjects for the project automatically.
- With automatic update enabled for subjects, it is still possible to manually delete subjects from the project. Manually deleted subjects can be viewed using the Show filter.
- For subjects with multiple pairings, the Subject Pairing Selection page can be used to remove individual pairings.
Only the selected subjects will be included in the project. By default, there are no subjects selected. However, if automatic update is enabled when the project is created, then all subjects are included.
If Automatic Update was enabled for the subject when creating the project, this section can be skipped since subject selection is automatic.
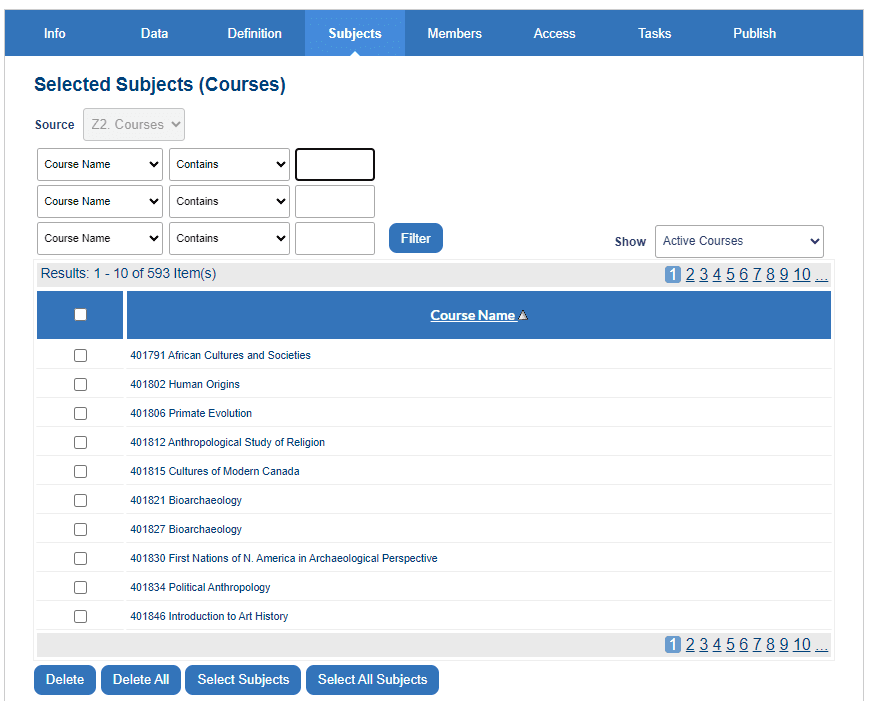
Click Select All Subjects to add all available subjects to the project. To add specific subjects, click Select Subjects. The Selection List appears displaying all the available subjects for the definition.
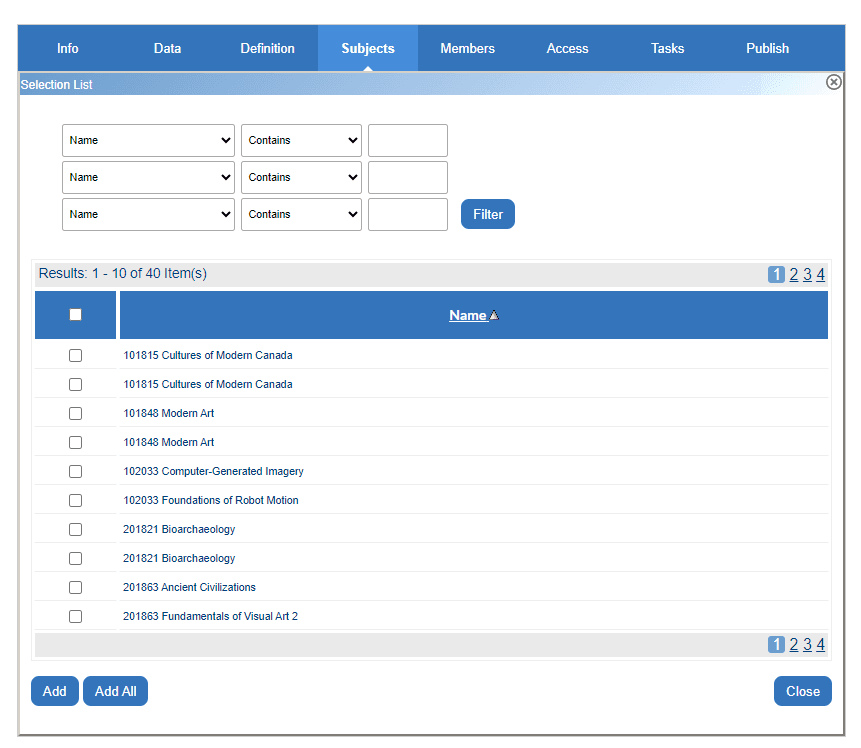
Click Add after selecting the subjects to include in the project. Alternatively, click Add All to include all of the subjects based on the current filter conditions.
7) Assign members to subjects
Group members assigned to a subject will be responsible for updating the data for that subject using the DIG end user task.
If the Automatic Update option was applied to a group when creating the project, this section can be skipped since member selection is automatic. Groups without Automatic Update enabled will still need to be assigned subjects.

Add Members
Members can be added to a subject three different ways:
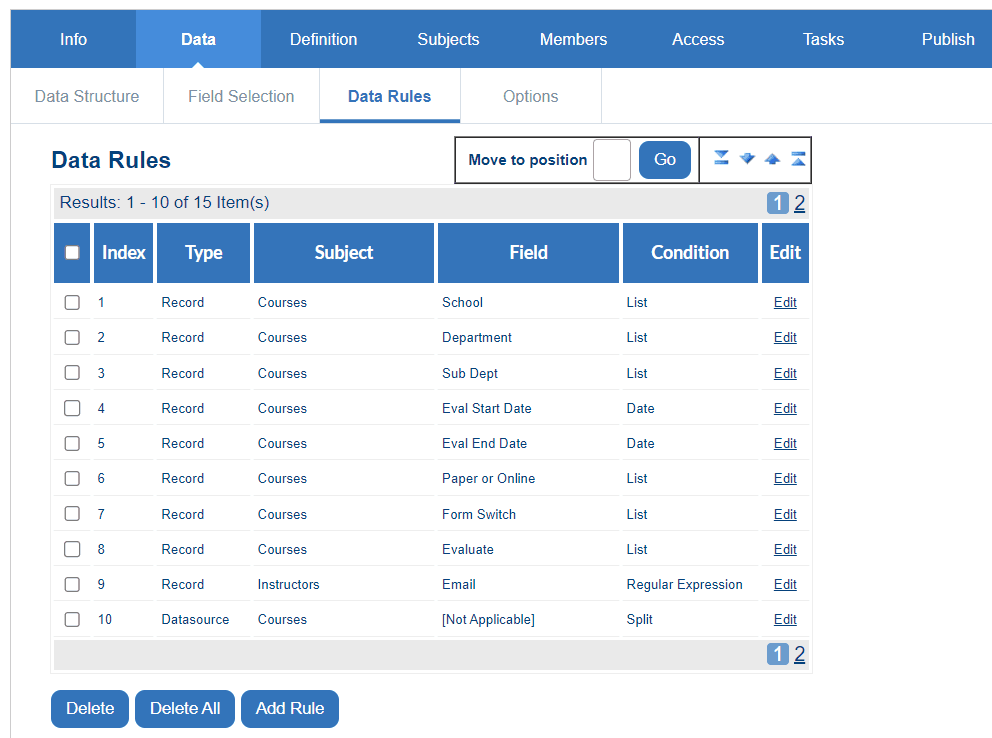
8) Create DIG data validation rules
Data rules are used to ensure that the users being asked to complete a DIG task are only able to add valid data that conforms to expectations. Rules can apply to either items in a datasource (Datasource), a specific field within a record (Record), or within subgroups of a group (Subgroup).
In the case where rules conflict, the most recently added rule takes precedent.
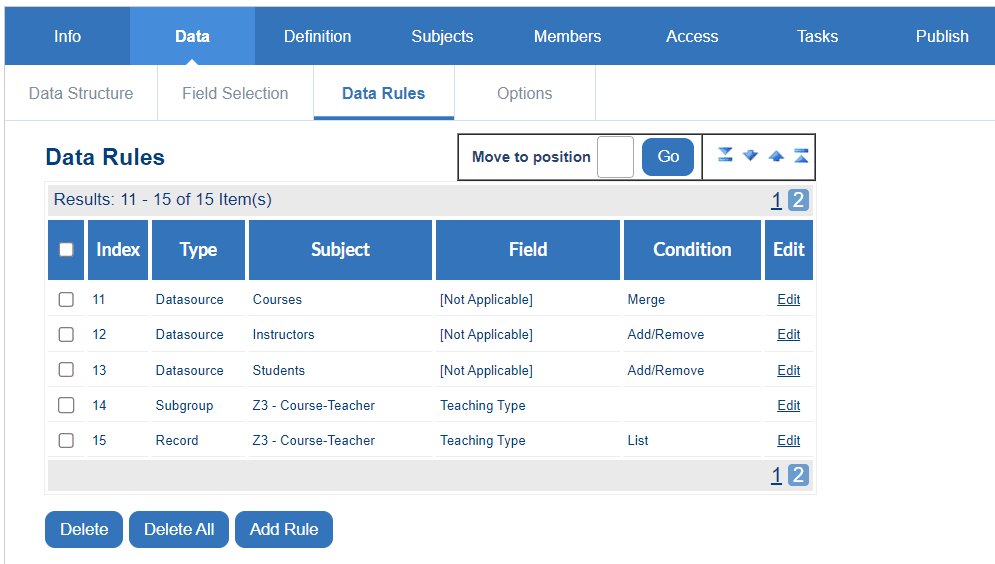
Datasource rules
There are three conditions that can be used to define datasource rules.
- Split
- Merge
- Add/remove
Record rules
There are five conditions that may apply to record rules.
- Regular expression
- String
- List
- Date
- Numerical value
Subgroup rules
Create subgroups to categorize subject members belonging to the same group.
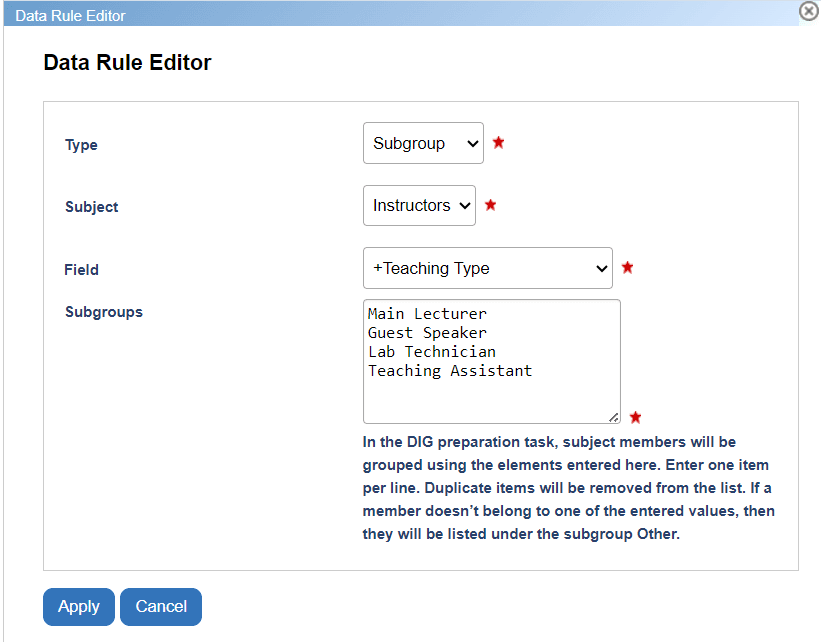
Example of DIG project type 3 data rules:
8) Manage access to the DIG project
Blue provides multiple levels of security for DIG projects, allowing you to control who has access to a project and what they can do within a project.
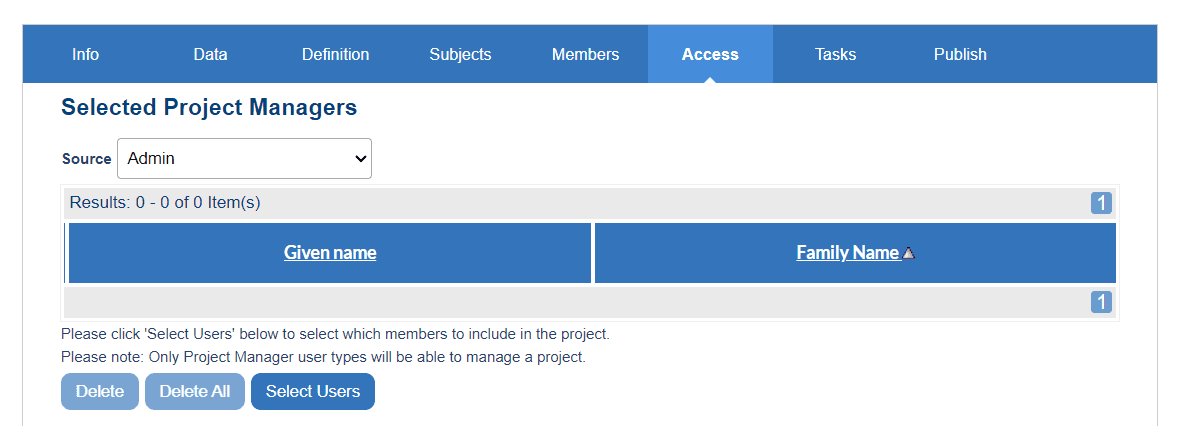
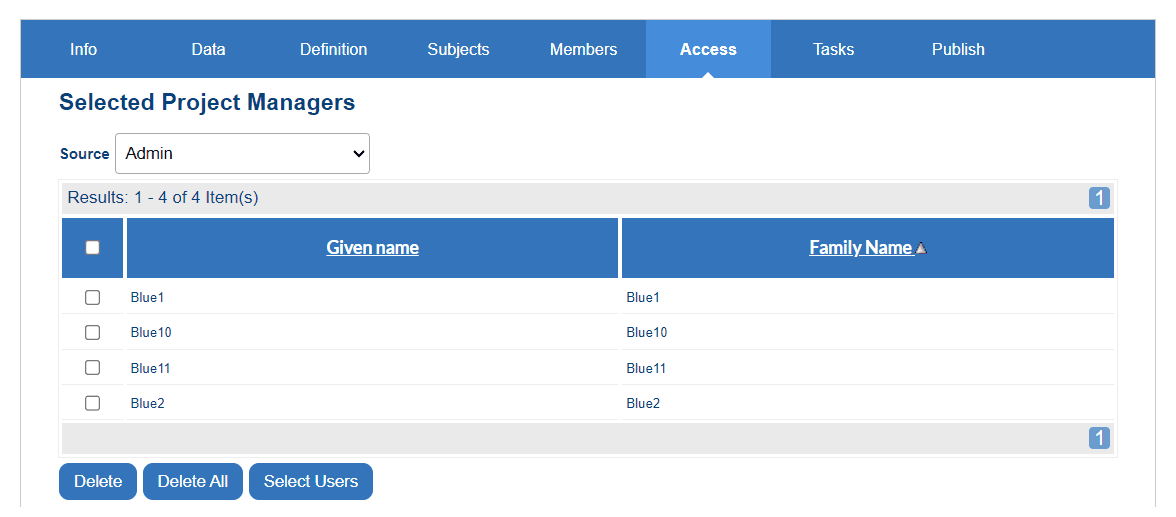
Share access with Project Managers
All Blue Administrators have access to any DIG project, but only the selected Blue Project Managers and Blue Project Manager Assistants that have been included in DIG Project - Access are able to view and modify this project.
Adjust the Features Available to the end user working with DIG Tasks
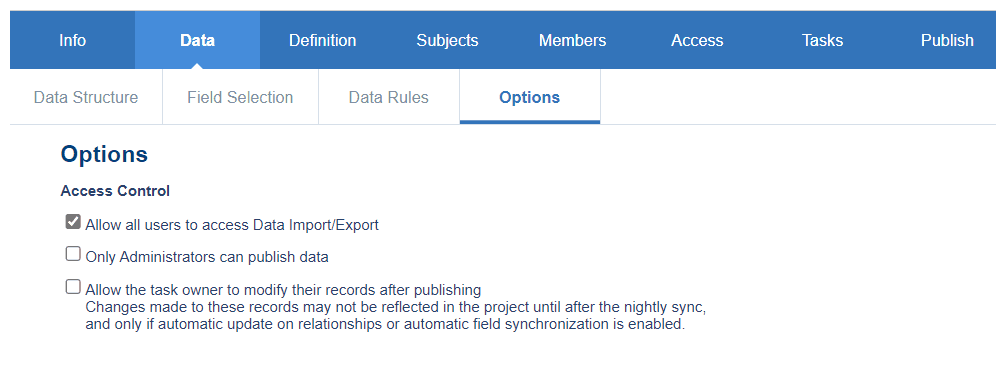
The DIG end user task contains several features that can be enabled or disabled by project administrators. The options found within Data - Options for a DIG project include:
- Allow all users to access Data Import/Export - when enabled, DIG task owners are able to access the Data Import/Export page.
- Only Administrators can publish data - when enabled, only users with an Administrator role in Blue will be able to publish data.
- Allow the task owner to modify their records after publishing - when enabled, users will be able to modify published records in the DIG task.
- Changes made to these records may not be reflected in the project until after the nightly sync, and only if automatic update on relationships or automatic field synchronization is enabled.
- Demographic and relationship synchronization will need to be applied in the evaluation project if changes made in DIG are to propagate to records already added to the evaluation project.
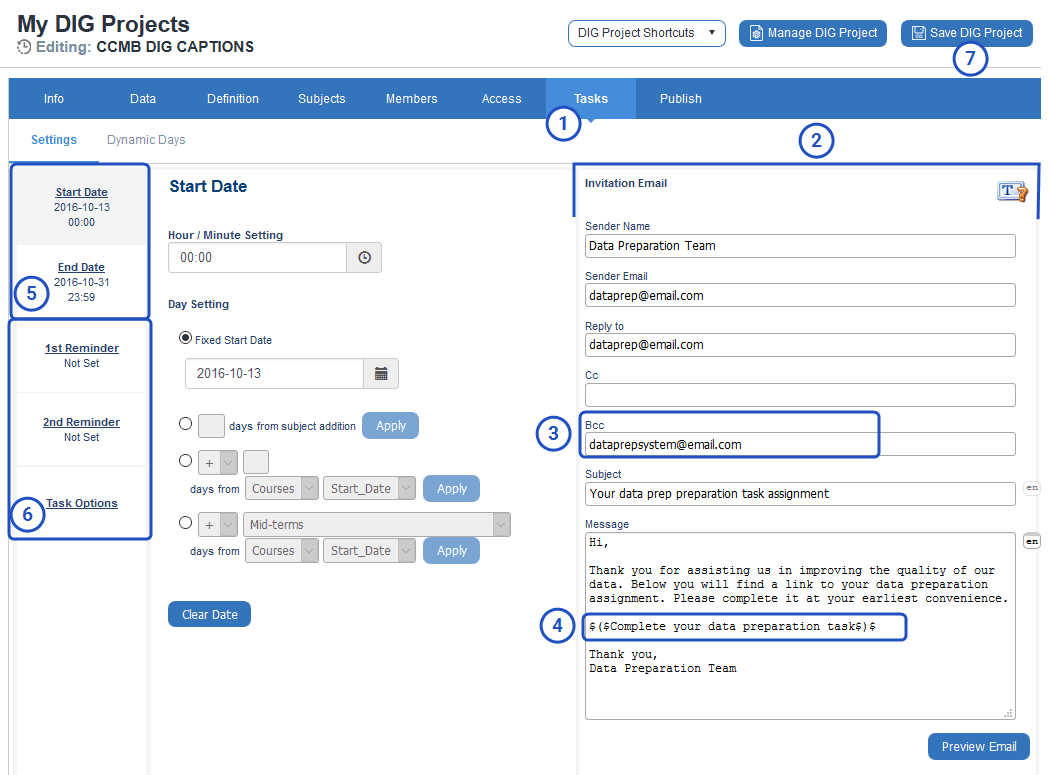
10) Set up DIG task notifications
Configure the invitation emails and reminder notifications for the DIG task. If any of the email related fields (Sender Name, Sender Email, CC, etc) are left blank, the defaults from System Configuration will be used.
- Navigate to DIG - Tasks.
- Enter the required information in the Invitation Email settings.
- Enter an email address in the BCC field; this should not be an individual’s working email address, but one that is reserved to monitor the messaging process (this step is optional, but strongly recommended).
- Configure the link text that will be included in the email. This link is highly sensitive to proper syntax. Use $($ at the beginning of the link text and use $)$ at the end of the link text, e.g.
$($Complete your data preparation task.\$\)\$ - Set the start and end dates.
- Configure the reminder content, dates, and other settings.
- Save.
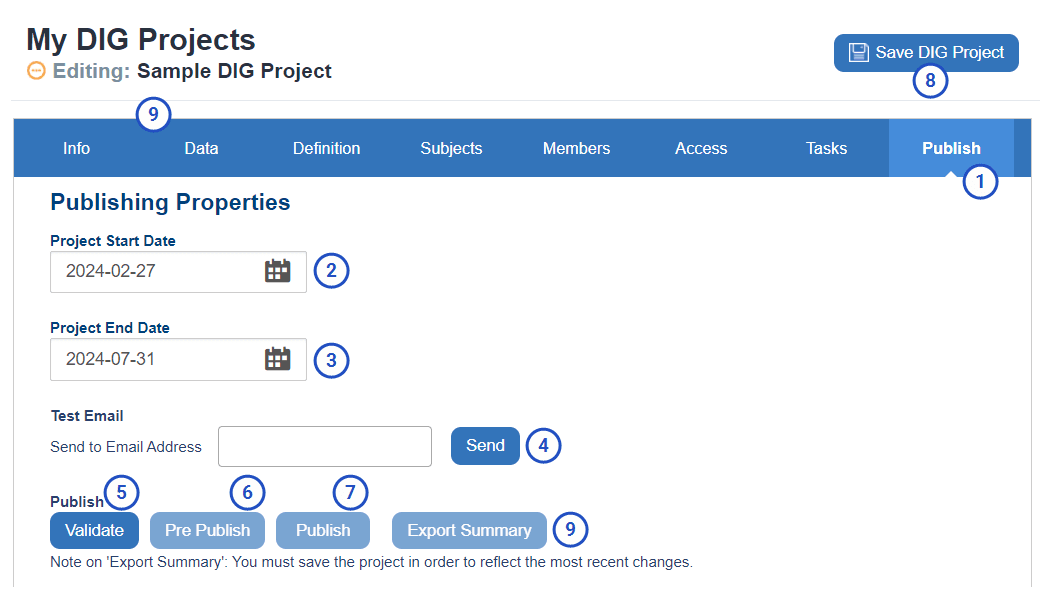
11) Publish the DIG project
Publishing a project sets in motion a number of events. Tasks will be created for all assigned users. Invitation emails will be sent to each user as their task becomes active. Finally, assigned tasks will begin to show up on the dashboards of users.
- Navigate to the Publish page for the project.
- Set a Project Start Date.
- Set a Project End Date.
- Send yourself a Test Email and validate that the content is OK and the links are functional. A similar email will be sent to all group members once the project is published.
- Validate the project and resolve any errors or warnings that are identified.
- Prepublish the project (an optional step primarily used by project assistants that don't have the ability to publish a project).
- Publish the project.
- Save.
- Export Summary to download a CSV file summarizing when the DIG task for each subject is scheduled to start and when it is scheduled to end.
Stage 3 - Manage the DIG project
Once the DIG project has been published, assigned users will perform the DIG task and prepare the survey data by reviewing and validating. Users that have been assigned DIG tasks are able to review, edit, and publish data that has been assigned to them. They will receive email notifications as a reminder to regularly review the data assigned to them. To view instructions on how to navigate the DIG task from the perspective of an end user, see DIG data preparer task guide.
You may choose to manually manage your tasks with features specifically designed for the project manager, focused on managing tasks either individually or in bulk. To view the TASKS page, navigate to your DIG project and select manage DIG project from the header. To learn more about how to manually manage tasks, see Manage tasks.
Stage 4 - Configure the evaluation project
Once the DIG task is successfully published, a built-in field called 'Transformed' will go from 'No' to 'Yes' in the prepared data and the validated data from the DIG project is now ready to be consumed by the evaluation project. Your evaluation project must use the same DIG datasources that were used in your DIG project. To view specific steps on how to create a typical course evaluation project, see Create end-of-term course evaluations.
Before publishing, you must apply a Transformed=Yes filter in your evaluation project to only accept records that have been successfully published from the DIG task.
Once your evaluation project has a Transformed=Yes filter applied to it with other typical settings configured, your survey campaign is now ready to publish with validated data.
Troubleshooting FAQs
Appendix
DIG process & data flow diagram
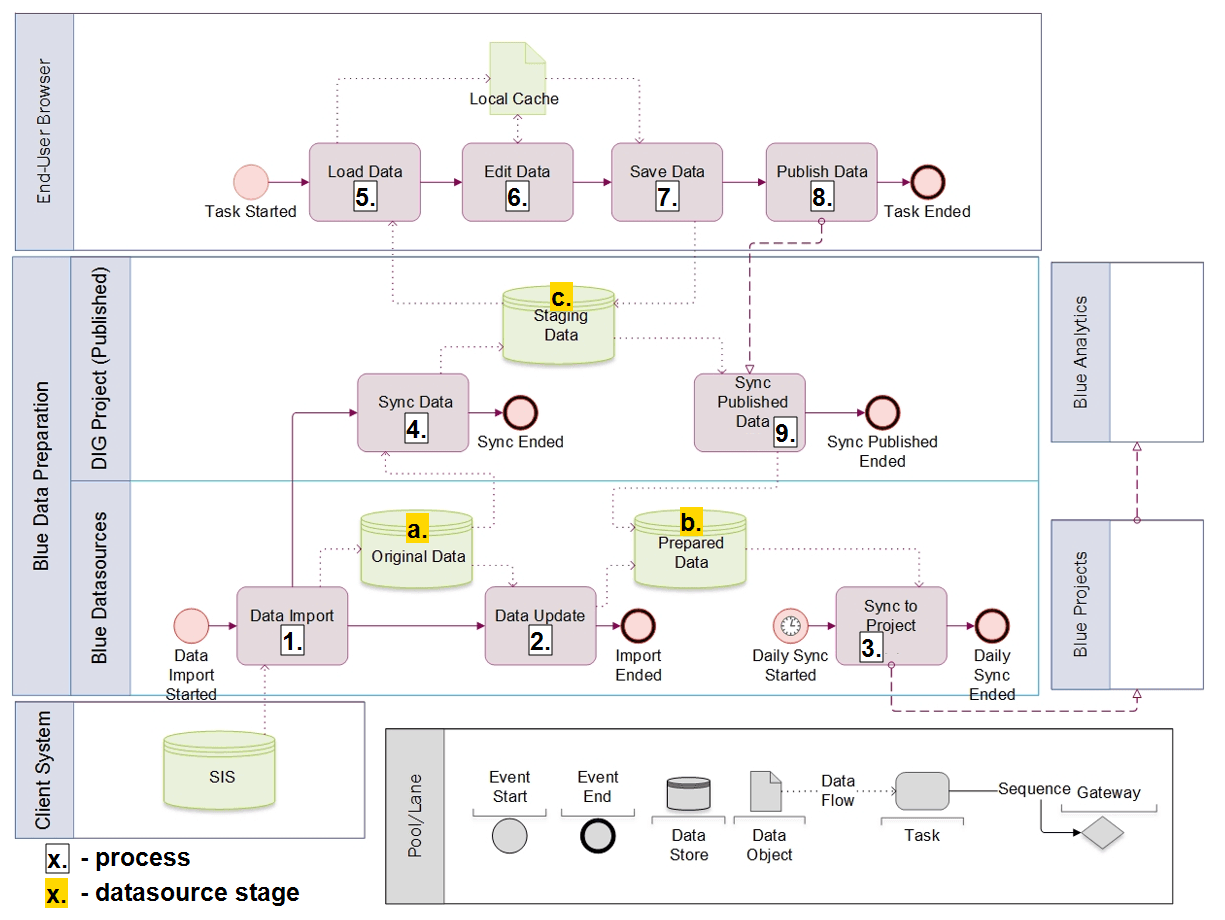
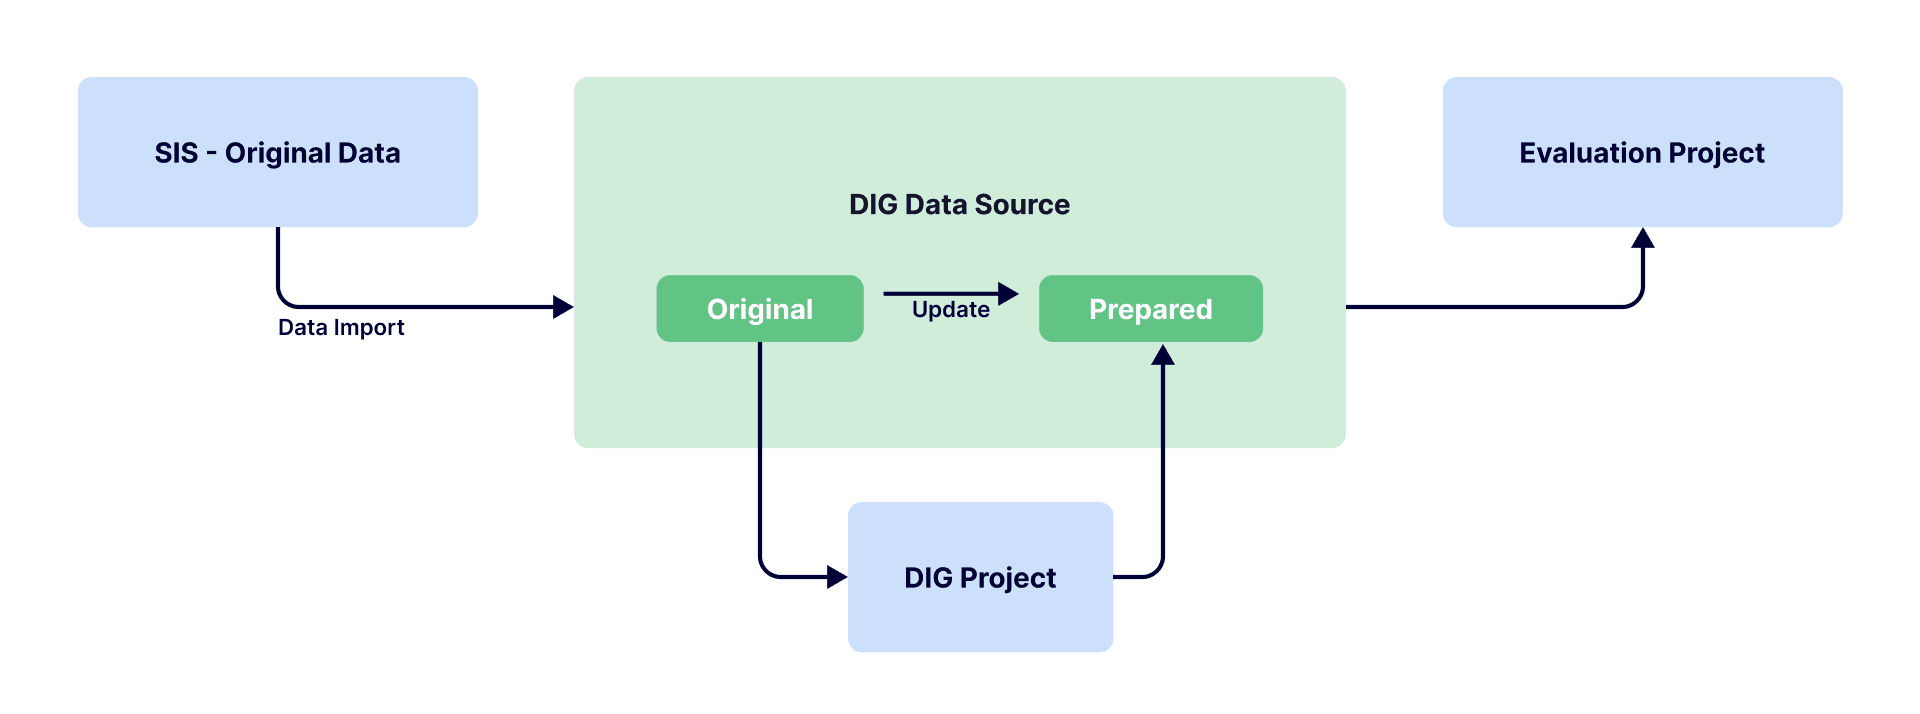
Datasource stages in DIG process
- Original data - Source data that has been imported from outside of Blue.
- Prepared data - Final data that will be used in your Blue evaluation project.
- Staging data - Data that has been reviewed, modified and validated in the DIG end user task.
Upon the initial import of source data into Blue, all three datasources (Original, Prepared, and Staging) are identical. Only after subsequent automatic update imports and DIG end user tasks occur will there be changes in data across all three datasources.
Explanation of DIG process & data flow diagram
| Process # | Process name | Description | Location |
|---|---|---|---|
| 1. | Data Import | Source data is imported from the client's system into Blue as Original data. | Blue Datasources |
| 2. | Data Update | Original data and Prepared data get automatically updated with the source data. | Blue Datasources |
| 3. | Sync to Project | Prepared data gets pushed to the final evaluation project. | Blue Datasources |
| 4. | Sync Data | Original data synchronizes with Staging data in the DIG project. | DIG Project |
| 5. | Load Data | The DIG task pulls the Staging data from the DIG project. | DIG Task |
| 6. | Edit Data | The DIG task edits the Staging data. | DIG Task |
| 7. | Save Data | The DIG task saves the Staging data. | DIG Task |
| 8. | Publish Data | The DIG task publishes the Staging data. | DIG Task |
| 9. | Sync Published Data | The published data is synchronized with the DIG project which is then pushed to the Prepared data. | DIG Project |
THINGS TO KNOW ABOUT SPLITS, MERGES AND DEFAULT SUBJECTS
Progress bar The progress bar reflects the number of selectable rows rather than the number of original subjects.
- Each split row counts as its own selectable item
- A merged subject counts as a single selectable item
- Original subjects count as one selectable item each This ensures the loading denominator always matches the visible grid.
Bulk editing subjects, splits and merges DIG supports a unified bulk-edit workflow across all row types—standard default subjects, merged subjects, and split subjects. All rows display selection checkboxes, and users may perform bulk operations such as:
- Editing demographics
- Assigning group members
- Unassigning group members
- Creating new group members