Dynamic Role Access (DRA) power guide
Introduction
Dynamic Role Access (DRA) is a tool that helps you manage report access for academic leaders, such as deans and department chairs. You can easily assign or change access rights for these users based on their roles and responsibilities. Instead of manually updating each report, DRA can automatically synchronize with your institution's organizational hierarchy to grant access. This saves time and effort, and ensures that academic leaders can access the reports they need.
Is DRA right for your institution?
If you answer yes to the following questions then Dynamic Role Access may be right for your institution.
- Are reports shared with academic leaders?
- Is access to a report determined by leadership roles (e.g.: dean, associate dean, department chair, etc.)?
- Is your institution's organizational structure based on a hierarchical tree model?
- Is access to reports updated throughout the year?
- Do academic leaders need access to historical reports?
What is involved in setting up DRA?
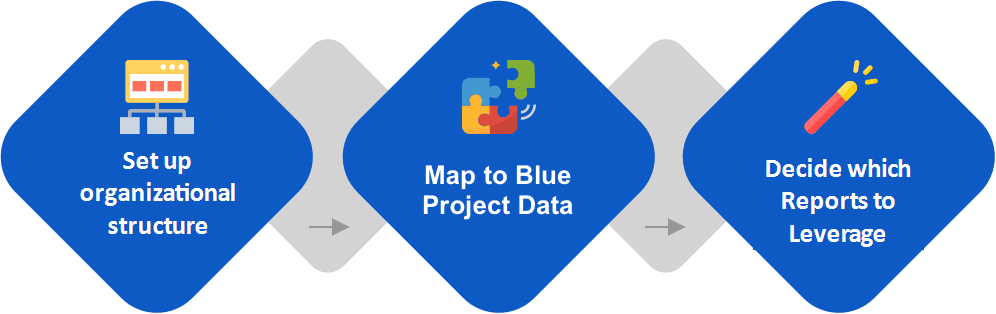
To set up DRA for a project, there are three main stages (see diagram below) which, when completed, will automate the process of rerouting reports to new or different individuals who have been assigned to existing roles in the organizational hierarchy.
How long does it take to set up DRA?
The time required for each project may vary, but usually it ranges from 1 to 3 hours. This includes the initial planning and the activation of your organizational groups in the reports. After the setup is done, you can easily change one dean for another in a matter of minutes—or, even better, it can be done automatically once you synchronize your organizational structure. For older reports, you may need some extra time to fix any data that does not match your current organizational structure.
The following planning sections describe the components of DRA and provide various scenarios to consider or adapt to your institution’s roles, hierarchy and relationships.
Planning
Organizational Roles
Which organizational roles will you choose to set up DRA for your institution?
An organizational role is a specific function that an individual performs at an institution or organization. The roles you will need to set up DRA will vary depending on who will access which reports.
Consider the following scenario:
- Deans need to access School / Faculty level reports.
- Associate Deans need the same access as their Deans to access School / Faculty level reports.
- Deans and Department Chairs need access to Department level reports (Department is one level below School / Faculty in this example), but Associate Deans must not be granted access to Department level reports.
- Deans, Associate Deans and Department Chairs also need access to individual instructor reports.
Can you use less roles vs. more roles?
In the example above, Deans and Associate Deans share the exact same access rights for School / Faculty reports as well as individual instructor level reports in requirements #1, #2, and #4. You could combine the ‘Deans and Associate Deans’ roles into one single role simplifying your setup and enabling you to have less roles to manage, however requirement #3, indicating that Associate Deans do not have access to Departmental reports, requires you to maintain a separate role for Associate Deans. In this example, using less roles would prevent you from having the granular needed for these roles.
We recommend that you have enough roles to match your current report access scenarios. You can also include additional roles, such as “associate” or “assistant” hierarchy levels, if you think you might need more report access options in the future. You can also create new roles later.
Should you add instructors as an organizational role for report access?
No. Giving instructors an organizational role for report access is unnecessary and not recommended. Most instructors only need to see their own individual reports.
Are any of your instructors also academic leaders who need to have access to organizational level reports?
These instructors / academic leaders usually have complementary roles based on your organizational structure. For example, a department head who is also an instructor will have access to their own personal instructor reports in addition to reports for other instructors under their purview. As a department head, this user’s access to reports is managed through the organizational hierarchy structure in DRA (see hierarchies below) and can change as the user moves from one role to another, whereas the instructor report access is static and does not change automatically if they are no longer have that role.
Is it necessary to create a separate user datasource for academic leaders, such as deans and department chairs?
No, they can reside in the same general user datasource that already contains faculty and students. This way there is no duplication of user records for an academic leader who is also an instructor for instance.
Hierarchies
Is your organization’s hierarchy complex? How much of it should you bring into Blue?
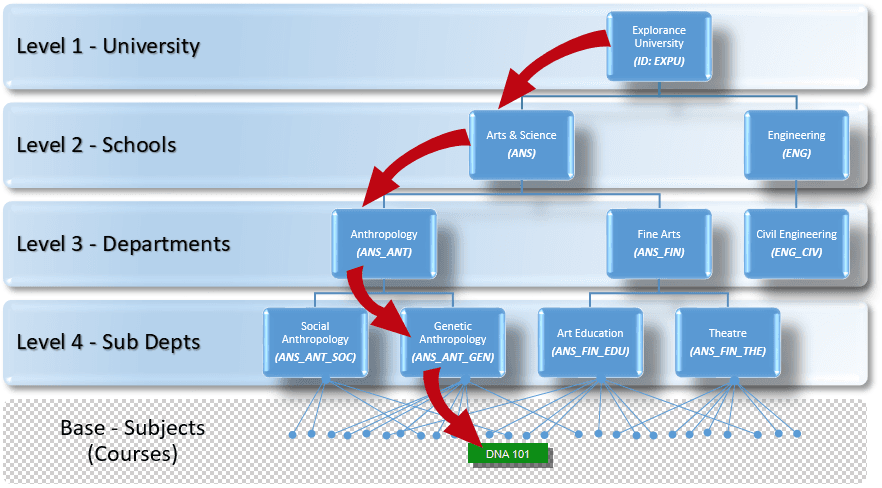
To explain what hierarchy means, we can use a tree as an example. A tree has branches that divide into smaller branches, and each branch represents a different node or unit in your organization and how they connect to each other. For example, we could create a departmental hierarchy used for Course evaluations:
A University (level 1) would be at the top, followed by a School of Arts and Science (level 2), which has a Department of Anthropology (level 3), and a Sub Department (level 4) that offers a Genetic Anthropology program, which teaches the DNA 101 course (base level). This hierarchy has 4 levels plus the base Courses level. Courses are not included in the hierarchy setup but linked to organizational units in a later step.
To add your hierarchy to Blue, create a hierarchy data file such as the table below containing the 4 levels and the data required for this hierarchy.
| Unit ID | Unit name | Parent ID | Parent name | Level |
|---|---|---|---|---|
| EXPU | Explorance University | ------- | ----------------------------- | 1 |
| ANS | Arts & Science | EXPU | Explorance University | 2 |
| ENG | Engineering | EXPU | Explorance University | 2 |
| NUR | Nursing | EXPU | Explorance University | 2 |
| SOC | Social Work | EXPU | Explorance University | 2 |
| PUB | Public Health | EXPU | Explorance University | 2 |
| MED | Medicine | EXPU | Explorance University | 2 |
| ANS_ANT | Anthropology | ANS | Arts & Science | 3 |
| ANS_FIN | Fine Arts | ANS | Arts & Science | 3 |
| ENG_CIV | Civil Engineering | ENG | Engineering | 3 |
| ANS_ANT_SOC | Social Anthropology | ANS_ANT | Anthropology | 4 |
| ANS_ANT_GEN | Genetic Anthropology | ANS_ANT | Anthropology | 4 |
| ANS_FIN_EDU | Art Education | ANS_FIN | Fine Arts | 4 |
| ANS_FIN_THE | Theater | ANS_FIN | Fine Arts | 4 |
You can only map a template to a hierarchy datasource when you create the datasource for the first time. Once completed, the template mapping is fixed and cannot be modified later. If you need a different template in the future, you have to create a new datasource.
Your naming conventions can be different from the example shown above, such as the following common hierarchy:
- Level 1 - University
- Level 2 - Faculties
- Level 3 - Schools
- Level 4 - Modules
- There can only be one parent level. A course can only belong to one sub department, the sub department can only belong to one department, and that department can only belong to one school. If an organizational unit is co-owned, we recommend linking it to the primary parent unit. If a parent unit cannot be defined, you might consider managing a parallel hierarchy, discussed below.
- Each organizational unit must have a unique ID. As an example, the Department of Nursing that belongs to the School of Nursing cannot share the same ID as its parent (NUR). If you have similarly named organizational units across the institution, you may consider a concatenated ID (e.g., ScNUR for School of Nursing, DpNUR_NUR for the Department of Nursing in the School of Nursing, and DpMED_NUR for the Department of Nursing in the School of Medicine).
- When creating your unique IDs use alphanumeric characters only. Do not include any special characters such as spaces ( ), backslashes (), ampersands (&), apostrophes ('), dollar signs ($), hyphens (-), or plus symbols (+) in the column headers or the data fields. These characters can interfere with the normal functioning of your datasource and create errors. This also applies to any other column headers or data fields in your datasource.
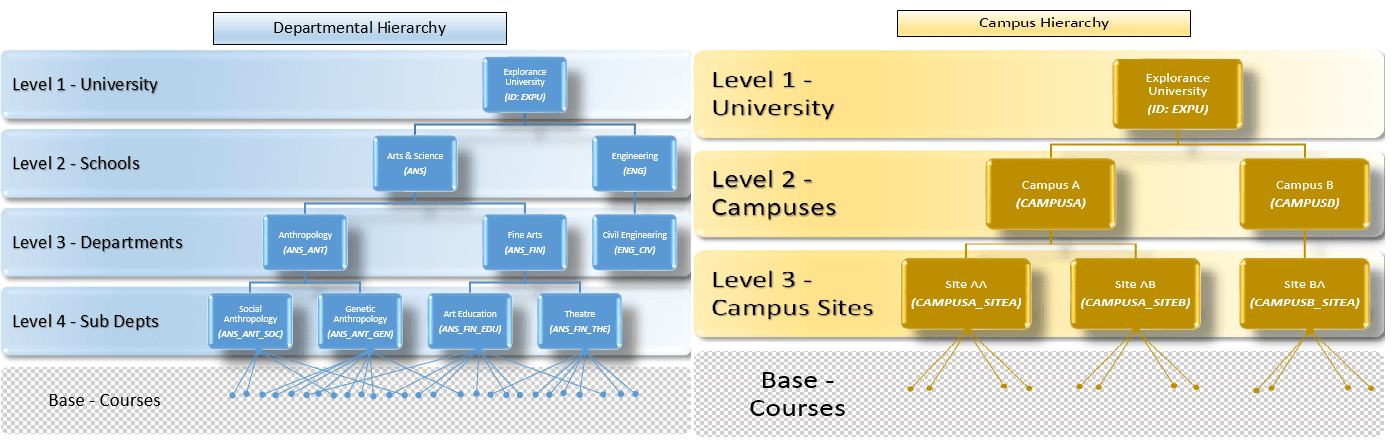
What if you have two different (parallel) hierarchies that aren’t fundamentally related to each other?
Your institution may have sets of organizational units that belong to distinct hierarchies. A common example is a Campus Hierarchy that doesn’t quite fit inside of the Departmental Hierarchy. One campus may contain courses from several departments, and these same departments may have courses taught at different campuses. Trying to fit campuses into departments or departments into campuses could prove problematic. In this case, we recommend that you consider two separate hierarchies that work in parallel, both belonging to the same root: Level 1 - University.
How does the hierarchy get linked to your course data?
Your courses data file will be referenced to the organizational unit IDs for each course. These references are represented by fields (columns) in your courses table, one for each level of the organization. For example, if you have a 3-level hierarchy, you will need at least two fields (the top level is implied, so it is not required) that contain the level-2(School ID) and level-3 IDs (Department ID) for each course.
Example of course data showing two reference fields containing organizational units
| Course ID | Course Name | School ID | Department ID |
|---|---|---|---|
| 401925-2669-QI | 401925 Municipal Planning and Engineering | ENG | ENG_CIV |
| 401925-2669-QI | 401926 Remote Sensing and Image Analysis | ENG | ENG_CIV |
| 401927-2697-QI | 401927 Remote Sensing and Image Analysis | ENG | ENG_CIV |
| 401928-8392-QI | 401928 Remote Sensing and Image Analysis | ENG | ENG_CIV |
| 401929-9247-Q2 | 401929 Remote Sensing and Image Analysis | ENG | ENG_CIV |
| 401930-2520-Q2 | 401930 Remote Sensing and Image Analysis | ENG | ENG_CIV |
| 401931-9817-Q2 | 401931 Digital Systems | ENG | ENG_ELE |
| 401932-7806-Q2 | 401932 Digital Systems | ENG | ENG_ELE |
| 401933-9442-Q2 | 401933 Digital Systems | ENG | ENG_ELE |
| 401934-3882-Q2 | 401934 Digital Systems | ENG | ENG_ELE |
| 401935-9768-Q2 | 401935 Digital Systems | ENG | ENG_ELE |
- Each project uses a copy of the course data. This stored project data is what will be linked to your hierarchy to determine who will be given access to which data for each project’s respective reports.
- While there is no limit to the number of levels you can manage in your hierarchy, more than 4 or 5 levels can become progressively more challenging to manage. Consider using only the levels you will need for managing report access.
Relationships
How will you link people to the hierarchy?
The next step involves assigning people to their respective organizational units. There are three elements to consider:
- who they are (UserID),
- what organizational unit (OrgUnitID) they are tied to
- what organizational role (OrgRoleID) they play in relation to the unit.
To illustrate this concept, we have added the people who require access to reports with their corresponding roles in each level of this hierarchy.
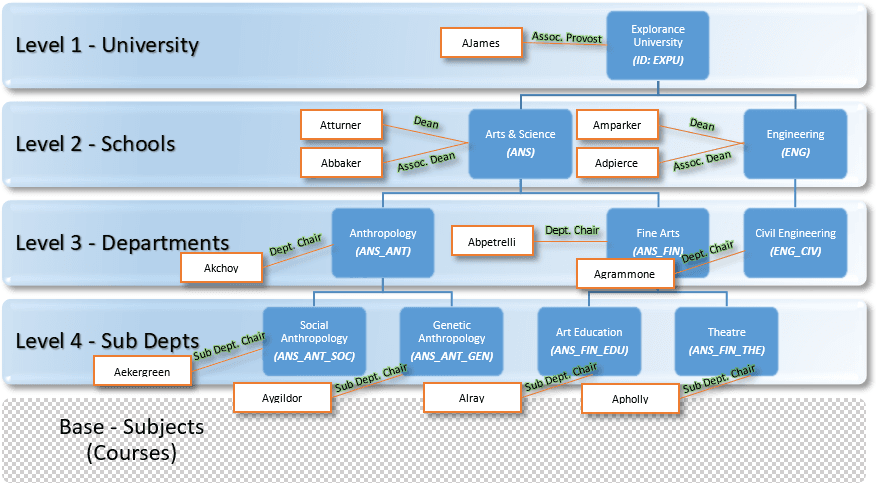
To add these relationships to Blue, create a Relationship data file, such as the one below:
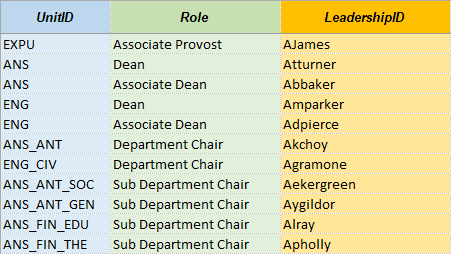
Can the same person play multiple roles?
Yes. For example, Amy K Choy (Leadership ID: akchoy) could be a Department Chair in one department and an Assistant Department Chair in another. This would be represented by two different records, both of them containing the LeadershipID Akchoy.
Only include the same person once and at the highest possible level within the same branch of the organizational tree. For example, avoid including a reference to Jacob Smith as the Dept. Chair of Anthropology (lower level) if he is already the Dean of Arts & Science (higher level), which contains Anthropology. However, if there are special exemptions for Jacob Smith’s access within Arts & Science, consider providing a more granular role for Jacob at the lower Department level only. This will help you manage fewer relationship records and help you to review with more clarity what Jacob Smith should be able to access.
What if your academic leaders need access to instructor reports?
Throughout this document, we have described a hierarchy with courses at the base level, meaning that courses belong to a school, department, module, etc. You can also create a hierarchy with instructors at the base level, meaning that instructors are linked to a school, department, sub department, etc. The core elements are the same: Your instructor data will need references (columns) that identify the organizational units they belong to.
If your academic leaders need access to instructor reports, it may be useful to map one hierarchy to courses and another to the instructors. For example, you could have a hierarchy based on departments for courses and a hierarchy based on the academic affairs institutional office roles for instructors. This way, you can make sure that relevant academic leaders can access the reports for the courses they oversee, and those who manage instructors can access instructor reports. DRA is designed to support both cases, and they can work in parallel.
All the notes in this document can apply equally to a course or an instructor-based hierarchy. You will be able to specify in your projects whether to map your hierarchy to the course or the instructor.
Implementing DRA
The following sections provide step-by-step instructions for setting up DRA. The instructions are broken down into 3 stages which are listed in the table below. The end result of this implementation will enable you to connect the desired organizational groups for each parent report with a simple toggle.
For preparation guidelines and concepts, refer back to the Planning section above.
| Stage | Process | Description |
|---|---|---|
| Stage 1 | Set up your organizational structure | Create your organizational roles, hierarchies, and relationships datasources. |
| Stage 2 | Configure your project’s organizational settings | Map your organizational structure to your project data to create organizational groups. |
| Stage 3 | Determine which reports will leverage which organizational groups | Link reports to organizational groups. The members of these groups will be updated automatically each night based on the changes made to your organizational structure. |
Stage 1 - Set up organizational roles, hierarchies, and relationship datasource
Set up organizational roles
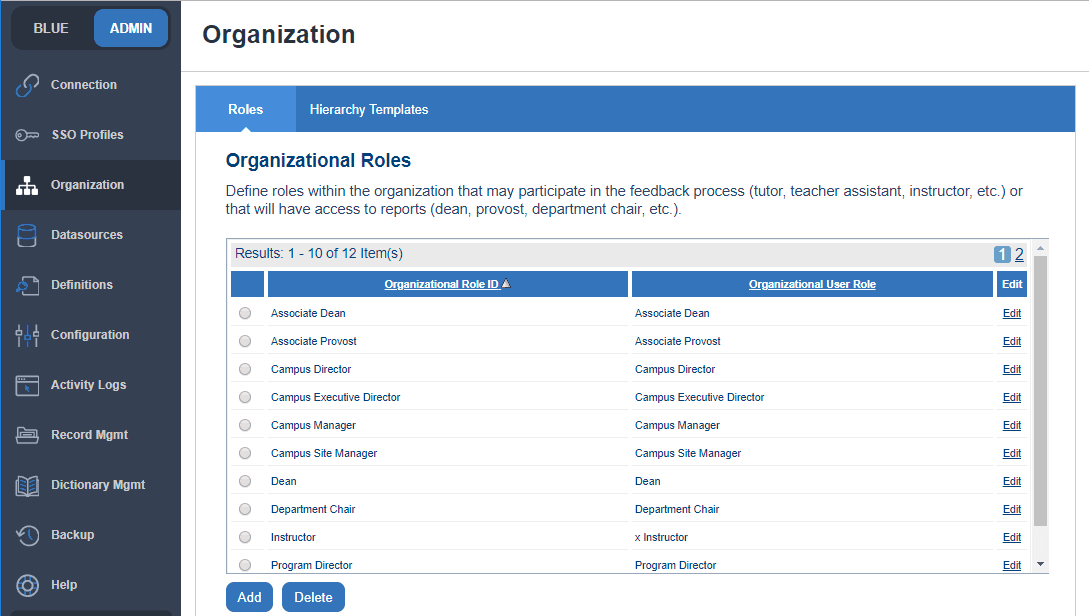
Navigate to System Administration - Organization - Roles where you can add, remove and edit organizational roles. Create as many organizational roles as required, but remember the Organizational Role ID must be unique.
- The Organizational Role ID contains unique identifiers used in the relationship data, whereas the captions are for display purposes.
- Organizational roles can be deleted even if they are in use. Deleting an organizational role will invalidate any relationships associated with the role, which may cause users to lose access to reports on the next daily sync.
- Each hierarchy datasource maintains a copy of the hierarchy template. Therefore, deleting a hierarchy template does not impact existing hierarchy datasources.
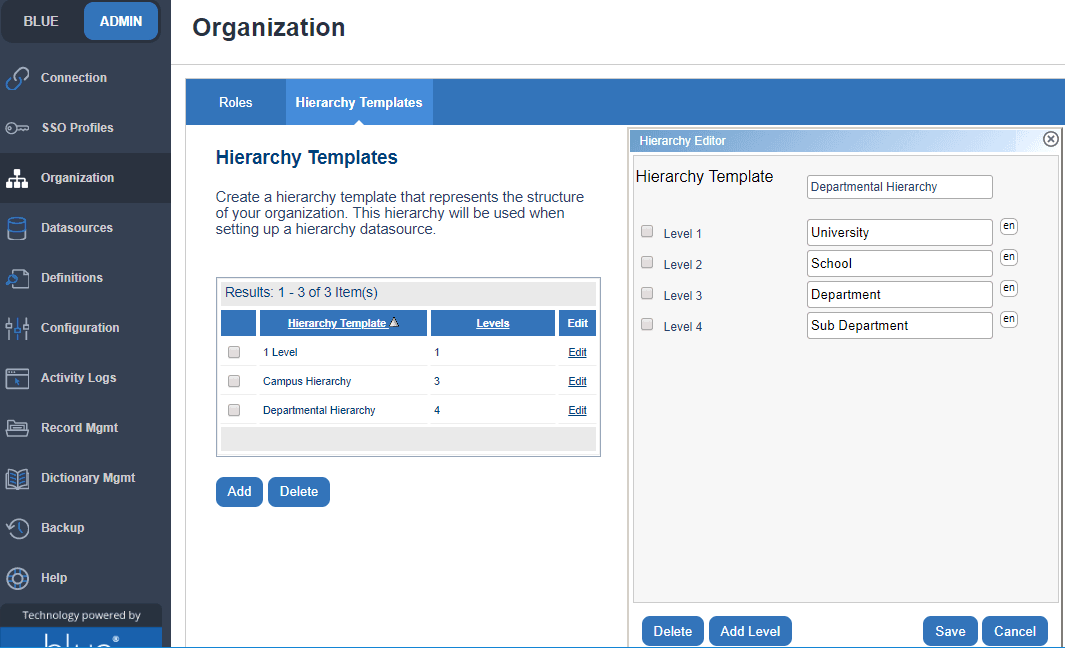
Set up a hierarchy template
A hierarchy template is a prerequisite to configuring the hierarchy datasource.
- Navigate to Organization - Hierarchy Templates
- Click Add to create a Hierarchy Template
- In the side panel, enter the name of the hierarchy (e.g., “Departmental Hierarchy”)
- Add the number of levels you will need and provide a name for each level.
- Click Save to complete.
Instead of listing all the levels of the hierarchy, could we just list the bottom level column only, and the system could infer the rest?
This was considered in the design, but we allowed for the lower levels to be left empty (null) as not all courses within the institution report to the same number of organizational levels. For example, it could be that somewhere in your institution, not all departments have sub-departments—but some do. Given this and to eliminate confusion, we kept the requirements consistent for all hierarchies. This means that the higher-level IDs must be represented at a minimum.
How do I remove a level of my organization?
There is no option to remove a level once a hierarchy datasource has been created; however, you may simply ignore the lower level, provided you continue to map the corresponding column in your courses datasource. Alternatively, if you plan to remove a middle level, you should consider replacing the older hierarchy with a new one that better reflects your current organizational structure.
Hierarchy datasource
A hierarchy datasource must contain only three fields, the organizational unit ID, the organizational unit, and the parent ID.
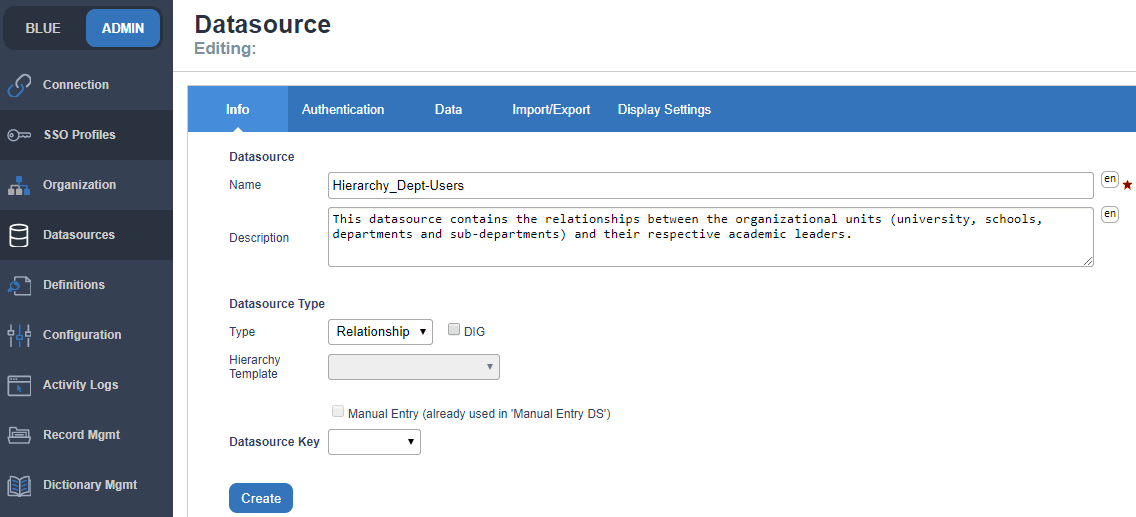
Set up a hierarchy datasource
- Navigate to ADMIN - DATASOURCES
- Click Add Datasource
- Provide a name (required) and description (optional)
- Select Hierarchy from the Type drop-down menu
- Select the Hierarchy Template you will be using.
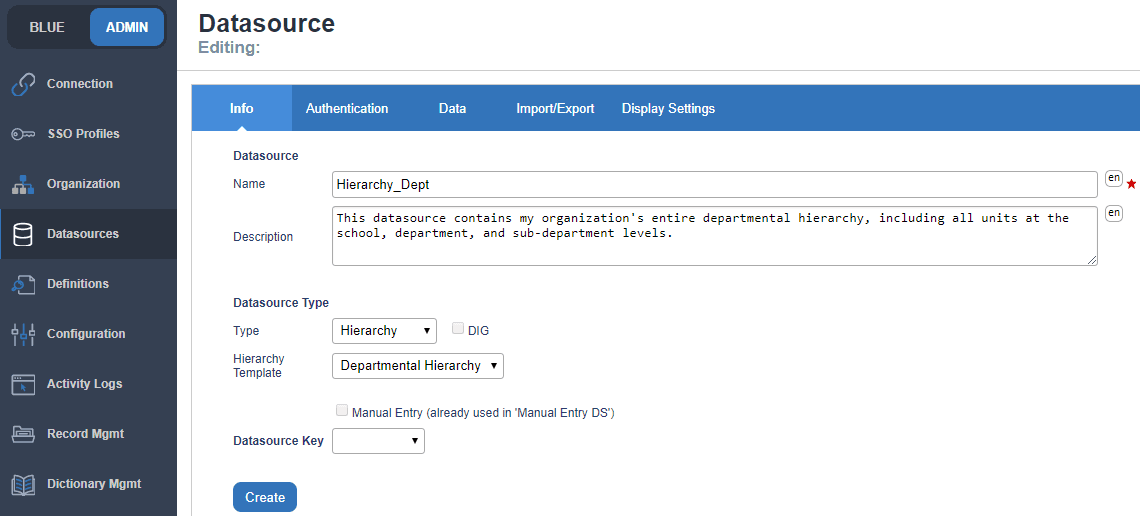
- Click Create to add a hierarchy datasource.
- Configure the data blocks** in DATASOURCE - DATA.
- In DATASOURCE - IMPORT/EXPORT, specify the Organizational Unit ID the Organizational Unit (the caption), and the Parent ID. These are required fields for the hierarchy datasource. If there are other fields present in the file, they will be ignored.
- Finalize the import.
The hierarchy datasource may fail to import for several reasons:
- Organizational Unit IDs are not unique.
- The number of levels detected in the file exceeds the number of levels defined for the hierarchy template.
- The Parent ID is either missing or invalid, meaning it does not correspond to any Organizational Unit ID.
- Set a schedule as needed in Datasource - Import/Export - Schedule.
- Rename hierarchy levels in Datasource - Display Settings.
When creating the column headers and adding data to user, hierarchy or relationship datasources in Blue, DIG, and DRA, ensure that your data does not contain any special characters such as symbols, accents, or punctuation marks. These characters can cause your datasource to react in ways that it was not designed to and cause errors.
Setup a relationship datasource
- Navigate to Datasources
- Click Add Datasource
- Provide a Name (required) and Description (optional)
- Select Relationship from the Type drop-downmenu
- Click Create to add the relationship datasource.
- Configure the data blocks in Data.
- In Import / Export, specify in the Datasources section which hierarchy datasource to use as the Source and which users datasource to use as the Target:
When setting up the relationship datasource, two fields must be configured when importing the data block.
- Source - must be the hierarchy datasource
- Target - must be the users datasource
- In Import / Export, specify in the System Fields section which is the organizational unit ID in the hierarchy datasource (Source ID); specify which is the User ID in the users datasource (Target ID) and which is the role column in the users datasource (Organizational Role ID). Finalize the import.
- Set a schedule as needed in Import / Export - Schedule.
- In Display Settings, you may rename the levels of the hierarchy if needed.
Stage 2 - Set up organizational links and create organizational groups
Set up organizational links
This section enables you to apply your hierarchy and organizational relationships to your project based on your responses to the following questions:
- What columns in your project data represent the different levels of your hierarchy?
- What groups should you create based on the organizational roles you defined?
Once the project is configured, your reports will be ready to leverage the new organizational groups you have created, and these will update automatically based on changes you make to the relationship datasource.
In Organizational Links, you will map the data of your project with the levels of your hierarchy. This allows your projects to fully integrate with the hierarchy and relationships datasources you created.
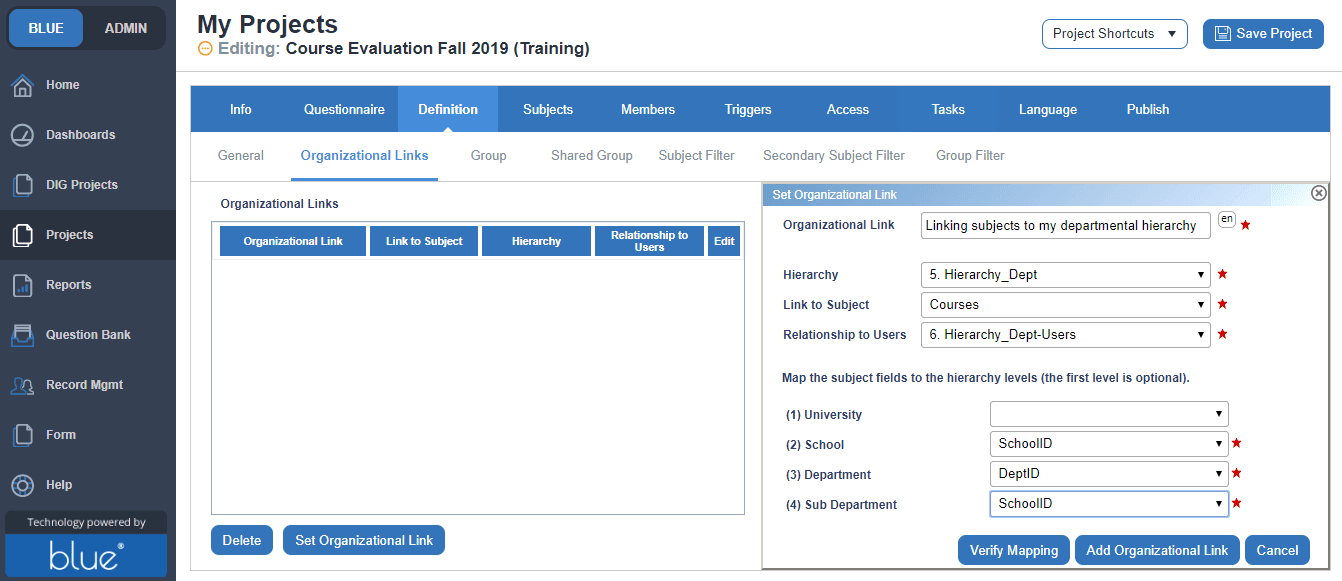
- Go to: Projects > Select Project (Edit mode) > Definitions > Organizational Links
- Click Set Organizational Link to add a new link and enter a name for this link (e.g., ‘Linking subjects to my departmental hierarchy’, or ‘Linking subjects to my campuses hierarchy’).
- Select the datasource that contains the hierarchy datasource you would like to map to the project’s data.
- Select whether to map the hierarchy to the primary subjects (e.g., courses) or secondary subjects (e.g., instructors).
- Select the hierarchy-to-leadership relationship datasource to apply to this project.
- You are now able to map the columns in your project’s data with each level of the hierarchy. All but the root level must be mapped.
If you don’t map a column to the root level (level 1), all subjects in your project will be mapped to the hierarchy. This is most often the desired effect, so it is generally recommended to leave the root column mapping blank unless there are certain subjects you wish to exempt from the mapping entirely. If however you do select a column to map to the root level, only the subjects that share the same name in that column as the root will be considered. For example, if you called your root level ‘University A’, this is the expected value in the root column; subjects without ‘University A’ (e.g., University B, or blank) will not be mapped.
 7. Once the tasks above are completed, you may Verify Mapping. Verification helps you identify any issues between your hierarchy and relationships and the data in your project. This can help you troubleshoot issues with certain users who are not receiving access to their expected reports. Keep in mind that the mapping will only look at current and active (non-deleted) data within your project and not data that may be added at a later time, which is likely to occur if your project is live.
8. Click Add Organizational Link to add your link to the project. You may repeat these steps for additional organizational links for this project.
9. Save your project to apply the changes.
Create organizational groups
Create the groups that will be used in your reports. Create groups that are one-to-one with the roles you created (Deans group = Deans role only), or you may combine several roles together (College Level group = both Deans Associate Deans roles).
- Go to Project - Definitions - Group.
- Click Add Group.
- Enter a Group Name that will be easy to distinguish in reports.
- Select whether the group will be linked to the primary (courses) or secondary (teachers) subjects.
- Select the Organization Link Type. This link type is only available if you have an Organizational Link (created in the previous section) based on the primary or secondary subjects you chose to link this group to.
- Under Organization, select the Organizational Link you set up in the previous section.
- Select at which level of your organization you would like this group to be linked.
- Select which Organizational Roles should apply to this group.
- Select the Report Viewing Privilege. If this option is not selected, the members of this group will not be given report access.
- Save your project to apply the changes.
Repeat these steps for each group you wish to connect to your project’s reports.
Only Organizational Roles found at the designated level will apply. For example, if you select a Sub Department level and an Associate Provost role, but there is no Associate Provost role at that level, no users will be found for this group.
Stage 3 - Connect groups to reports and filter report viewers
Connect organizational groups to reports
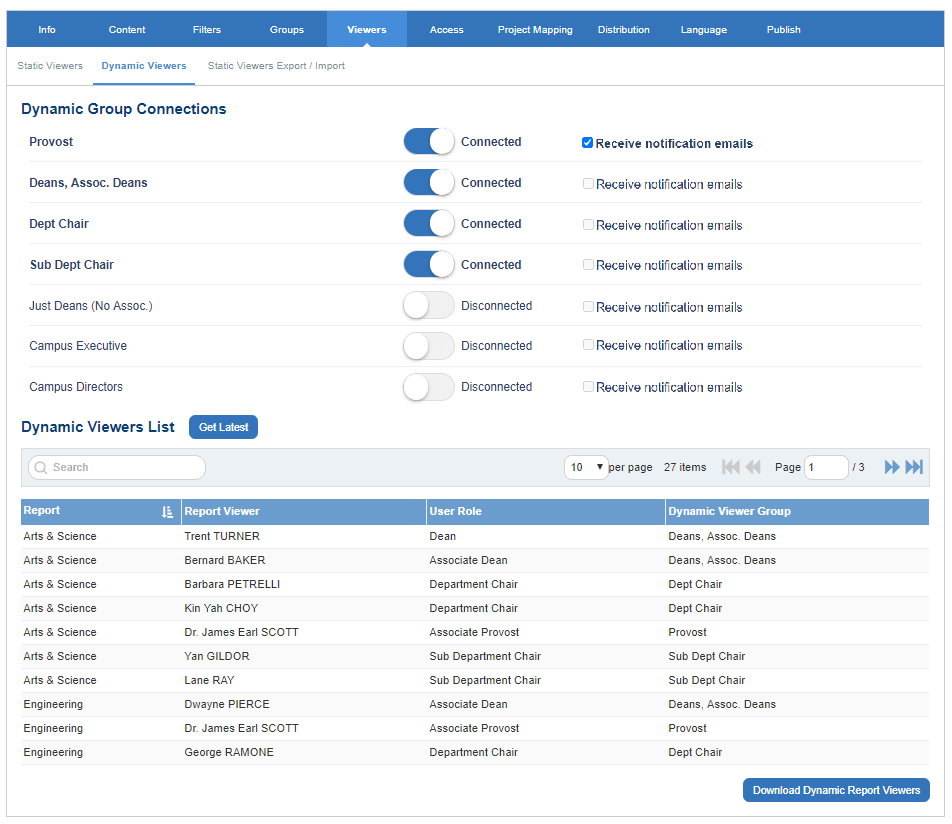
Now that your organizational groups have been created, they will be available to activate (“connect”) in a special section of your report called Dynamic Viewers. Here you will see a listing of all the organizational groups you have configured for the project associated with this report. Connecting these groups to the report ensures that your reports assign the respective academic leaders to their reports. It also updates their access nightly with changes you may make to your organizational structure (i.e., by modifying either the hierarchy or hierarchy-to-leadership relationship datasource).
- Navigate to Reports.
- Edit a report.
- Navigate to Viewers - Dynamic viewers.
- Toggle on the organizational groups you want this report to connect to (e.g., select only Dept Chairs for departmental reports).
- Check the Receive notification emails option for this Dynamic Group so that all users will receive an email when a report is ready for review.
- Click Get Latest to see a preview of which child reports your dynamic report viewers are associated with. In case the same report viewer appears multiple times, you will also see their Organizational Role and the Group they belong to. You may also filter the list based on the viewer’s name, role or report title.
- Click Save Report to apply these connections.
- If your report is not yet published, the dynamic viewers will not have access to their dynamic reports until the report has been published.
- If your report is already published and active (not expired), the dynamic viewers will have immediate access to their respective reports the moment you save the report.
Update your users nightly synchronization (2:00 AM):
Ensure your report is published and not expired. There are no other settings needed for the automatic update of Dynamic Viewers. Nightly syncs happen at 2:00 AM server time.
Filtering report viewer groups
In projects RV groups have a behavior that is different from all other types of groups. Users who are part of RV groups will be pulled in from the data sources instead of the project snapshot. It is important to note that filtering in the project will not affect the demographics of report viewers.
When to deactivate email notifications for certain Report Viewer groups
If a large number of reports become available for certain Report Viewer groups, consider not activating the Receive notification emails to prevent overloading their email inboxes. Instead, send them a manual email through Blue as needed or encourage them to regularly visit the Blue Home page to check for reports.
To send a manual email to a Report Viewer group:
- Go to Reports > Select report (Manage mode) > Report Management
- Select Report Viewer from the View filter dropdown list
- Select the dynamic group you wish to email from the Group filter dropdown list. This will filter the list to only the viewers you are interested in emailing. Note: You may also select Static Viewers separately as needed.
- Click the Email button to compose and send the email.
Because a dynamic group can oversee a large number of people, and because a common use of Dynamic Groups is to obtain historical data for a specific hierarchical position, there is the potential that hundreds if not thousands of emails be sent to report viewers on a regular basis.
Instead of activating the automated email notifications, they can be sent manually via the Report Management controls, or you can send notifications from outside Blue via your internal communication channels.
Making modifications
The following sections provide information on managing changes to your DRA solution:
Add, remove or edit someone in the hierarchy-to-leadership relationship datasource
Adding or removing a record in the relationship datasource will add or remove that person’s access across all connected reports. Editing a relationship record will remove their prior access rights and replace them with the new one. This will occur automatically at the Wakeup Time* to all active reports that have an organizational group connected to this relationship datasource. To apply changes immediately to a report after updating the datasource, simply open the report and click the Save Report button. You may click Get Latest to preview the changes before saving (recommended).
Remove the Report Viewing privilege from a group
For any Dynamic Group, you may temporarily remove the Report Viewing privilege (Project (Edit) > Definitions > Group (Edit) > Privileges section). This removes access to the reports to all members in this group to all reports connected to this group at the designated Wakeup Time*.
Add a new organizational unit to the hierarchy datasource
Adding a record to the hierarchy datasource will have no immediate effect. You will need to link users to this new organizational unit in the relationship datasource as well as ensure you have courses that have this unit as a reference in your project data.
Remove an organizational unit from the hierarchy datasource
Removing a record in the hierarchy datasource will remove access to this organizational unit at the Wakeup Time*. Records with this organizational unit in the hierarchy-to-leadership relationship datasource will be ignored. It is recommended to remove records with non-existent organizational units in the relationship data source as well to keep your data consistent. If removing an organizational unit that has child units, you will need to remove these or reassign them to another parent organizational unit to ensure your hierarchy remains complete.
Delete an Organizational Group
Deleting an Organizational Group from the project will remove access to reports associated with this group at the Wakeup Time (occurs once per day at 2:00 AM by default).
Delete an Organizational Link
Deleting an Organizational Link will also remove all Organizational Groups based on this Organizational link.
Make changes to my project’s stored data
Since DRA relies on your organizational structure working in tandem with your project’s stored data, updates will be applied accordingly. For instance, if you change your courses to point to a different organizational unit, this will modify the access for those who previously had access to data pertaining to those courses.
Special cases
Not all configurations are the same, and not everyone has the same starting point. Here we will examine some special cases.
How do I remove static viewers now that dynamic viewers are set up?
If you created reports prior to Blue 9, chances are your leadership was given static report access in older reports. Once you have added these viewers to the Dynamic Viewers list, you will need to remove them from the Static Viewers list.
Remember: Instructors should be in the static viewers list so that they always have access to their data, it is recommended to keep them as static report viewers so they can always access their respective personal reports, so make sure to keep their access intact when performing these steps.
Note: The following assumes that your reports are active, meaning they are not expired; otherwise, the reports will not be shared with anyone and, therefore, no action is required.
Method 1 - Remove only the leadership from static viewers (and keep the instructors)
- Go to Report - Info.
- Verify that the Update static viewers automatically (an option from Report- Info) is disabled. If it is checked, consider Method 2 (or simply disable it and follow these steps).
- Go to Report - Viewers - Static Viewers.
- Click Remove All, which will remove all static viewers, including instructors.
- Important: For instructor level reports, remember to reassign instructor access by selecting the group that contains your instructors from the Select Group dropdown and clicking Populate.
- Ensure that Stop Report is selected in Report - Distribution - Options Impact of Static Viewer Removal, otherwise the above changes will have no impact on who has access to the reports.
- Click Save Report to finalize.
- Repeat these steps for each applicable report.
Method 2 - Remove only the leadership from static viewers (and keep the instructors)
You may use this method if the Update static viewers automatically from project definition option is checked in your report.
- Go to Project (Edit) > Definition > Group.
- Locate all static groups that have the Report Viewing privilege (RV) and click Edit.
- Remove the report viewing privilege and click Apply.
- Repeat for each static group, except for your instructor groups (and others you wish to keep active for static report access).
- Click the Save Project button to finalize.
- Repeat for each applicable project.
At the Wakeup Time, the static viewers for these groups will be removed from the reports associated with this project. Remember: Ensure that the Update static viewers automatically from project definition option is indeed checked (otherwise use Method 1). Also ensure that the impact of Static Viewers is set to “Stop Report” in order to remove their access.
Verify that the right static viewers still have access
- Go to Report (Manage) > Filter by: View=Report Viewer
- Under the Group filter dropdown, select Static Viewers
In the same report, can I manage static and dynamic report viewer access at the same time?
Yes. The static report viewing method of linking users to their reports (through the UI or by populating project links) continues to apply. This remains the best way to link instructors to their respective reports permanently. There may also be cases where you may wish to leverage the static report viewing method for academic leaders. Keep in mind, if a user is linked through DRA and also as a static report viewer, in order to remove their access, you will need to remove them from both to fully delete their access.
My organizational structure has changed. How do I update old projects to match the current hierarchy?
If you created your projects prior to using DRA, chances are that your old projects don’t have all the references columns to the organizational units in your Hierarchy. The good news is you are able to edit or add these references at any time. The following can also apply if you need to make changes to your hierarchy and ensure that older project data reflects these changes.
How do I add missing columns to my stored data?
The most common activity on older projects will be adding missing columns and data. If your project is recent, your courses datasource may still have the courses (or instructor) records you need, so it is possible to simply synchronize them with your project. If so, you may consider Method 1. Alternatively, if your courses datasource no longer has the same courses (course IDs no longer match with the project data), you may add the columns directly to the project with Method 2.
Before starting create a backup
Since you will be modifying project data, ensure you keep a backup for your records. This applies to both methods described below. Backup your data by following these steps:
- Go to Project (Manage) > Subject Management > Export / Import Subject Details.
- From the Select Information Source dropdown, select your courses datasource and click Download CSV File. The file contains all your project’s course data and columns.
- Store the file in a safe location.
- If your project has a secondary subject (e.g., instructors), repeat steps 2 and 3 but select the secondary subject from the Select Information Source dropdown.
Method 1 – Add new columns directly in your project (Recommended)
This method covers most scenarios as it does not require that your stored project data matches your datasource:
- Go to Project (Manage) > Subject Management > Export / Import subject Details
- Select the courses datasource from the dropdown list and click Download CSV File. The file contains all your project’s course data and columns.
- Save a copy of the file for your records (recommended).
- Add the necessary columns, such as School, Department, and the values for each course.
- Save the file (keep it in its original CSV file format).
- Upload the file by clicking Choose File and Upload. Listed are all the fields in the CSV file.
- Select the fields you wish to import and the datatype for each.
- Click on Import, review the logs and the data, and then finalize if there are no issues.
Method 2 – Synchronize your Courses datasource
Important - Only use this method if your Courses datasource still has the matching courses in your project, otherwise use Method 1.
- Go to Project (Manage) > Field Management; under Available Fields, you will see fields that exist in your project that are not in your Project Fields.
- Click Add All to add missing fields to your project, and confirm.
- Under Project Fields, select the new fields you just added and click the Update Data button. This will copy the selected data from the datasource to the project. You may synchronize other fields as needed.
The columns have now been added to the project and are available to be used for Organizational links and for report analysis.
Do I need to save or unexpire my project to apply changes?
You do not need to save or un-expire a project to leverage the new data or changes for Dynamic Role Access. In some circumstances, you do not need to open your project in Edit mode at all. However, if you have added new columns, you will likely need to edit your project and update your Organizational Link to map these new columns to your hierarchy and then create the organizational groups you need. Unexpiring your project is never necessary for these functions—and it may not be advisable to unexpire your project if it is set to update its data automatically when it is live.
Can everyone linked to an organizational unit have full access to all reports in that unit?
If you don’t want to assign users to organizational units but want all users to have access to all of the reports, you will need to create at least one generic organizational role (e.g., “All Access Role”). For all relationships between academic leaders and their respective organizational units, simply include this generic organizational role in the Role column. You may apply the same role to all levels of your organization.
InSystem wide settings for projects and reports
InA to Z guides