Create end-of-term course evaluations
This guide will focus primarily on the project setup for end-of-term course evaluations, specifically where courses are team-taught, both the course and instructor will be evaluated, instructors will be able to add questions, and coordinators will be allowed to adjust the evaluation schedule and add questions as well. Once the course has ended, the feedback will be analyzed in reports shared with instructors and academic leaders (provosts, deans, and department chairs). In this case, end-of-term evaluations are often summative in nature. Alternatively, you can learn about creating mid-term evaluations which are often considered more formative.
End-of-term feedback can be used in the holistic feedback approach in higher education. For more information, see Holistic feedback approach: end-of-term, instructor peer & self, and midterm evaluations.
Midterm vs. end-of-term evaluations
Midterm Student Feedback
- Need: Help instructors gather feedback during the course so they can adjust teaching methods before the semester ends.
- Possible objectives: Improve teaching effectiveness; improve student attitudes toward the course and subject matter.
- Delegated timing: Instructors control when the assessment is run.
- Questionnaire details: 3 – 5 questions; instructor questions only; allows question personalization; uses a question bank.
- Main users of responses: Instructors.
- Nature of assessment: Formative—ongoing, informal, aimed at improvement and gap-finding.
End-of-Term Course Evaluation
- Need: Help universities gauge instructor performance, course-material relevance, and overall student experience.
- Possible objectives:
- Let students reflect on progress and make better learning decisions.
- Enable universities to rate instructor abilities and refine future curricula.
- Provide input for promotion or tenure.
- Delegated timing: Coordinators decide when the evaluation runs.
- Questionnaire details: 10 – 15 questions; covers institutional, course, and instructor items; allows personalization; question bank; cascaded format.
- Main users of responses: Provost office, deans, department chairs, instructors.
- Nature of assessment: Summative—formal, end-of-course, measures outcomes against set criteria.
What We Are Building
An end-of-term evaluation that allows students to evaluate a course being taught by multiple instructors using a single questionnaire.
Our Choices
The following parameters will be applied throughout this guide:
- Evaluations for team-taught courses: Instructors teaching the same class/section will be evaluated by their respective students on the same questionnaire as the course.
- Core questions: Each evaluation will include predefined core questions at the institutional, school, or departmental level.
- Question personalization for coordinators and instructors: Coordinators and instructors can add or select questions. Coordinator questions focus on course aspects, while instructor questions focus on their own teaching (e.g., approachability, knowledge of course material, student engagement).
- Delegated timing: Coordinators can adjust the timing of the evaluation.
- Shared reports: Reports are shared with academic leaders and instructors.
General Overview of Steps
- Add datasources – Include data for the courses being evaluated, the people involved in the feedback process, and their relationships.
- Create the Definition – Select the type of evaluation structure to use.
- Define groups and privileges – Create the groups participating in the evaluations and assign privileges.
- Create the project – Select the project's Definition, audience type, confidentiality level, and group update settings.
- Verify subjects and members – Ensure the correct subjects and group members are included.
- Build the questionnaire – Configure the mandatory survey and optionally allow coordinators and instructors to add or select validated questions.
- Configure tasks – Apply initial task settings.
- Schedule tasks – Set task and reminder schedules to collect feedback.
- Publish project – Set the overall evaluation schedule and publish the project.
- Create reports – Analyze feedback and generate summary reports.
Common Terms in End-of-Term Course Evaluations
These terms may vary by region or institution.
- Course evaluation: A student end-of-class summative survey. Also known as "student evaluation", "learning feedback", "student feedback", "paper evaluation", "module evaluation", or "teaching effectiveness survey".
- Instructor: Someone who teaches one or more courses. Also referred to as “professor”, “teacher”, or “lecturer”.
- Course: A unit of teaching typically lasting one academic term. Also called “class”, “module”, or “paper”.
- Program: A collection of related courses defining a degree focus. Also known as "module" or "field of study".
- Academic term: A portion of the year during which courses are held. Also referred to as “semester”, “trimester”, or “quarter”.
- Course coordinator: Oversees teaching quality and materials for one or more courses. Also called “course leader”, “module leader”, or “primary instructor”.
- Academic leader: Head of an academic department, faculty, or institution. Titles include "provost", "dean", "headmaster", "department chair", "director", "superintendent", etc.
- Organizational unit: A functional division within an institution (e.g., School of Arts & Science, Department of Dentistry, Sub Department of Civil Engineering).
- Hierarchy level: Organizational structure levels, such as University (Level 1) > School (Level 2) > Department (Level 3) > Sub Department (Level 4). These levels and names may vary by institution.
Step 1 – Add Datasources
The first step is to add datasources containing relevant information on courses, the people involved, and their relationships.
What You Need for Datasources:
- Courses (Object): Courses being evaluated
- Users (User): Students, instructors, coordinators, and academic leaders
- Course-Student (Relationship): How students are linked to courses
- Course-Instructor (Relationship): How instructors are linked to courses
- Course-Coordinator (Relationship): How coordinators are linked to courses
- Dept-Hierarchy (Hierarchy): How the departmental hierarchy is structured and links to courses
- Dept-Hierarchy-Users (Relationship): How academic leaders are linked to their respective organizational roles
To learn more about creating a hierarchy and assigning organizational roles, see Dynamic Role Access (DRA) power guide.
Example of Entity Relationship Diagram for datasources:

Step 2 - Create the Definition
The next step after adding datasources is to create the Definition.
What you need for the Definition:
| Definition settings | Values |
|---|---|
| Definition type | Multiple secondary subject pairing |
| Subject source | Courses |
| Secondary source | Users |
| Pairing source | Course-Instructor |
Step 3 - Define groups and privileges
As part of the Definition, you will also need to create the groups of individuals that will be participating in your end-of-term evaluations and assign them privileges.
- You may also apply a data filter as part of the Definition to select specific courses, students, or instructors if not all departments wish to participate in offering end-of-term evaluations.
- If you wish to give academic leaders access to the Response Rate Monitor to monitor aggregate response rates, see Setting up the Response Rate Monitor.
What you need for groups and privileges:
| Name | Link type | Privileges | Purpose |
|---|---|---|---|
| Students | Relationship datasource | Fillout (FO) | Students will be asked to fill out a questionnaire (FO). |
| Instructors | "Links to" | Question personalization (QP) Report viewing (RV) Subject view (SV) | Instructors will be asked to personalize the questionnaire at the instructor level (QP), view reports (RV), and view the real-time response rate for each of their evaluations (SV). |
| Coordinators* | Relationship datasource | Question personalization (QP) Subject management (SM) | Coordinators will be asked to personalize the questionnaire at the course level (QP) and manage the evaluation process (SM). |
| Provost office | Organization | Report viewing (RV) | Academic leaders will be invited to view reports (RV). |
| Deans | Organization | Report viewing (RV) | |
| Department chairs | Organization | Report viewing (RV) |
- Coordinators: Alternatively, if there is only one coordinator per course, then a "links to" link type can be used instead of a relationship datasource.
- The organization link type will not be listed until you have created organizational links. For more information, see Dynamic Role Access (DRA) power guide.
Step 4 - Create the project
The next step after defining groups is to create the feedback project.
What you need to create the project:
| Project settings | Values |
|---|---|
| Definition selected | End-of-term |
| Automatic update | Enabled for all groups |
| Project audience | Private |
| Confidentiality | Yes (recommended) |
| Project name | Multi course and instructor evaluation |
| Remove subjects and raters that have been deleted | Enabled |
Step 5 - Verify subjects and group members
Since Automatic Update was enabled for all subjects and groups when creating the project, Blue will automatically populate subjects and group members in the project.
Although this process is automated, it is crucial that you verify the right subjects and group members have been included in the project.
Get started by navigating to the MEMBERS - EXPORT/IMPORT tab and select export members to download a CSV file of all courses and associated group members in your project. For more information, see Export or import project members.
Example of exported data (courses and their paired group members):
| SubjectID | SubjectName | GroupCaption | MemberID | MemberName |
|---|---|---|---|---|
| 101815-8504-Summer | 101815 Cultures of Modern Canada | Instructors | afong | Annette Fong |
| 101815-8504-Summer | 101815 Cultures of Modern Canada | Students | 60535 | Casey Andrade |
| 101815-8504-Summer | 101815 Cultures of Modern Canada | Students | 70088 | Scott Abraham |
| 101848-9502-Summer | 101848 Modern Art | Instructors | bbaker | Bernard Baker |
| 101848-9502-Summer | 101848 Modern Art | Students | 90493 | Nicole Ackerman |
| 101848-9502-Summer | 101848 Modern Art | Students | 90294 | Kyle Berry |
| 202047-7051-Summer | 202047 Computer Aided Structural Analysis | Instructors | jscott | James Scott |
| 202047-7051-Summer | 202047 Computer Aided Structural Analysis | Students | 90682 | Nolan Aloisi |
| 202047-7051-Summer | 202047 Computer Aided Structural Analysis | Students | 80904 | Keyly Allen |
If you did not enable Automatic Update for groups and subjects, see Select members in a multi secondary pairing project for steps on how to manually add group members to the project.
Step 6 - Build the Questionnaire
After project creation, construct the questionnaire containing:
- Core questions (standardized)
- Personalized questions (from instructors/coordinators)
Reference: Build and manage a questionnaire
Questionnaire Components
| Section | Description | Resources |
|---|---|---|
| Core Questions | Standard questions linkable to: - Schools - Departments - Courses - Instructors - Instructor types | Guide |
| Question Personalization | Instructors can: - Create custom questions - Select questions Per course they teach | QP Task Guide |
Example Questionnaire: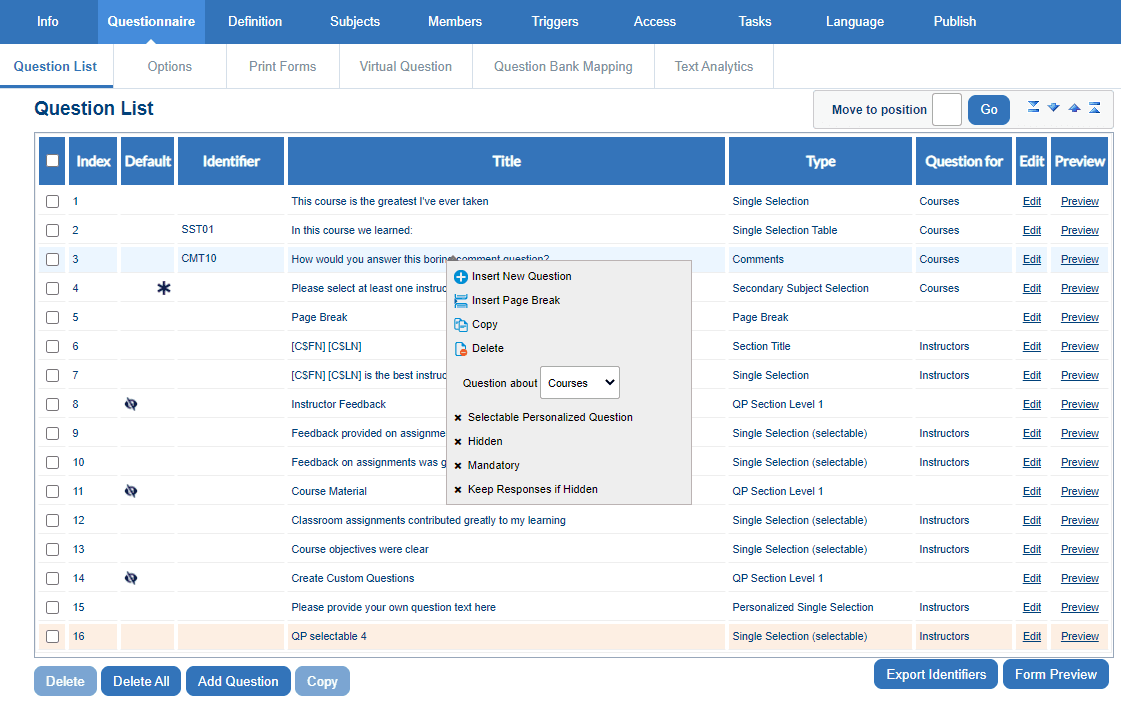
Step 7 - Configure Tasks
Set up task permissions for each user group:
Task Configuration Summary
| Task Type | Owners | Key Settings | Status |
|---|---|---|---|
| Subject Management | Coordinators | • Set subject participation • Control scheduling • Set start dates | Enabled ✅ |
| Question Personalization | Coordinators Instructors | • Modify after submission • View all questions • Copy from past projects • Question quotas (Min 1, Max 10) | Enabled |
| Fillout | Students | • Welcome page • Task list on thank-you page | Enabled ✅ |
Common Settings
- Authentication: Required for all tasks
- Owner Removal: Deletes task in all cases
- Require authentication: It is recommended to enable this option for all task types especially if participants in your organization use SSO.
- Impact of task owner removal: It is recommended to enable 'Delete task' for all task types.
Get started by navigating to the TASKS tab and enabling the subject management, question personalization, and fillout tasks. For each task, select configure to configure the settings.

Step 8 - Schedule tasks
After you have configured the tasks, the next step is to schedule when each task starts and ends.
Example of end-of-term evaluation schedule (your schedule may vary):
| Task type | Start date | End date | Reminders |
|---|---|---|---|
| Subject management | Earliest course start date | Latest course end date | 1-2 |
| Question personalization | Earliest course start date | 1 day before fillout task begins | 1-2 |
| Fillout | 3-5 weeks before course end date | 1-2 weeks before course end date | 3-5 |
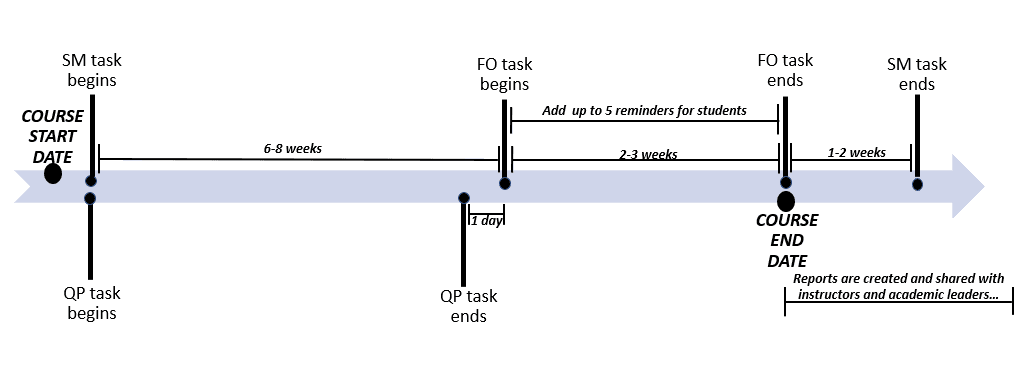
For steps on how to schedule tasks and reminders in your end-of-term project, see Configure project task schedules.
Step 9 - Publish project
The next step is to publish the project, which is essentially activating the tasks so that they can be completed by all the groups.
What you will need to publish the project:
| Publishing setting | Selected option |
|---|---|
| Verify that subjects and members are added | Export members shown in Step 5. |
| Project start date | Earliest course start date |
| Project end date | 2-3 weeks after the course end date |
Before publishing the project, verify that subjects and members have been automatically populated to the project if not already done in Step 5.
After verifying that the appropriate subjects and members have been added, navigate to the PUBLISH tab to start publishing the project. For more information, see Publish a project.
For future semesters, you can simply copy the end-of-term report created in this guide and change the dates according to your semester. To learn more, see Copy an existing report.
Step 10 - Create reports
The final step is to create reports which analyzes the student feedback collected from the project. For end-of-term evaluations, reports will be shared with instructors and academic leaders.
What you will need for reports:
Project setting: Project type selected
Value: End-of-term
Report setting: Report type
Value: Individual
Report setting: Distributed
Value: Enabled
Report setting: Breakdown by secondary subject
Value: Enabled
Report setting: Automatic update
Value: Enabled
For steps on how to create reports, see Create a new report and Add a response sheet type report block.
InGroup members in Blue