Create on demand 360 multi-rater assessments
This guide will focus primarily on the project setup for on demand 360 multi-rater assessments. A 360 multi-rater assessment is a process for gathering feedback about an employee from multiple perspectives of their organization. This feedback offers a well-rounded view of this individual's strengths and areas for improvement which can be used to create an effective learning and development plan.
Before consulting this document, it is recommended to know the fundamentals of setting up a standard 360 multi-rater assessment project. To learn more, see Create 360 multi-rater assessments.
In this guide, we have created a special scenario that is different from the standard 360 multi-rater assessment. Unlike the standard 360 review, on demand 360 reviews invite employees to set up their own 360 multi-rater assessments on a recurring basis. Each employee will have the option to participate in their 360 assessment and will be able to select the people evaluating them. If the employee decides to participate and launch their assessment, they may be able to adjust the schedule, select questions, monitor response rates in real-time, and download the results. Once the assessment has ended, the feedback will be analyzed in reports shared with employees, managers, department heads, and the CEO/President.
What we are building
A 360 multi-rater assessment that allows each employee to opt out to having themselves reviewed by people selected in the organization.
Our choices
The following parameters will be applied throughout this guide:
- Rater selection - Employees can select their peers, direct reports (if any), and optionally add other people outside of the organization, such as clients, to participate in their assessment. The employee and their manager will be preselected in the assessment.
- Quarterly assessment period - The assessment period will be quarterly (every 3 months), where the employee will decide whether they want to run a 360 review.
- One project required - Only one project is required to fully automate the process of running on demand 360 reviews with the least amount of maintenance.
- Employees choose to participate - Each employee can opt out to have themselves assessed for the review period. If they take no action, their assessments will automatically launch.
- Unsolicited feedback - Employees can opt in to review other employees in the organization. This will be classified as unsolicited feedback.
- Multi-level questionnaire - The questionnaire will be categorized into four sections: core company questions, department questions, leadership questions, and questions selected by the employee. Core company questions will be common for all reviews, while department, leadership, and employee selected questions will be specific to the employee under review.
- Delegated timing - Employees can adjust the timing of their assessment.
- Instant results - Employees can download anonymous responses the moment their assessment ends, in addition to reports.
- Distributed reports - Individual reports are shared with the employees while aggregate reports are shared with managers, department heads, and the CEO/President.
What is needed for setting up this type of evaluation project:
| Criteria | Values | Description |
|---|---|---|
| Definition type | Primary/secondary subject pairing | This allows employees to be evaluated for multiple periods within a single project. |
| Groups and privileges | Self (RS, QP, SM, FO, RV) Managers (FO, RV) Peers (FO) Direct Reports (FO) Others (FO) Unsolicited (FO) Department Heads(RV) CEO/President (RV) | Employees will be asked to select the raters who will evaluate them (RS), personalize the questionnaire (QP), manage the evaluation (SM), fill out the questionnaire (FO), and view reports (RV). Managers will be asked to fill out the questionnaire (FO) and view reports (RV). Peers, Direct Reports, Others, and Unsolicited will be asked to fill out the questionnaire (FO). Department Heads and the CEO/President will be granted access to view reports (RV). |
General overview of steps
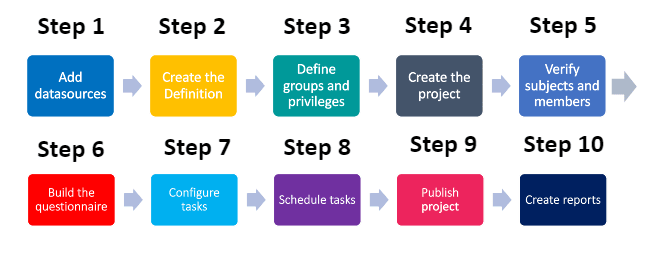
- Add datasources - Include the data for the assessment periods, the employees providing feedback, and their relationships to each other.
- Create the Definition - Select what type of evaluation structure to use.
- Define groups and privileges - Create the groups that will participate in the assessment and assign privileges to them.
- Create the project - Select the project's Definition, audience type , confidentiality level, and automatic update option for groups.
- Verify subjects and members - Check to see that the right subjects and group members have been automatically included in the project.
- Build the questionnaire - Create and configure the core company questions to your specifications, and allow employees to select from a list of validated questions.
- Configure tasks - Apply initial task settings.
- Schedule tasks - Set the schedule to collect the feedback.
- Publish project - Set an overall schedule for the feedback process and publish the project.
- Create reports - Analyze the feedback in reports to provide a summary and record of the review.
Step 1 - Add datasources
The first step is to add datasources containing relevant information on the quarterly assessment periods and employees that will be involved in the feedback process.
What you need for datasources:
| Datasource name | Datasource type | Contents | Sample CSV file |
|---|---|---|---|
| Quarters | Object | Quarterly assessment periods | Quarters.csv |
| Employees | User | Employees | Employees.csv |
| Quarters-Employees | Relationship | How employees are linked to the quarterly assessment periods | Quarters-Employees.csv |
| Manual-Entry | User (manual entry) | Supports the ability to manually enter people that are not part of the same organization (clients, suppliers, etc.) for the purpose of rater selection | 360-ManualEntry.csv |
| Org-Hierarchy | Hierarchy | How the organizational hierarchy is structured and links to employees | Org-Hierarchy.csv |
| Org-Hierarchy-Users | Relationship | How employees are linked to their respective organizational roles | Org-Hierarchy-Users.csv |
Step 2 - Create the Definition
The next step after adding datasources is to create the Definition.
What you need for the Definition:
| Definition settings | Values |
|---|---|
| Definition type | Primary/secondary subject pairing |
| Subject source | 360° feedback |
| Secondary source | Employees |
| Pairing source | Quarters-employees |
Step 3 - Define groups and privileges
As part of the Definition, you will also need to create the groups of individuals that will be participating in your 360 assessments and assign them privileges.
You may also apply a data filter as part of the Definition to select specific employees if not all departments wish to participate in offering on demand 360 evaluations.
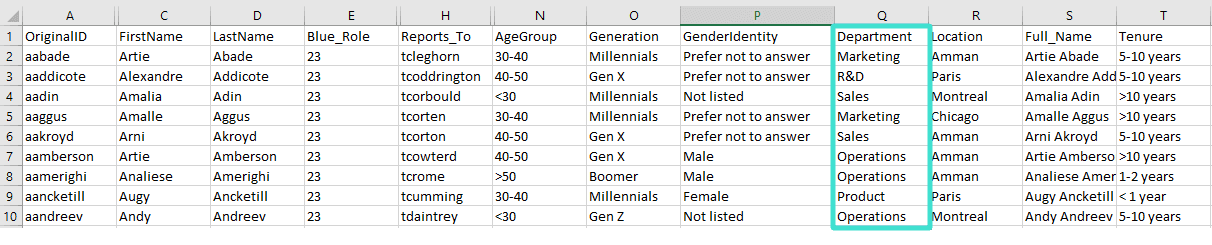
It may be useful to understand what the fields in your employee (user) datasource represent before defining groups and privileges for your 360 on demand project. For example, the Reports_To column represents which person an employee reports to, so we will be using that field to create the managers group.

What you need for groups and privileges:
| Name | Min # | Max # | Link type | Privileges | Description |
|---|---|---|---|---|---|
| Self | 1 | N/A | Links to | Rater selection (RS) Question personalization (QP) Fillout (FO) Report viewing (RV) Subject management (SM) | The employee that can rate themselves and judge their own aptitude. |
| Managers | N/A | N/A | Links to | Fillout (FO) Report viewing (RV) | The employee's manager that is automatically set based on the employee (user) datasource. |
| Peers | 3 | 8 | Manual selection | Fillout (FO) | Employees that work alongside the individual. |
| Direct Reports | 3 | 8 | Manual selection | Fillout (FO) | NOTE: Since not all employees manage people, not all individuals will have direct reports. |
| Others | 3 | 8 | Manual entry | Fillout (FO) | People that interact with the employee but are not part of the same organization (clients, suppliers, etc.). |
| Unsolicited | N/A | N/A | Manual selection | Fillout (FO) | Employees who volunteer to give additional feedback |
| Department Heads | N/A | N/A | Organization | Report viewing (RV) | Employees that lead each department in the organization. |
| CEO/President | N/A | N/A | Organization | Report viewing (RV) | The chief executive officer of the organization. |
The organization link type will not be listed until you have created organizational links. For more information, see Dynamic Role Access (DRA) power guide.
At the moment, the Hierarchy link type is only supported for the single subject traditional project setup.
Step 4 - Create the project
The next step after defining groups is to create the feedback project.
What you need for creating the project:
| Project settings | Values |
|---|---|
| Definition selected | 360 on demand definition created in Step 2 |
| Automatic update | Enabled for self, managers, and subjects (quarterly assessment periods) |
| Project audience | Private |
| Confidentiality | Yes (recommended) |
| Project name | 360 on demand |
| Remove subjects and raters that have been deleted | Enabled |
Since Automatic Update was enabled for all subjects and groups when creating the project, Blue will automatically populate subjects and group members in the project.
Although this process is automated, it is crucial that you verify the right subjects and group members have been included in the project.
Get started by navigating to the MEMBERS - EXPORT/IMPORT tab and select export members to download a CSV file of all subjects and associated group members in your project. For more information, see Export or import project members.
Example of exported data (quarterly assessment periods and their paired group members):
| SubjectID | SubjectName | GroupCaption | MemberID | MemberName |
|---|---|---|---|---|
| 2022-Q1 | 360 - Q1, 2022 | Self | aabade | Artie Abade |
| 2022-Q1 | 360 - Q1, 2022 | Peers | jschafer | Johna Schafer |
| 2022-Q1 | 360 - Q1, 2022 | Managers | tcleghorn | Tymon Cleghorn |
| 2022-Q2 | 360 - Q2, 2022 | Self | tipwell | Thorpe Ipwell |
| 2022-Q2 | 360 - Q2, 2022 | Direct Reports | estrank | Estella Strank |
| 2022-Q2 | 360 - Q2, 2022 | Unsolicited | blilly | Bobette Lilly |
| 2022-Q3 | 360 - Q3, 2022 | Self | jscott | James Scott |
| 2022-Q3 | 360 - Q3, 2022 | Others | nbrack | Nora Brack |
| 2022-Q3 | 360 - Q3, 2022 | Peers | rjuggins | Roxie Juggins |
If you did not enable Automatic Update for groups and subjects, see Select members in a subject pairing project for steps on how to manually add group members to the project.
Step 6 - Build the questionnaire
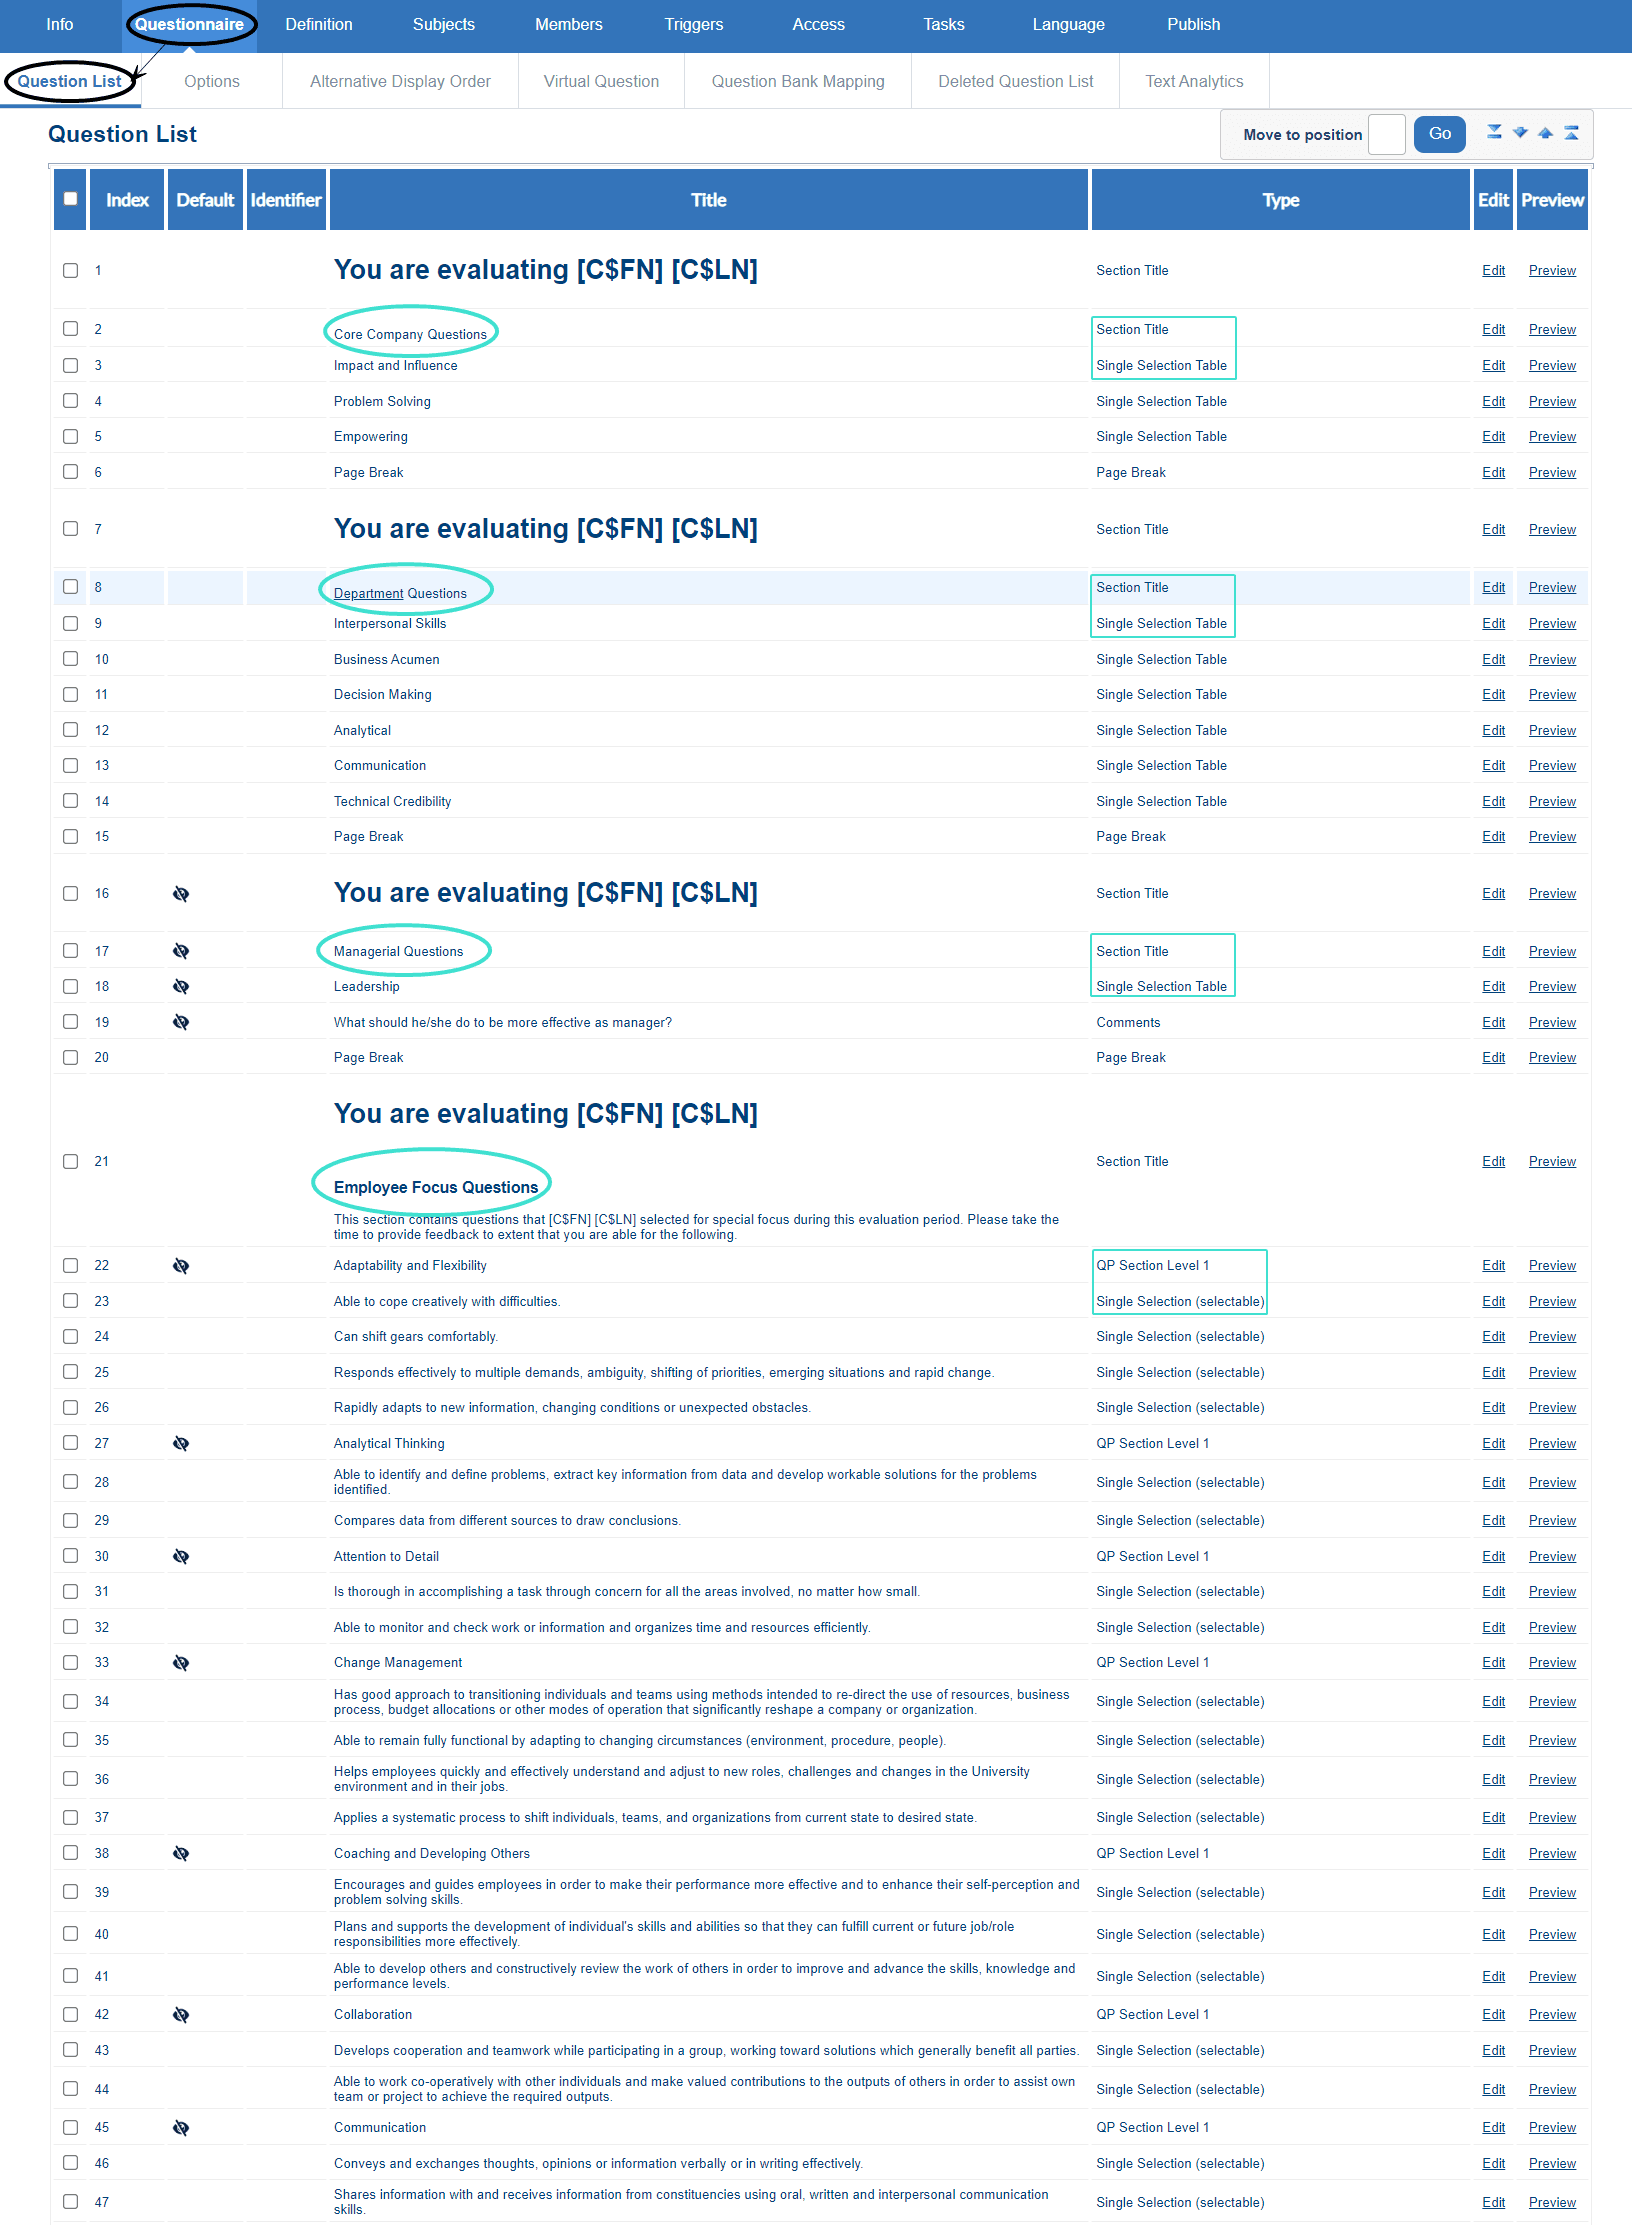
The next step after creating the project is to build the multi-level questionnaire. The questionnaire will be categorized into four sections: core company questions, department questions, leadership questions, and questions selected by the employee. To learn more, see Build and manage a questionnaire.
What you need to know about building the questionnaire:
| Sections | Question Type(s) | Description |
|---|---|---|
| Core company questions | Single selection table Section title | A list of preselected, centrally administered questions common to all 360 multi-rater assessments. |
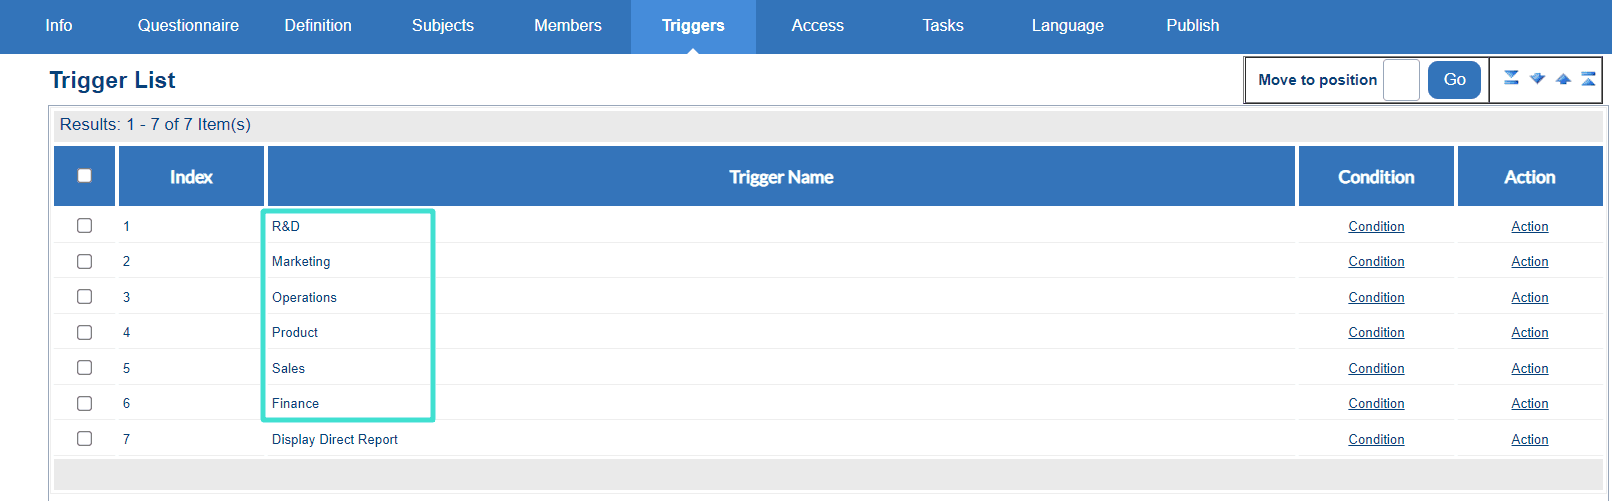
| Department questions | Single selection table Section title | Departmental triggers^1 |
| Leadership questions | Single selection table Section title | Questions that assess the employee's managerial/leadership skills specific to their team in the department. |
| Personalized questions | Single selection (selectable) QP section level | Employees can select from a list of validated questions. |
To learn more about personalized questions, see Create personalized questions.
Example of employees (user) datasource:
Example of departmental triggers:
Example of setting up a 360 on demand questionnaire:
Step 7 - Configure tasks
The next step is to configure the tasks associated with each privilege so that those tasks can be performed by the different groups.
What you will need to configure tasks:
| Task type | Task owner(s) | Configuration | Selected option |
|---|---|---|---|
| Rater selection (RS) | Self | Allow modifications after submitting Allow raters to be members of multiple groups Require authentication | Enabled Enabled Enabled |
| Subject management (SM) | Self | Allow task owner to set subject participation Default participation Allow task owner to set evaluation scheduling Allow task owner to set start date Require authentication Impact of task owner removal | Enabled Opt-in Enabled Enabled Enabled Delete task |
| Question personalization (QP) | Self | Allow modifications after submitting Show all questions in question personalization view Allow task owner to copy questions from a previous project Allow task owner to copy questions from a previous project Set min and max for optional and customizable questions quota Require authentication Impact of task owner removal | Enabled Enabled Enabled Min: 0 Max: 5 Enabled Delete task |
| Fillout (FO) | Self Managers Peers Direct Reports Others Unsolicited | Include welcome page Include task list ono thank you page Enable certificates Enable self-enrollment Allow user to opt out from the task list and questionnaire Impact of task owner removal | Enabled Enabled Enabled Enabled Enabled Enabled Delete task |
- Require authentication - It is recommended to enable this option for all task types especially if participants in your organization use SSO.
- Impact of task owner removal - It is generally recommended to enable 'Delete task' for all task type. This will automate the replacement or removal of users automatically synched with your HRIS, such as managers.
Get started by navigating to the TASKS tab and enabling the rater selection, subject management, question personalization, and fillout tasks. For each task, select configure to configure its settings.
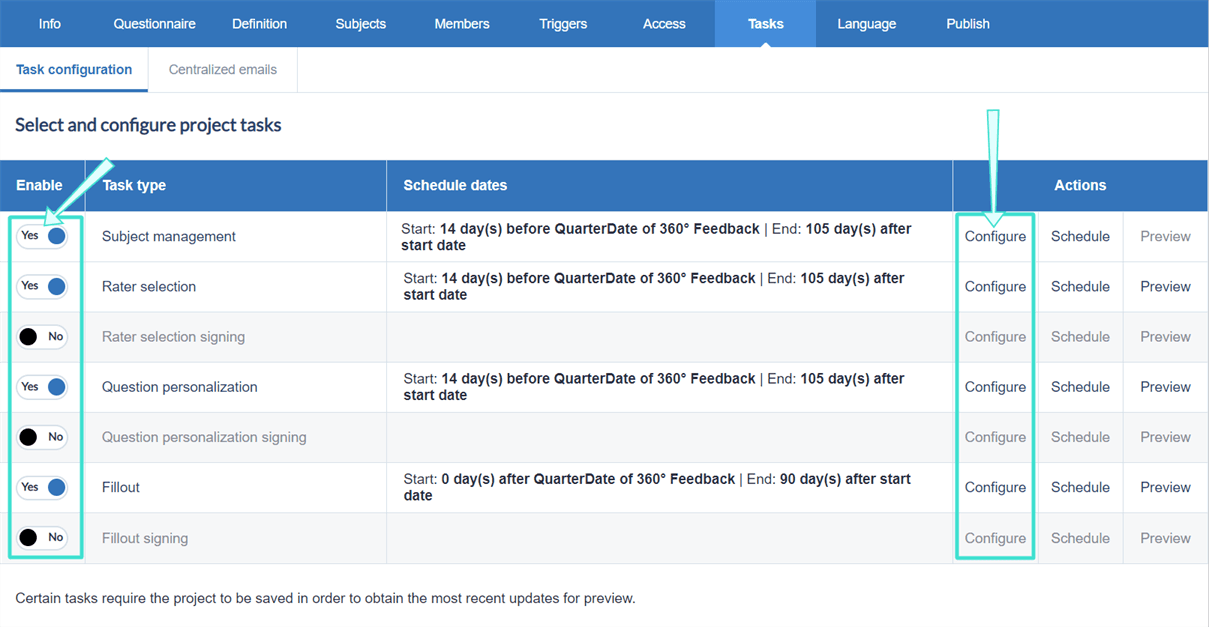
Step 8 - Schedule tasks
After you have configured the tasks, the next step is to schedule when each task starts and ends.
You may use the following schedule as a guideline:
| Task type | Start date | End date | Reminders |
|---|---|---|---|
| Rater selection (RS) Subject management (SM) Question personalization (QP) | 14 days before assessment start date | 105 days after start date | 1-2 |
| Fillout (FO) | Assessment start date | 90 days after start date | 1-2 |

For steps on how to schedule tasks in your 360 project, see Configure project task schedules.
Step 9 - Publish project
The next step is to publish the project, which is essentially activating the tasks so that they can be completed by all the groups.
What you will need to publish the project:
| Publishing setting | Selected option |
|---|---|
| Verify that subjects and members are added | Export members shown in Step 5. |
| Project start date | Before RS, SM, and QP tasks begin |
| Project end date | After RS, SM, and QP tasks end |
Before publishing the project, verify that subjects and members have been automatically populated to the project if not already done in Step 5.
After verifying that the appropriate subjects and members have been added, navigate to the PUBLISH tab to start publishing the project. For more information, see Publish a project.
Step 10 - Create reports
The final step is to create reports which analyzes the employee feedback collected from the project. For 360 on demand assessments, individual reports will be shared with employees, and aggregate reports will be shared with managers, department heads, and the CEO/President. For steps on how to create reports, see Create a new report
It is recommended to create the following reports:
- Employee report - This one is one per quarter leveraging the individual breakdown by secondary subject report.
- Employee report (cumulative) - This one is an aggregate of the employee based on Group By secondary subject.
- Department report - Aggregate based on Group By secondary subject department.
- Company report - Aggregate based on Group By secondary subject Company.
What you will need for individual reports:
| Report setting | Value(s) |
|---|---|
| Project type selected | On demand 360 project |
| Report type | Individual |
| Distributed | Enabled |
| Breakdown by secondary subject | Enabled |
| Automatic update | Enabled |
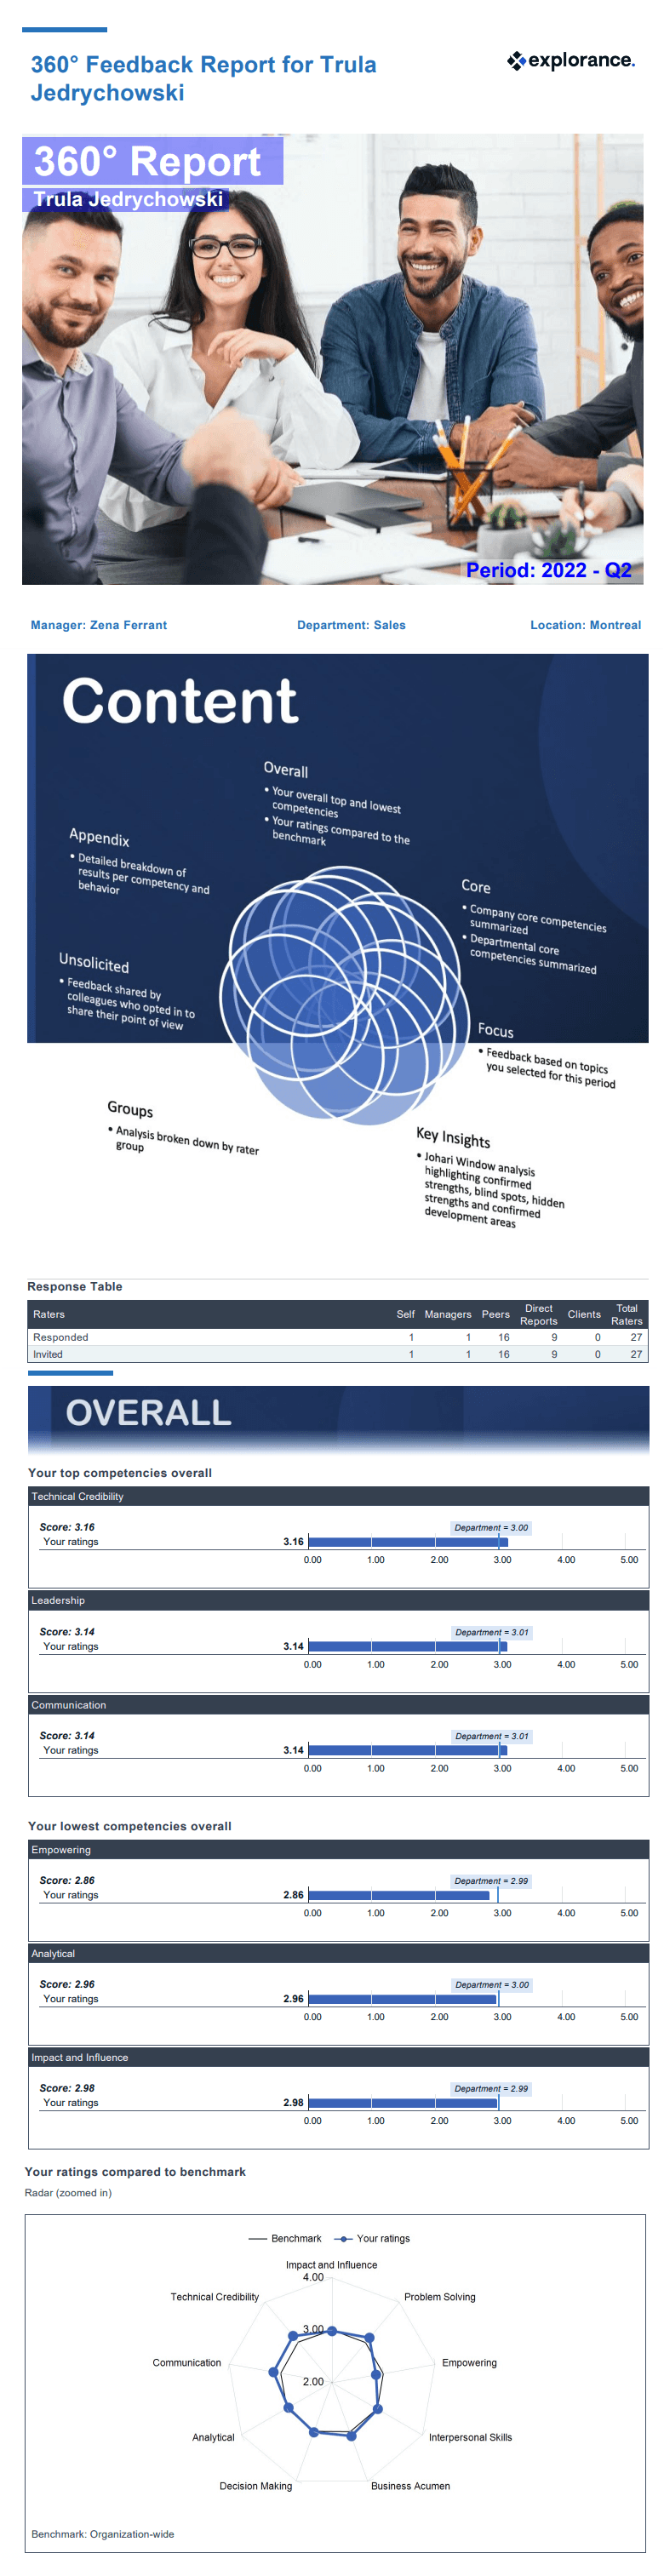
| Types of report blocks used | Response table Johari window Spreadsheet Score |
To learn more about report visualizations, see both Example chart report content in 360 multi-rater assessments and Example tabular report content in 360 multi-rater assessments.
Example of published individual employee report:
What you will need for aggregate reports:
| Report setting | Value(s) |
|---|---|
| Project type selected | On demand 360 project |
| Report type | Group by |
| Distributed | Enabled |
| Breakdown by secondary subject | Enabled |
| Automatic update | Enabled |
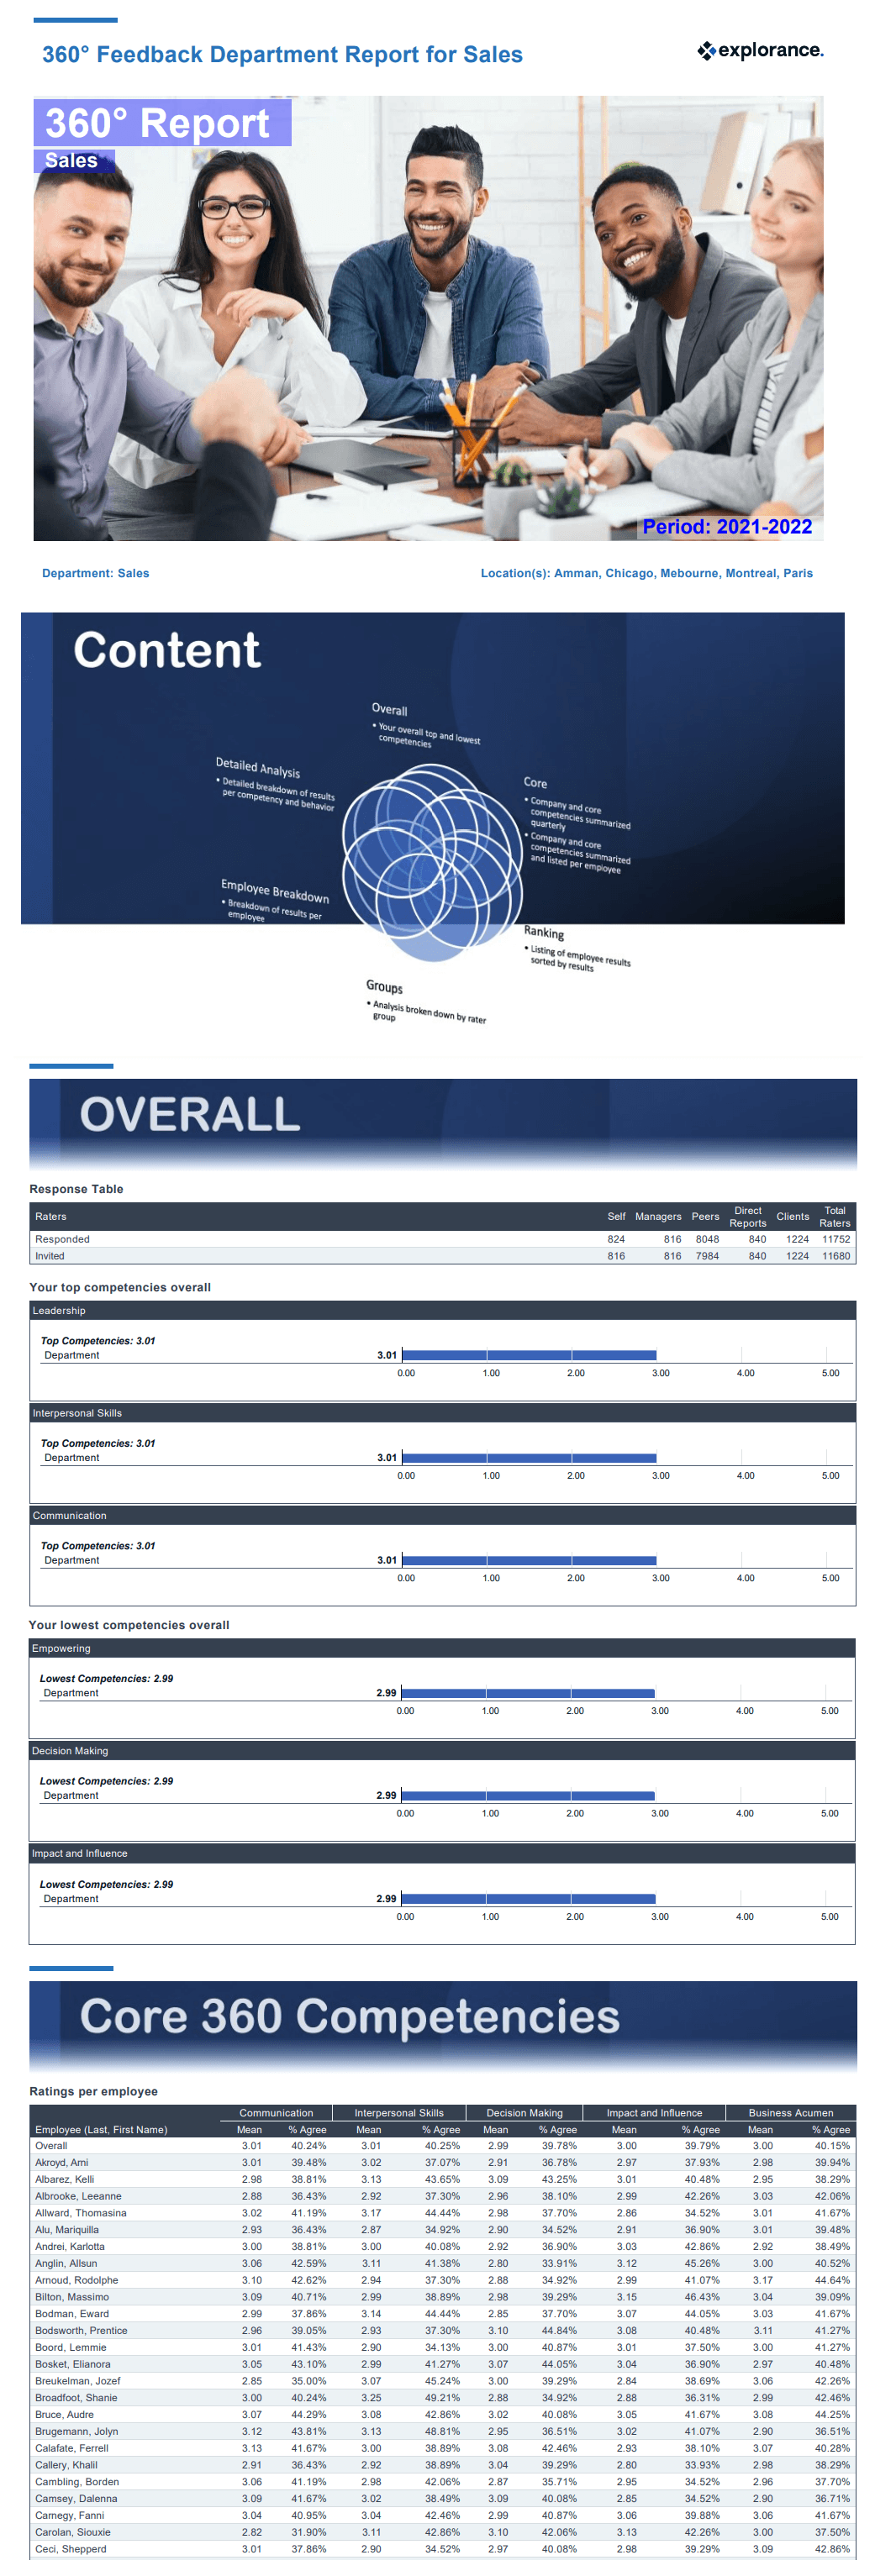
| Types of report blocks used | Response table Johari window Spreadsheet Score Summary |
Example of published departmental group by report:
Login for external groups - Manual Entry groups (for external raters, such as clients) cannot log in, therefore it is currently not recommended to use Require Authentication for the fillout task. If authentication is required for employees (e.g., to activate self-enrollment), consider collecting feedback from external participants in a separate project that does not require authentication.