Create employee experience touchpoint evaluations
This guide will focus primarily on the project setup for employee experience touchpoint evaluations, and is suitable for organizations of all sizes. An employee experience touchpoint can be defined as interactions or engagements an employee has with their employer throughout their tenure at the organization. These touchpoints can occur at various stages of the employee journey, from the initial recruitment process or job change/promotion, to exiting the company.
In this scenario, employees will evaluate their specific experience touchpoint and manager. Once the experience survey has been completed by employees, the feedback will be analyzed in reports shared with managers and executive leaders such as department heads, division heads, and the CEO/President. With the use of dashboards, we can see results across all touchpoints that support filtering, breakdowns, and thresholds for safe querying of all data.
What we are building
A process that allows an employee to evaluate their respective experience touchpoint and hiring manager throughout their employment at an organization.
Our choices
The following parameters will be applied throughout this guide:
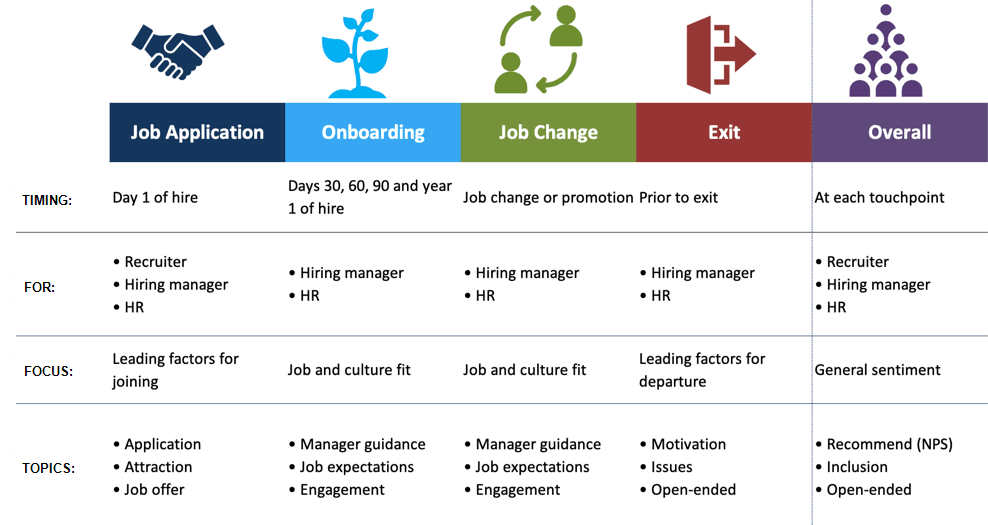
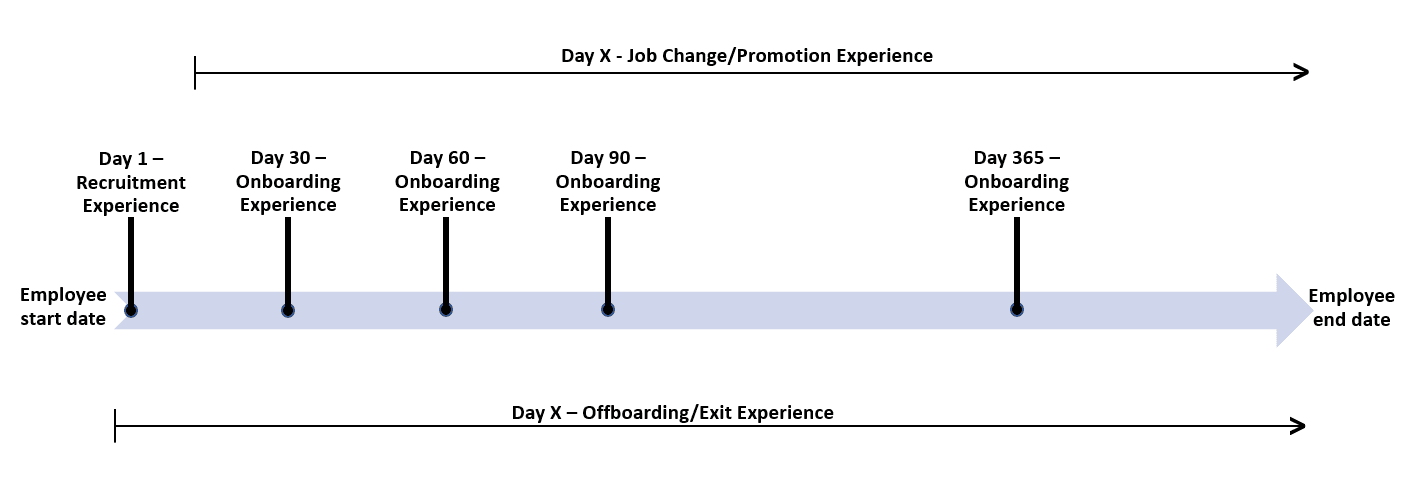
- Seven milestone touchpoints defined: For the purposes of this guide, we have chosen seven milestone touchpoints that an employee could typically experience throughout their tenure at an organization. You may add, remove or create new touchpoints according to your organization's needs. The touchpoints chosen for this scenario include the initial recruitment process, four onboarding experiences of the new hire (after day 30, day 60, day 90, and day 365), a job change experience, and the offboarding experience when exiting a company. You may add or remove touchpoints according to your organization's needs.
- Multiple projects: Multiple projects are used to launch employee experience surveys for each touchpoint.
- One questionnaire for each touchpoint: Each touchpoint will have a different questionnaire that could include questions about the organization, the facilitator, and specific departments.
- Report analysis: Reports are shared with managers and executive leaders such as department heads, division heads, and the CEO/President. For further analysis, the use of dashboards can allow you to explore data to make actionable insights.
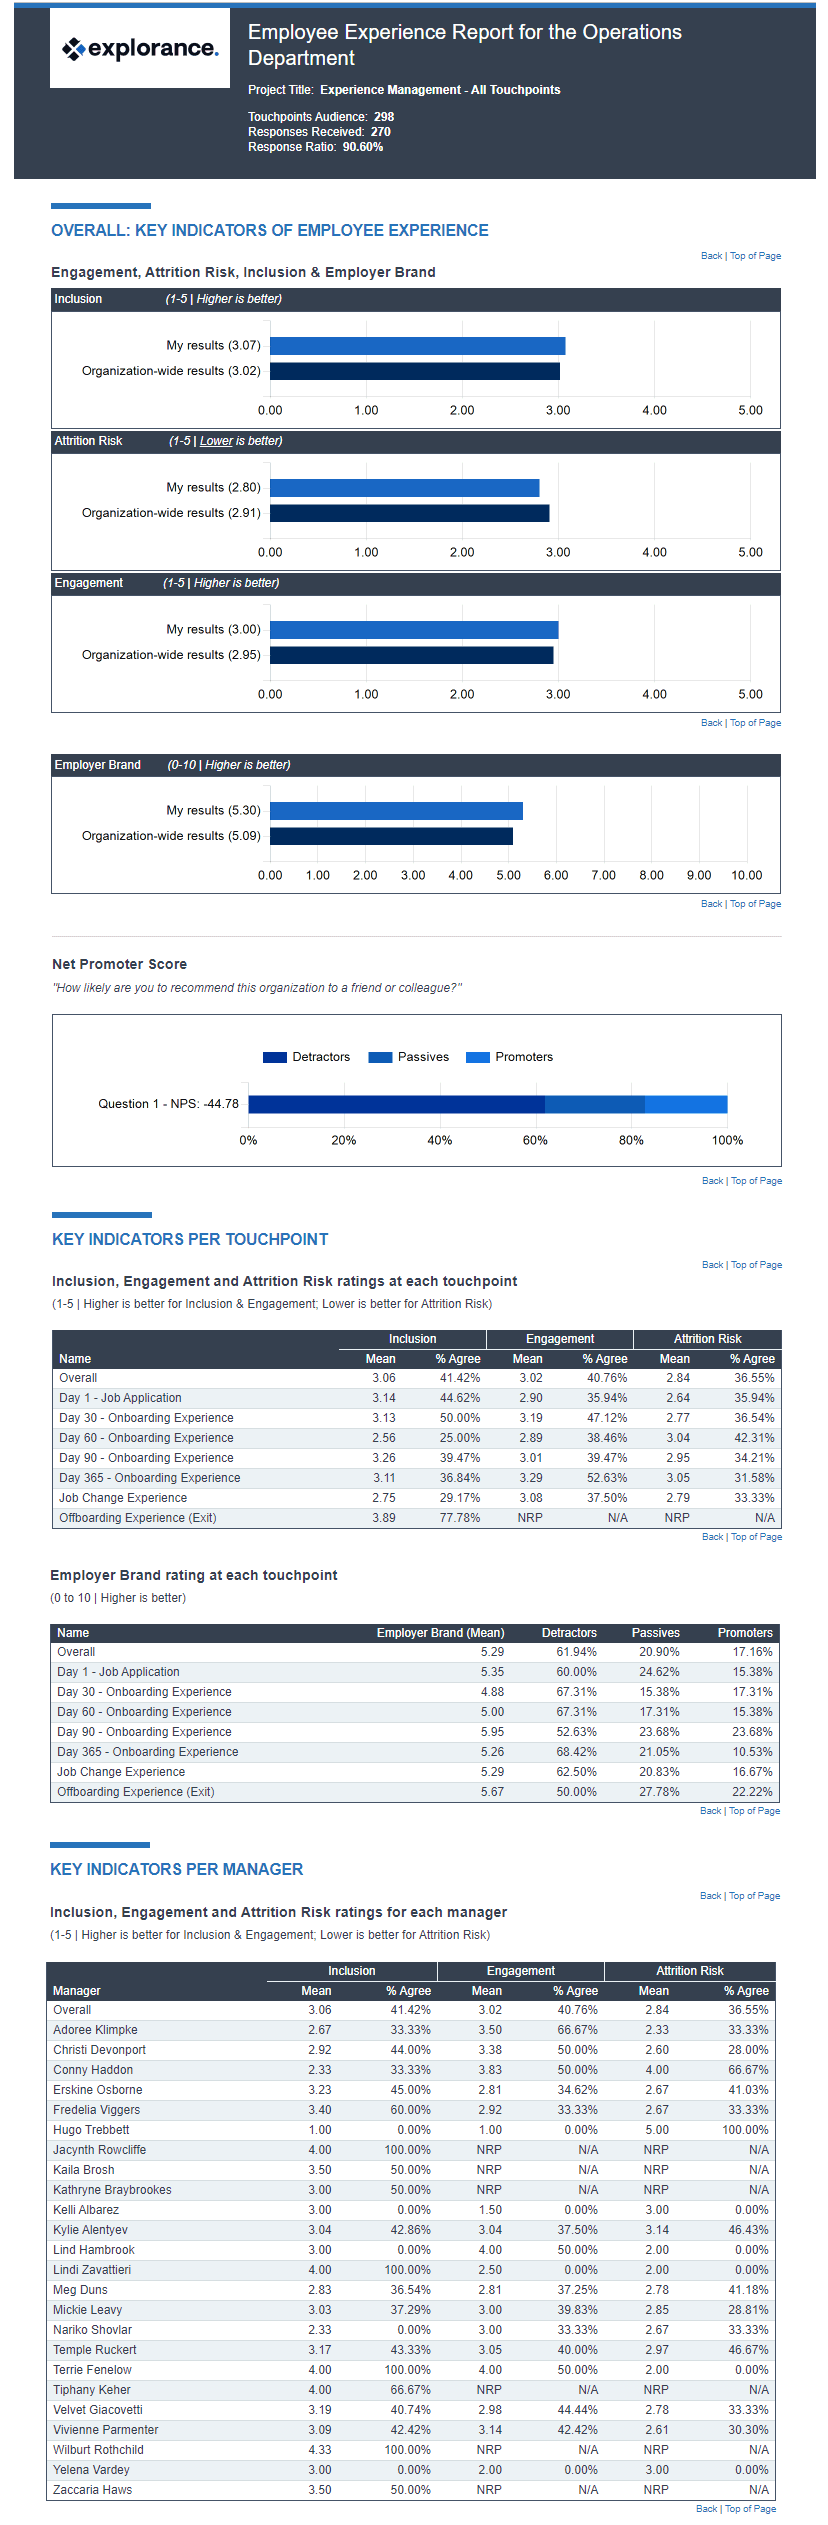
Example of employee experience touchpoint analysis
Could we create one single project with all experience touchpoints instead of multiple projects to achieve the same result?
Yes, instead of creating one project per experience touchpoint, you may create a single project that contains all experience touchpoints. However, this comes with different data requirements which may be more complex to build including a job position-touchpoint identifier for each touchpoint. Other considerations:
| Feature | Basic Approach - One project per touchpoint | Advanced Approach - Single project setup (all touchpoints) |
|---|---|---|
| Primary subjects are: | Job Positions | Touchpoints |
| Secondary subjects are: | Managers | Managers |
| SUPPORTS: | ||
| Reminders | YES | YES |
| Combined reports | NO¹ | YES |
| Combined dashboards | YES | YES |
| Time trend analysis in dashboards | YES | YES |
| PROJECT REQUIREMENTS: | ||
| Triggers (optional) | YES | YES |
| Subject filters (optional) | YES | YES |
| DATA MANAGEMENT: | ||
| Special relationship file with concatenated job position and touchpoint IDs needed | NO | YES |
| This Markdown will generate a well-formatted table when rendered. Let me know if you ne |
1 Can be achieved if you perform migration of all data into a separate project, however, this can be a tedious process and it is not recommended.
Can I use a question bank instead of triggers for both the basic and advanced approaches?
Yes, optimally for likert questions with a scale of 1-10. You can use a question bank for any question type except multiple selection and NPS. For more information on question banks, see Implementing question bank for course evaluations.
Can I display different questions for different departments for the same touchpoint?
Yes, questionnaires can be cascaded and customized by using a question bank or with triggers. For more information on question banks, see Implementing question bank for course evaluations, and for more information on triggers, see Create triggers.
What is needed for setting up this type of evaluation project:
| Criteria | Values | Description |
|---|---|---|
| Definition type | Multiple secondary subject pairing | * This allows employees to evaluate their specific employee experience touchpoint and manager on a single questionnaire. |
| Groups and privileges | Employees (FO) Managers (RV) Department Heads (RV) Division Heads (RV) CEO/President (RV) | * Employees will be asked to fill out the questionnaire (FO). * Managers will be granted access to view reports (RV). * Executive leaders such as the department heads, division heads, and the CEO/President will be granted access to view reports (RV). |
General overview of steps
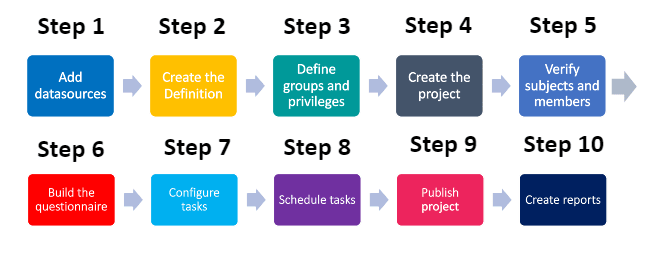
- Add datasources - Include the data for the department-specific job positions being evaluated, the defined employee experience touchpoints, the people involved in the feedback process, and their relationships to each other.
- Create the Definition - Select what type of evaluation structure to use.
- Define groups and privileges - Create the groups that will participate in the evaluation and assign privileges to them.
- Create the project - Select the project's Definition, audience type, confidentiality level, and automatic update option for groups.
- Verify subjects and members - Check to see that the right subjects and group members have been automatically included in the project.
- Build the questionnaire - Create and configure the employee experience touchpoint questions to your specifications.
- Configure tasks - Apply initial task settings.
- Schedule tasks - Set the schedule to collect the feedback.
- Publish project - Set an overall schedule for the feedback process and publish the project.
- Create reports - Analyze the feedback in reports to provide a summary and record of the review.
Common terms in employee experience touchpoint evaluations
Depending on your region, the terms used in your organization may vary. Common terms that are used in employee experience surveys:
Direct Report A direct report is an employee that reports directly to another person in an organization. Someone who has direct reports (typically a manager) is responsible for designating them with work and providing them with regular feedback.
Employee Experience Touchpoint Employee experience touchpoints are the numerous interactions and engagements that an employee has with their employer over the course of their employment. These touchpoints can occur at various stages of the employee journey, from the recruitment process to their exit from the company.
Executive Leader An executive leader refers to the head of an organization, division, or department. Specific terms used for executive leaders include "CEO/President", "Vice-President", "Division Head", "Department Head", "Director", etc.
Hierarchy Level An organizational structure is typically subdivided into levels for chain-of-command significance, such as Company (level 1) > Division (level 2) > Department (level 3) > Sub Department (level 4). These levels can vary in number and in nomenclature depending on the organization.
Organizational Unit An organizational unit is one of the many essential business functions that reside at a particular level of the organization (e.g., “Division” of Finance, “Department” of Accounting, “Sub Department” of Expenses, where each of these are org units within a division, department and sub department respectively).
Step 1 - Add datasources
The first step is to add datasources containing relevant information on the department-specific job position, experience touchpoints and employees that will be involved in the feedback process. We have included a sample CSV file for each datasource that closely mimics the data of a large organization performing employee experience touchpoint surveys.
You may download each datasource to use as a template for your organization's data and follow the remaining steps to build your experience touchpoint projects.
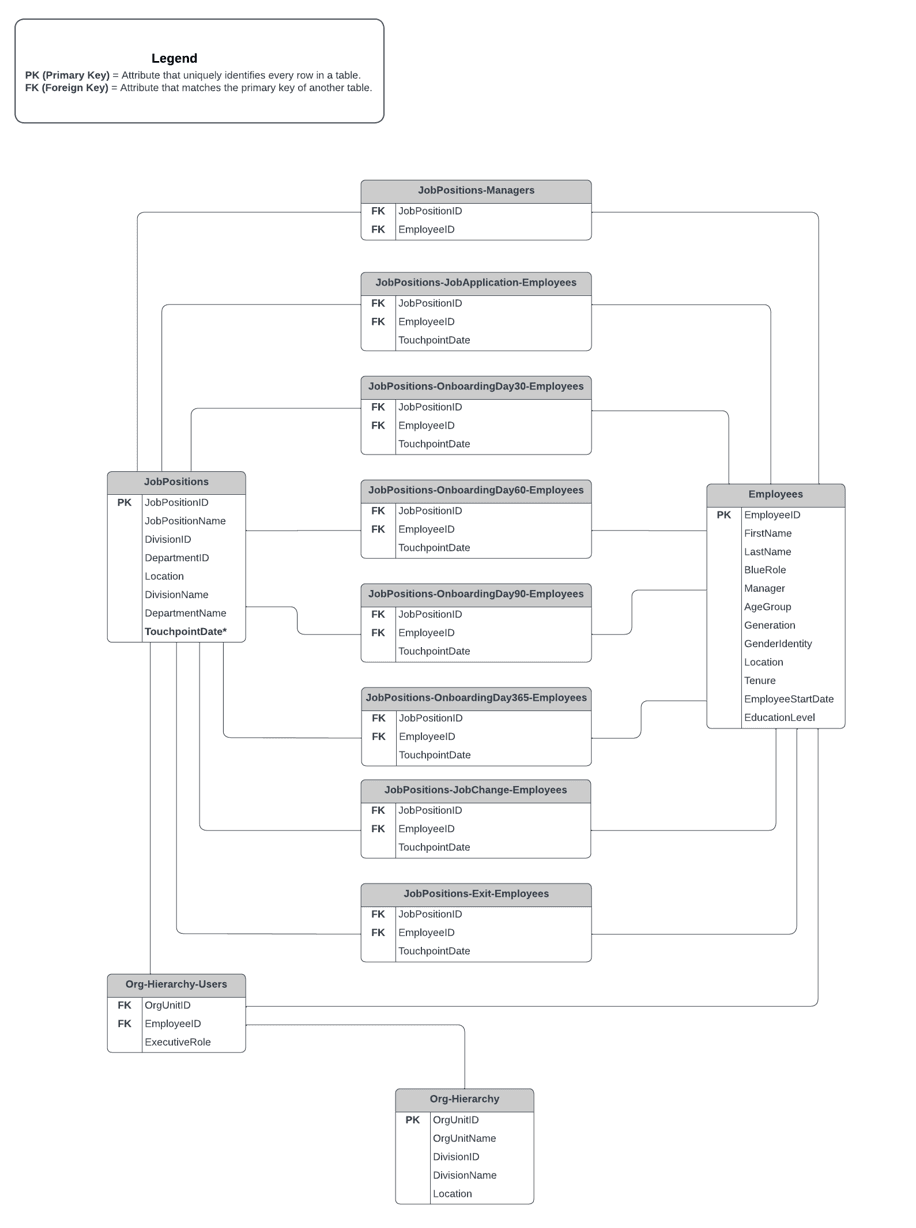
What you need for datasources:
| Datasource name | Datasource type | Contents | Sample CSV file |
|---|---|---|---|
| JobPositions | Object | Department-specific job positions in the company | JobPositions.csv |
| Employees | User | All employees in the company including managers and executive leaders | Employees.csv |
| JobPositions-Managers | Relationship | How managers are linked to department-specific job positions in the company | JobPositions-Managers.csv |
| JobPositions-JobApplication-Employees | Relationship | How new hires are linked to department-specific job positions in the company | JobPositions-JobApplication-Employees.csv |
| JobPositions-OnboardingDay30-Employees | Relationship | How onboarding employees after 30 days are linked to department-specific job positions in the company | JobPositions-OnboardingDay30-Employees.csv |
| JobPositions-OnboardingDay60-Employees | Relationship | How onboarding employees after 60 days are linked to department-specific job positions in the company | JobPositions-OnboardingDay30-Employees.csv |
| JobPositions-OnboardingDay90-Employees | Relationship | How onboarding employees after 90 days are linked to department-specific job positions in the company | JobPositions-OnboardingDay30-Employees.csv |
| JobPositions-OnboardingDay365-Employees | Relationship | How onboarding employees after 365 days are linked to department-specific job positions in the company | JobPositions-OnboardingDay30-Employees.csv |
| JobPositions-JobChange-Employees | Relationship | How employees that have changed jobs or received a promotion are linked to department-specific job positions in the company | JobPositions-JobChange-Employees.csv |
| JobPositions-Exit-Employees | Relationship | How offboarding employees are linked to department-specific job positions in the company | JobPositions-Exit-Employees.csv |
| Org-Hierarchy | Hierarchy | How the organizational units are structured and relate to each other | Org-Hierarchy.csv |
| Org-Hierarchy-Users | Relationship | How executive leaders are linked to their respective organizational roles and where those roles reside in the organization | Org-Hierarchy-Users.csv |
If you wish to use a single project setup, you may download the following sample CSV file of the object datasource where the unique identifiers for job positions are concatenated with specific touchpoints: AllTouchpoints-SingleProjectSetUp.csv-
** TouchpointDate*: This relational date field in the job positions datasource is not required but recommended.
Step 2 - Create the Definition
The next step after adding datasources is to create the Definition for each touchpoint.
What you need for the 7 Definitions:
| Definition settings | Values |
|---|---|
| Definition type | Multiple secondary subject pairing (same for all definitions) |
| Subject source | Job positions (same for all definitions) |
| Secondary source | Employees (same for all definitions) |
| Pairing source(s) | Definition 1: JobPositions-JobApplication-Employees Definition 2: JobPositions-OnboardingDay30-Employees Definition 3: JobPositions-OnboardingDay60-Employees Definition 4: JobPositions-OnboardingDay90-Employees Definition 5: JobPositions-OnboardingDay360-Employees Definition 6: JobPositions-JobChange-Employees Definition 7: JobPositions-Exit-Employees |
Why should I use the multiple secondary subject pairing Definition type for an employee experience project?
Using this Definition type will allow employees to evaluate their respective experience touchpoint and manager on a single form.
Step 3 - Define groups and privileges
As part of the Definitions, you will also need to create the groups of individuals that will be participating in your experience surveys, and assign them privileges.
What you need for groups and privileges:
| Group | Link type | Privileges | Description |
|---|---|---|---|
| Employees | Relationship datasource | Fillout (FO) | Employees will be asked to fill out a questionnaire (FO). |
| Managers | Relationship datasource | Report viewing (RV) | Managers will be invited to view reports (RV). |
| Department Heads | Organization | Report viewing (RV) | Executive leaders including department heads, division heads, and the CEO/President will be invited to view reports (RV). |
| Division Heads | Organization | Report viewing (RV) | |
| CEO/President | Organization | Report viewing (RV) |
The organization link type will not be listed until you have created organizational links. For more information, see Dynamic Role Access (DRA) power guide.
Step 4 - Create the project
The next step after defining groups is to create the feedback project for each touchpoint.
What you need for creating the project:
| Project settings | Values |
|---|---|
| Definitions selected | Experience touchpoint definitions created in Step 2: Definition 1: JobPositions-JobApplication-Employees Definition 2: JobPositions-OnboardingDay30-Employees Definition 3: JobPositions-OnboardingDay60-Employees Definition 4: JobPositions-OnboardingDay90-Employees Definition 5: JobPositions-OnboardingDay360-Employees Definition 6: JobPositions-JobChange-Employees Definition 7: JobPositions-Exit-Employees |
| Automatic update | Enabled for all groups |
| Project audience | Private |
| Confidentiality | Yes (recommended) |
| Project names | Evaluation of Employee Experience - Touchpoint X: Project 1: Evaluation of Employee Experience - Job Application Project 2: Evaluation of Employee Experience - Onboarding Day 30 Project 3: Evaluation of Employee Experience - Onboarding Day 60 Project 4: Evaluation of Employee Experience - Onboarding Day 90 Project 5: Evaluation of Employee Experience - Onboarding Day 360 Project 6: Evaluation of Employee Experience - Job Change Project 7: Evaluation of Employee Experience - Exit |
| Remove subjects and raters that have been deleted | Enabled |
Why should I choose a private audience with confidential responses?
By protecting the identity of respondents, participants may feel more comfortable providing honest feedback.
Since Automatic Update was enabled for all subjects and groups when creating the project, Blue will automatically populate subjects and group members in the project.
Although this process is automated, it is crucial that you verify the right subjects and group members have been included in the project.
Get started by navigating to the MEMBERS - EXPORT/IMPORT tab and select Export Members to download a CSV file of all subjects and associated group members in your project. For more information, see Export or import project members.
Example of exported data (employee experience touchpoints and their paired group members):
| SubjectID | SubjectName | GroupCaption | MemberID | MemberName |
|---|---|---|---|---|
| MKT-AMM-108-1108001-Onboarding-001 | Day 1 - Job Application for the Brand Designer position | Employees | astebbings | Andrej Stebbings |
| MKT-AMM-108-1108001-Onboarding-002 | Day 30 - Onboarding Experience for the Brand Designer position | Employees | astebbings | Andrej Stebbings |
| MKT-AMM-108-1108001-Onboarding-003 | Day 60 - Onboarding Experience for the Brand Designer position | Employees | astebbings | Andrej Stebbings |
| MKT-AMM-108-1108001-Onboarding-004 | Day 90 - Onboarding Experience for the Brand Designer position | Employees | astebbings | Andrej Stebbings |
| MKT-AMM-108-1108001-Onboarding-005 | Day 365 - Onboarding Experience for the Brand Designer position | Employees | astebbings | Andrej Stebbings |
| MKT-AMM-108-1108001-JobChange | Job Change Experience for the Brand Designer position | Employees | astebbings | Andrej Stebbings |
| MKT-AMM-108-1108001-Exit | Offboarding Experience for the Brand Designer position | Employees | astebbings | Andrej Stebbings |
| RD-MTL-432-1432001-Onboarding-001 | Day 1 - Job Application for the Data Analysis position | Employees | fcoda | Florie Coda |
| RD-MTL-432-1432001-Onboarding-002 | Day 30 - Onboarding Experience for the Data Analysis position | Employees | fcoda | Florie Coda |
| RD-MTL-432-1432001-Onboarding-003 | Day 60 - Onboarding Experience for the Data Analysis position | Employees | fcoda | Florie Coda |
| RD-MTL-432-1432001-Onboarding-004 | Day 90 - Onboarding Experience for the Data Analysis position | Employees | fcoda | Florie Coda |
| RD-MTL-432-1432001-Onboarding-005 | Day 365 - Onboarding Experience for the Data Analysis position | Employees | fcoda | Florie Coda |
| RD-MTL-432-1432001-Exit | Offboarding Experience for the Data Analysis position | Employees | fcoda | Florie Coda |
| RD-MTL-432-1432001-JobChange | Job Change Experience for the Data Analysis position | Employees | fcoda | Florie Coda |
If you did not enable Automatic Update for groups and subjects, see Select members in a subject pairing project for steps on how to manually add group members to the project.
Step 6 - Build the questionnaire
The next step after creating the project is to build the conditional questionnaire. To learn more, see Build and manage a questionnaire.
What you need to know about building the questionnaire:
| Sections | Question type(s) | Description |
|---|---|---|
| Core company questions | Single selection table Section title Section details | A list of preselected, centrally administered questions common to all experience surveys. |
| Departmental questions | Single selection table Section title Section details | Divisional triggers* |
| Facilitator questions | Single selection table Section details Section title NPS (scale distribution) Comments | Questions about the recruitment experience that include NPS questions and open-ended feedback. Questions about the recruitment experience that include NPS questions and open-ended feedback. |
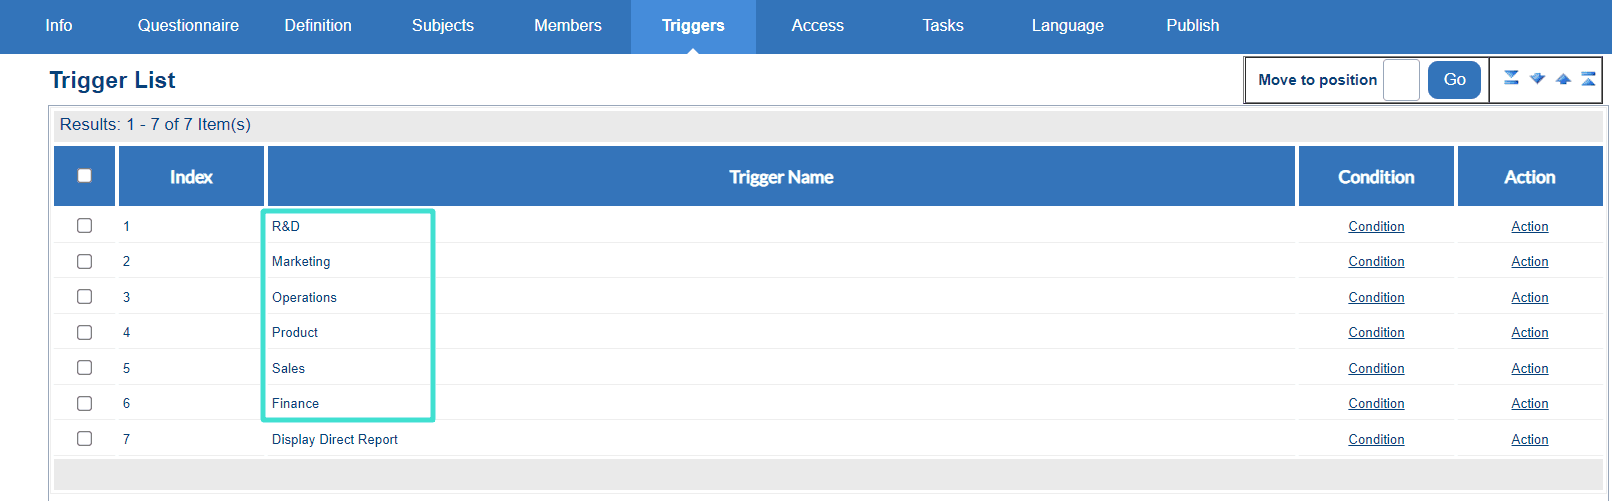
Divisional triggers: Question condition triggers are used to adjust the questionnaire dynamically based on employees belonging to different departments in the company. Departmental questions are based on divisional demographics in the object datasource. To learn more, see Create triggers.
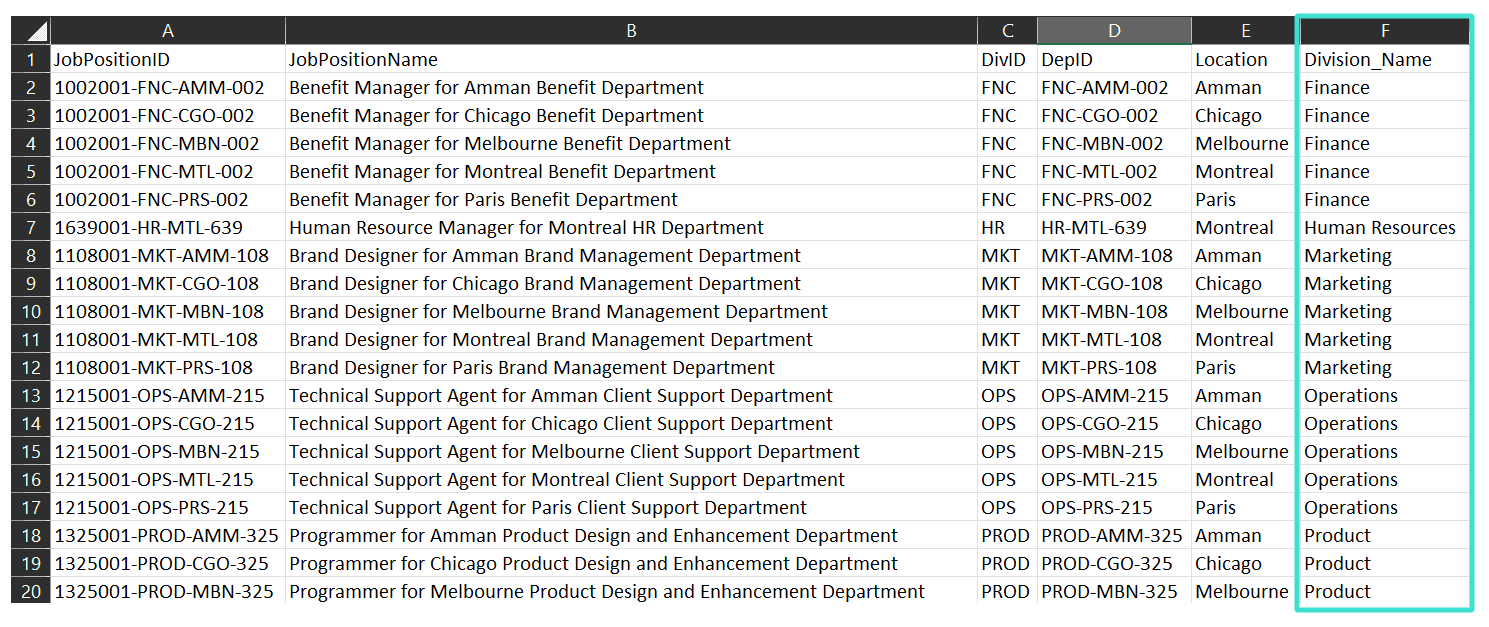
Example of object datasource:
Example of divisional triggers:
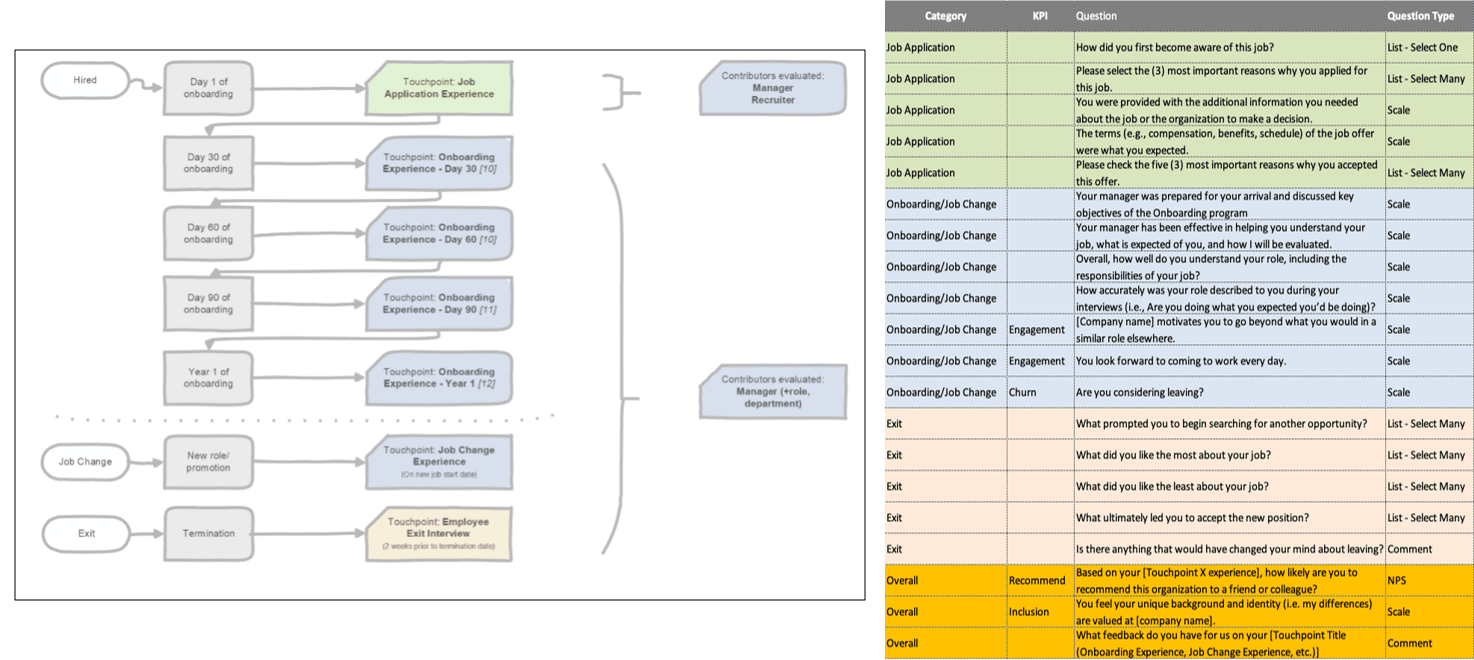
Example of setting up an employee experience touchpoint questionnaire:
Step 7 - Configure tasks
The next step is to configure the tasks associated with each privilege so that those tasks can be performed by the different groups.
What you will need to configure tasks:
| Task Type | Task Owner(s) | Configuration | Selected Option |
|---|---|---|---|
| Fillout (FO) | Employees | Include welcome page | Enabled |
| Include summary page | Enabled | ||
| Include task list on thank you page | Enabled | ||
| Enable certificates* | Enabled | ||
| Allow rater to modify their responses after submitting | Disabled | ||
| Require authentication* | Enabled | ||
| Impact of task owner removal | No effect |
Certificates can be used as a great tool in engagement and participation for you surveys. To learn more, see Designing a certificate.
Require authentication: It is recommended to set 'No effect' to this option for the fillout task.
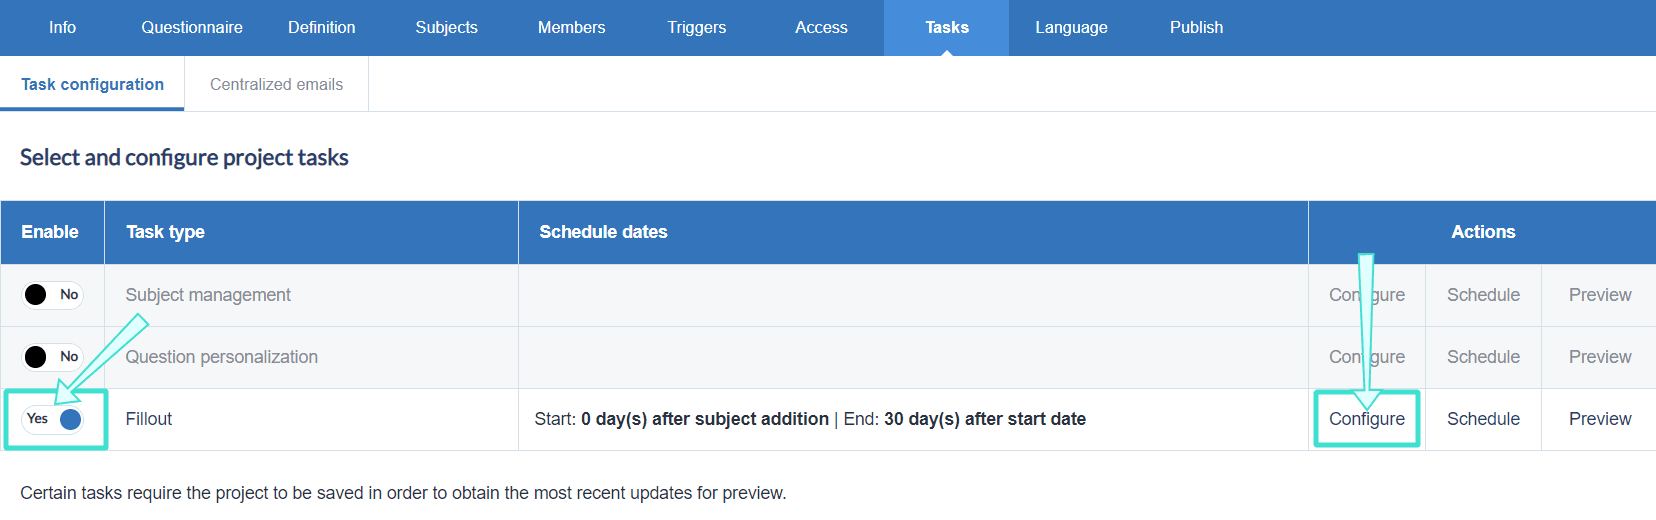
Get started by navigating to the TASKS tab and enabling the fillout tasks. Select Configure to configure its settings.
Step 8 - Schedule tasks
After you have configured the fillout task, the next step is to schedule when each employee experience touchpoint starts and ends.
You may use the following fillout schedules as a guideline:
| Fillout (FO) schedule type | Start date | End date | Reminders |
|---|---|---|---|
| Day 1 - Recruitment Experience | New employee hire date | 30 days after schedule start date | 1-2 |
| Day 30 - Onboarding Experience | 30 days after employee hire date | 30 days after schedule start date | 1-2 |
| Day 60 - Onboarding Experience | 60 days after employee hire date | 30 days after schedule start date | 1-2 |
| Day 90 - Onboarding Experience | 90 days after employee hire date | 30 days after schedule start date | 1-2 |
| Day 365 - Onboarding Experience | 365 days after employee hire date | 30 days after schedule start date | 1-2 |
| Day X - Job Change/Promotion Experience | Employee new position start date | 30 days after schedule start date | 1-2 |
| Day X - Offboarding/Exit Experience | Employee gives notice of resignation | 30 days after schedule start date | 1-2 |
For steps on how to schedule tasks and set reminders in your employee experience project, see Configure project task schedules.
Step 9 - Publish project
The next step is to publish the project, which is essentially activating the tasks so that they can be completed by all the groups.
What you will need to publish the project:
| Publishing setting | Selected option |
|---|---|
| Verify that subjects and members are added | Export members shown in Step 5. |
| Project start date | Before FO task begins |
| Project end date | Distant future (2-3 years) |
Before publishing the project, verify that subjects and members have been automatically populated to the project if not already done in Step 5.
After verifying that the appropriate subjects and members have been added, navigate to the PUBLISH tab to start publishing the project. For more information, see Publish a project.
Step 10 - Create reports
The final step is to create reports which analyze the employee feedback collected from the projects. For employee experience touchpoint surveys, aggregate reports will be shared with managers, department heads, and the CEO/President. For steps on how to create reports, see Create a new report.
It is recommended to create the following reports:
- Manager report: Aggregate based on Group By secondary subject manager.
- Departmental report: Aggregate based on Group By secondary subject department.
- Company report: Aggregate based on Group By secondary subject Company.
What you will need for aggregate reports:
| Report setting | Value(s) |
|---|---|
| Project type selected | Employee experience project |
| Report type | Group by |
| Distributed | Enabled |
| Breakdown by secondary subject | Enabled |
| Automatic update | Enabled |
| Types of report blocks used | - Response table - NPS (Scale distribution) - Spreadsheet Score - Summary - Comment |
To learn more about report visualizations, see both Example chart report content in 360 multi-rater assessments and Example tabular report content in 360 multi-rater assessments.