Create 360 multi-rater assessments
Introduction
A 360 multi-rater assessment (we will be referring to it as a 360 project throughout this document) is a process for gathering feedback about an individual from multiple perspectives. This type of assessment generally includes feedback from the individuals, their managers, and all or some of the following groups: direct reports, peers, clients, partners, senior leaders, and others. This feedback offers a well-rounded view of this individual's strengths and areas for improvement which can be used to create an effective learning and development plan.
To highlight Blue’s flexibility and the numerous features available to configure and manage a 360 project, we have created a sample scenario that introduces you to many of these features and provides links to more detailed information so that you can work with Explorance or on your own to run a 360 project.
Scenario
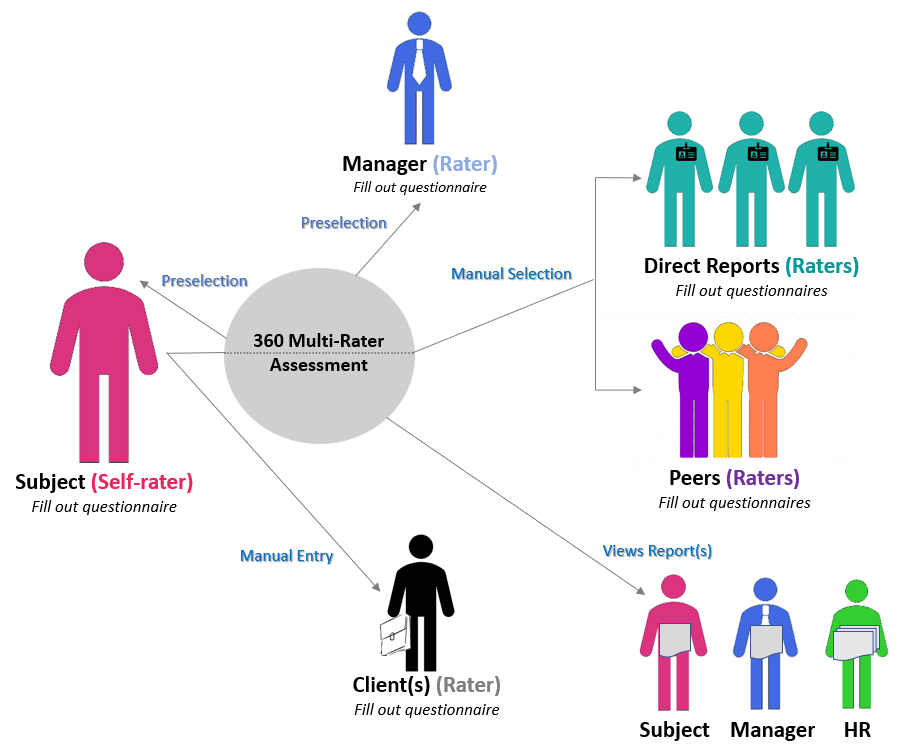
Our sample 360 project scenario includes individuals (referred to as subjects), their managers, direct reports, peers and clients. The subject of the assessment will self-rate, and be rated by members in each of the groups. We will show you managers being preselectedby the system, and then during a rater selection process, the subject can manually select 3-8 direct reports and peers from an organizational list, as well as add 3-10 clients by manually entering their names and email addresses. To prevent rater fatigue, Blue allows you to configure a rater quota for each rater which prevents raters from being selected too often.
Blue also allows you to select which individuals and/or groups will be designated as report viewers and when they will receive the reports. For purposes of this scenario, the subject and manager will each receive an individual report and HR will receive an aggregate, anonymous report detailing the results of the entire assessment. The reports will be distributed once the rating period has ended so that everyone receives their reports at the same time. Task distribution and start and end dates are flexible allowing you to set the parameters that suit your requirements. Finally, to foster an environment that truly promotes safe and constructive feedback within your process, minimum thresholds for responses can also be set allowing you to display results only if a specified rater group has collected a minimum number of responses for a given question. You can also combine several groups into a single virtual group when building reports to provide the response anonymity required to display the results.
The 360 multi-rater assessment can also be used for other projects, such as performance appraisals, competency evaluations, project team reviews, etc.
Steps to create a 360 multi-rater assessment
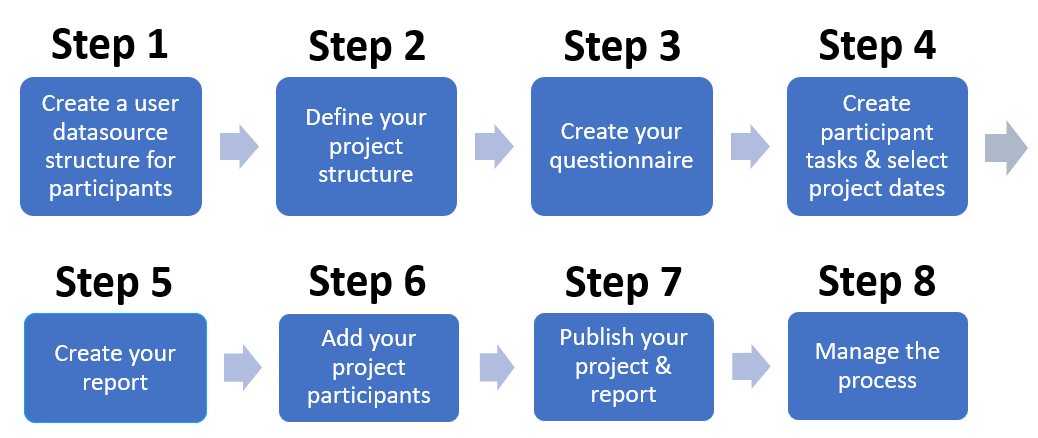
To help you visualize the various steps of this project, we have provided an illustration below. This example assumes that you are building your project from scratch.
For those clients who already have a 360 project in Blue, some of these initial steps may not be necessary.
Step 1 - Create a user datasource structure for participants
The participants of any Blue project are identified as users and stored in a user datasource. You can think of the datasource as a container for your data. A data block (file), which provides Blue with the user information needed to configure and run your project, is uploaded to your user datasource. To get started, create a list of participants in an Excel spreadsheet, the first row should contain field labels.
Required fields can have any label and can be in any order, but must include:
- User ID
- First name
- Last name
- Email address
- Blue role
This screenshot includes the required fields and several examples of optional fields you can include:
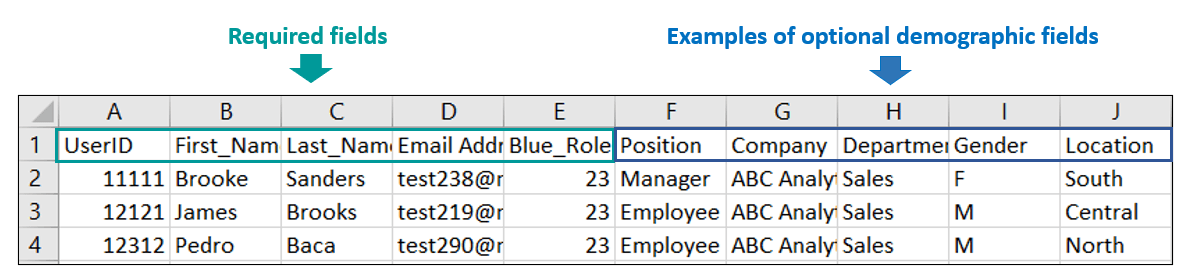
- The Blue role field is used to establish a users level of access to Blue. Enter 23 in this field to mark users as subjects.
- You can use your own naming conventions for the column or field names and then map or link your own field names to the required fields outlined when importing the data into Blue.
- There must only be a single record per person and User IDs must be unique across ALL of your Blue datasources.
- Consider what demographic data you will need to generate your reports; for example, if you want to show 360 feedback results by department, it is important that you include the department field in your datasource structure.
Learn more about How to set up a data block, import a data block, and add a user to an existing user datasource.
Step 2 - Define your project structure
The project definition establishes the project structure by determining:
- who is being rated (the subject),
- who is doing the rating (the raters),
- what does each group do (most fill out questionnaires, and a few view reports),
- what relationship do the raters have to the subject (manager, direct reports, peers, and clients),
- how are groups selected (preselection, manual selection, and manual entry).
The illustration below displays the relationships of the user groups that make up our sample 360 project structure:
Establish how raters are linked to the subject:
- Raters can be preselected when user groups are created using the link types:
- Link to - one to many
- Global
- Subjects can select raters from a predefined list using the link type manual selection
- Subjects can add their own raters (users who are not in the datasource) using the link type manual entry
The table below displays the various group options and how they could be set up for this project.
Group name: Subjects
- Raters: Yes (self-rater)
- Min #: 1
- Selection method: Preselection - Link to
- Privilege option(s): Rater selection; Fillout (questionnaire); Report viewing
- Enable for distributed selection: No
Group name: Managers
- Raters: Yes
- Selection method: Preselection - Link to
- Privilege option(s): Rater selection; Fillout (questionnaire); Report viewing
- Enable for distributed selection: No
Group name: Direct reports
- Raters: Yes
- Min #: 3
- Max #: 8
- Selection method: Manual Selection
- Privilege option(s): Fillout (questionnaire)
- Enable for distributed selection: Yes
Group name: Peers
- Raters: Yes
- Min #: 3
- Max #: 8
- Selection method: Manual Selection
- Privilege option(s): Fillout (questionnaire)
- Enable for distributed selection: Yes
Group name: Clients
- Raters: Yes
- Min #: 3
- Max #: 10
- Selection method: Manual Entry
- Privilege option(s): Fillout (questionnaire)
- Enable for distributed selection: Yes
Group name: HR
- Raters: No
- Selection method: Preselection - Global
- Privilege option(s): Report viewing
- Enable for distributed selection: No
What is the difference between using Hierarchy and Rater Selection in a 360 project ?
| Type | When typically used | Pro | Con |
|---|---|---|---|
| Hierarchy | Direct reports - 360; Manager for -180/360 | • Simplifies the subject experience in that they only need to take the assessment and not select their raters. • Enables you to pre-audit the information to ensure its accuracy and that it meets the requirements. • Simplifies the subject experience in that they only need to take the assessment and not select their raters.• Enables you to pre-audit the information to ensure its accuracy and that it meets the requirements. | • For complex organizations, can involve considerable upfront work to identify all raters and review them. |
| Rater selection | • Complex and larger rater networks. • Raters are unknown to management (e.g. when the subject needs to select customers or peers in other functions). | • Automates the rater selection process and manual effort by the organization. • Empowers subjects to select raters who can provide useful feedback. | • Process adds several weeks to the timeline particularly if manager approval of their employees’ rater networks is required. • Subjects may choose raters who will give them positive ratings. |
For more information on creating groups and privileges and setting up rater selection, consult the links below:
This 360 project can be copied to use for other projects. Simply modify the definition at the project level to edit the group member settings, questionnaire, reports, etc. according to your new project structure or use ”as is” to repeat a recurring assessment.
Step 3 - Create your questionnaire
A questionnaire is core to any survey or feedback process. Blue allows you to add different types of questions to gather quantitative and qualitative data.
Generally, use between 7-10 topic areas and 4-6 scalable and open-ended questions per topic area. The rater should be able to complete the assessment within about 10 minutes, otherwise response rates may be negatively affected.
Standard Question types
Blue offers the following standard question types:
For details on configuring and managing the questions that will be used in your 360 project questionnaire, learn more from the following help articles:
- Create and manage a questionnaire
- Add questions to a questionnaire
- Customize alternate question titles for raters
Dynamic Question Types
In addition to Blue’s standard question types, question triggers and question banks are available to add dynamic features to your questionnaire, such as:
Rater field trigger - Create a trigger condition based on information that is known about the rater. This allows you to customize the questionnaire based on specific rater attributes and demographics. (ex: only display certain questions to participants in a particular department)
Rater group trigger - Create a trigger condition based on which group the rater belongs to. (ex: select to display supervisor level questions to the “Manager” rater group and hide these questions for all other groups.
Question bank - Create placeholders in your questionnaire that pull questions from a question bank allowing the questionnaire to output a different question for each different rater group while maintaining the same structure.
To learn more:
Step 4 - Create participant tasks and select project dates
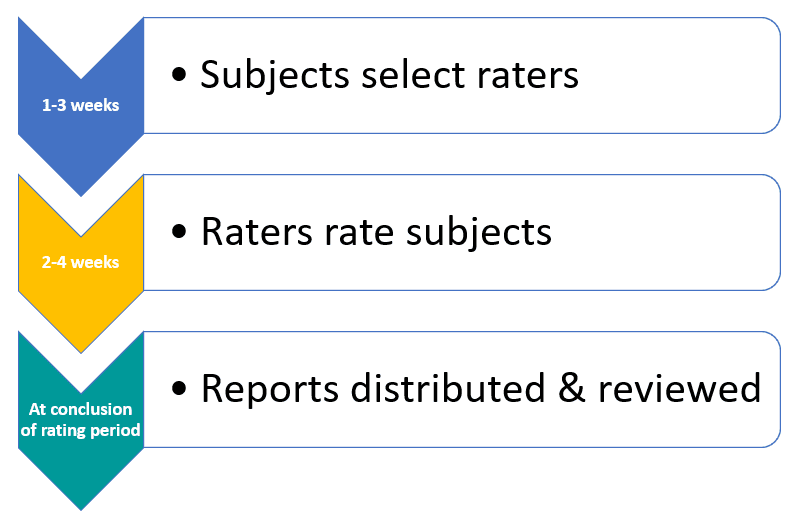
In our sample 360 project, we have included rater selection which will be completed before the questionnaires are emailed to the raters. The following is a typical time-line for this type of project:
Enable distribution of the questionnaire:
Repeat the steps above for the Fillout task and click on Save Project when complete.
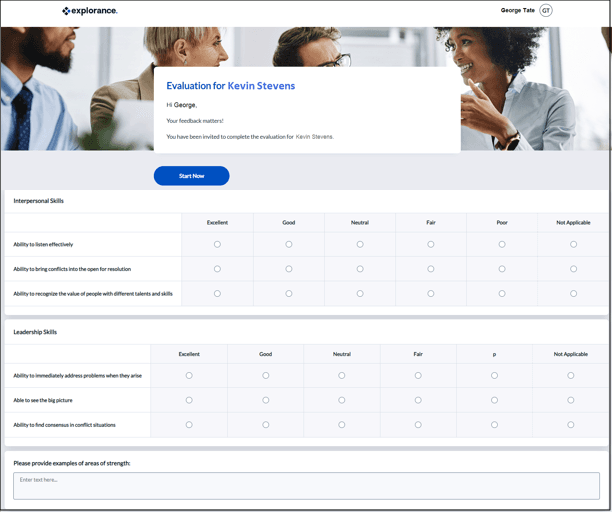
All participants will receive an email containing a link to a questionnaire similar to the sample below which they can fill out online and submit.
To reach those who may not have access to email or who may not use email as their primary communication method, you can send notifications via only SMS or a combination of email and SMS. SMS is only available for clients hosted on a subscription basis. SMS notifications can only be sent to US and Canadian numbers. For details, contact Explorance.
Learn more about configuring the rater selection tasks for your project.
Step 5 - Create your report
Reports help make sense of the data collected during your 360 project. You can build reports that include analysis on individual questions, the entire project, and groups within a project. Blue offers numerous possibilities to help you unlock the value in your data.
You can create your reports after the feedback collection process has been completed or as in our sample scenario, we are building out the entire process in advance of publishing the reports.
The following Report Types, Options, and Audience have been suggested for this sample 360 report:
Report Type:
- The Individual report is the most granular level report and most frequently used report type in Blue. It is ideal for a 360 project as it allows you to generate a report that is specific to an individual subject in order to provide the evaluation results for that individual.
- By selecting Distributed, Blue ensures that the selected report viewers are assigned on a per report basis, thus subjects will see only their own reports.
- Automatic update This option automatically updates the subjects and groups in the report. When subjects and / or groups have been added or deleted from a project, the corresponding reports will be updated.
Options:
- Hide report blocks that do not contain any results which eliminates any report blocks that have no data to be displayed in the report.
Audience:
- Private Access to the report is restricted to the users listed in REPORTS - VIEWERS and REPORTS - ACCESS.
Learn more about other options available in Blue by visiting these links: Create a new report. and Configure report information.
The settings used to create a report have a fundamental effect on the remaining options and settings available in the report. Therefore, the options and setting selected while setting up the report cannot be altered once the report framework is created.
Threshold options to consider
Multi-level report thresholds have been designed to prevent certain response data from being compiled and reported if not enough data is available. There are many reasons for deciding to not use response data. For example, it may be advisable to disregard some response data to ensure the anonymity of the survey respondents or to prevent the data from being skewed by an insufficient number of data points.
Blue utilizes multiple levels of report thresholds, providing flexibility and granularity in reporting:
- Report-level threshold - Prevents the report from being published if the threshold limits are not met. Thresholds can be set for the number of responses, the number of invitations and the percentage of responses received.
- Subject-level threshold - Withholds response data related to a particular subject if the minimum thresholds are not met. Like the report-level threshold, subject-level thresholds can be set for the number of responses, the number of invitations and the percentage of responses received.
- Question-level threshold - The question-level threshold allows you to decide if responses to a question are included, or not, based on the number of responses received.
- Report block-level threshold - When creating report blocks, a minimum response threshold can be specified for Question type report blocks
For details on how to configure thresholds, check out these topics:
In order to create the aggregate report that will be distributed to HR in this sample 360 project, simply create a new report selecting the Rollover report type. For more info: Rollover reports
Question report blocks
Report content is added through the use of question report blocks. These blocks can be used to organize and display the responses to the questions in your report in a meaningful way. Click on the link below to view a sample 360 individual report and then read further to discover the many report blocks available to share the data gathered during the 360 project.
The following are examples of the Category grouping report block and the various question report blocks most often used in 360 reports:
Start with the Category grouping report block which will provide a structure for your report in which to organize your question blocks.
For more details on how to configure your reports, check out these topics:
- Build and manage report content
- Configure report information
- Add a question report block
- Create and manage report blocks
- Create report filters
- Configure report thresholds
- Group Elements in Reports
Step 6 - Add your project participants
At this point in the project, you will have determined who will participate in the assessment and have the necessary information to upload the participant names and other information needed to update or overwrite your initial user datasource.
For more information to complete this step, please use the link below:
Step 7 - Publish your project & report
Now that you have:
- set up your datasource structure,
- defined your project structure,
- created your questionnaire,
- created your tasks and selected project dates,
- created your report,
- and added your participants,
you are ready to publish your project. But first, you may want to run your project through a testing phase to gain insight on how it will appear and behave once officially published. Should there be any problems, you will have the opportunity to troubleshoot or make appropriate modifications before tasks reach designated users.
The following link provides details on how to test or slow launch your project:
The next step is to actually publish your project; see the link below for instructions:
The Project’s Start and End Dates can differ from Fillout Dates where a 360 project may run long-term while individuals are added and given a specific window to complete the questionnaire within the project lifetime.
A Fillout task will be created per rater once that person is selected by a subject. The task Start and End Dates control when the email notices start and when access to the respective questionnaire will end.
At this stage, it is time to publish your report. Blue will automatically assemble the data and distribute your reports based on the parameters you set. In our original time-line for this sample 360 project, the distribution Start Date of the reports will occur at the conclusion of the rating process. Many other options are available to configure the distribution of your reports.
For instructions and more options on how to publish and distribute your report, check out these topics:
Step 8 - Manage the process
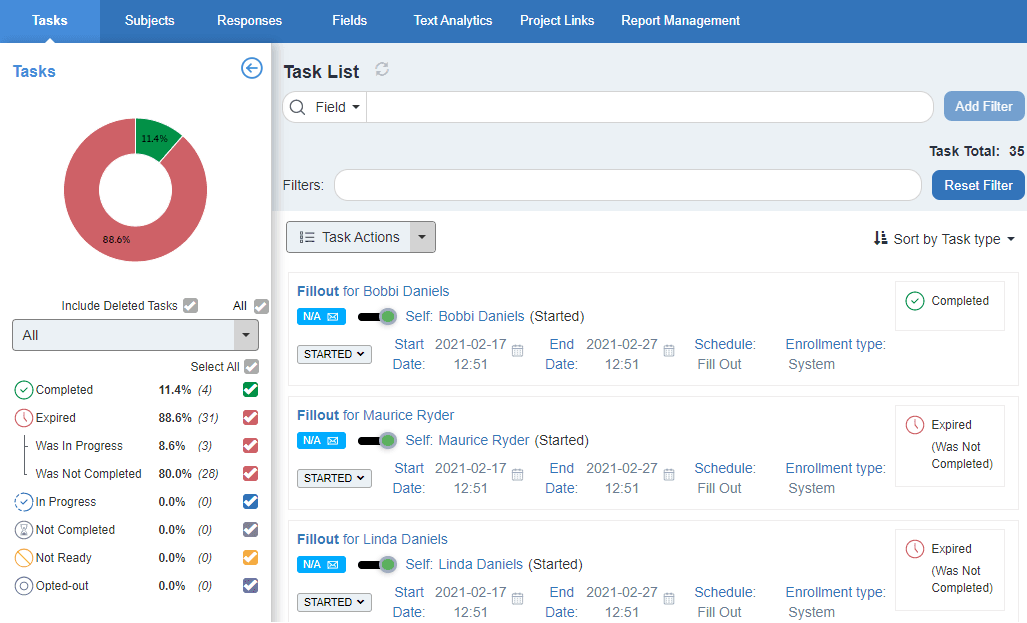
The Manage Project view can be used to:
- quickly view the status of tasks and notifications,
- modify the fillout task start and end dates for the completion of questionnaires by a selected rater, as well as stop, delete, resubmit or unsubmit a questionnaire,
- add or modify the subjects of this project,
- export responses,
- analyze comment responses,
- manage the individual reports.
Click on the following links for more details on how to:
- Manage tasks for a published project
- Manage subjects for a published project
- Add raters to a published project
- Manage published reports
Appendix
Here is some additional information to help you get organized when you are ready for your next 360 project. You don’t have to start from scratch. You can copy both your project and report and, if needed, make changes. Click on the following links to see how to:
InGroup members in Blue