Create course evaluation reports for students that include instructor commentary (Closing the feedback loop)
Introduction
This guide will focus primarily on setting up reports that share the results of course evaluations including instructor commentary to the students, specifically for end-of-term evaluations where courses are evaluated at different times. Student feedback can drive the improvement of your institution's teaching and learning, but the value of reporting results back to the students is typically overlooked. Institutions often assume that applying the evaluation results to improve student engagement is enough to ‘close the feedback loop’. However, the loop begins with students and closing the loop should end where it began: reporting the results to the students.
Before consulting this document, it is recommended to know the fundamentals of setting up a standard end-of-term course evaluation project. To learn more, see Create end-of-term course evaluations.
Our Choices
The following parameters will be applied throughout this guide:
Project Setup Recommendations
- Two projects required:
- Create separate projects for student feedback and instructor commentary
- First project collects student feedback
- Second project collects instructor responses
- Relative dates in projects: Used to accommodate different course evaluation timelines
- Instructor reports workflow:
- Share student feedback reports with instructors first
- Allow time for instructors to review results
- Instructors respond via the second project's survey
- Main lecturer only: For team-taught courses, only the main lecturer provides feedback to ensure cohesive commentary
- Student reports: Final reports include:
- Student feedback
- Instructor responses
- Shared with students, instructors, and academic leaders
- Project mapping: Combines questions from both projects to display:
- Student feedback
- Instructor commentary
- In final student reports
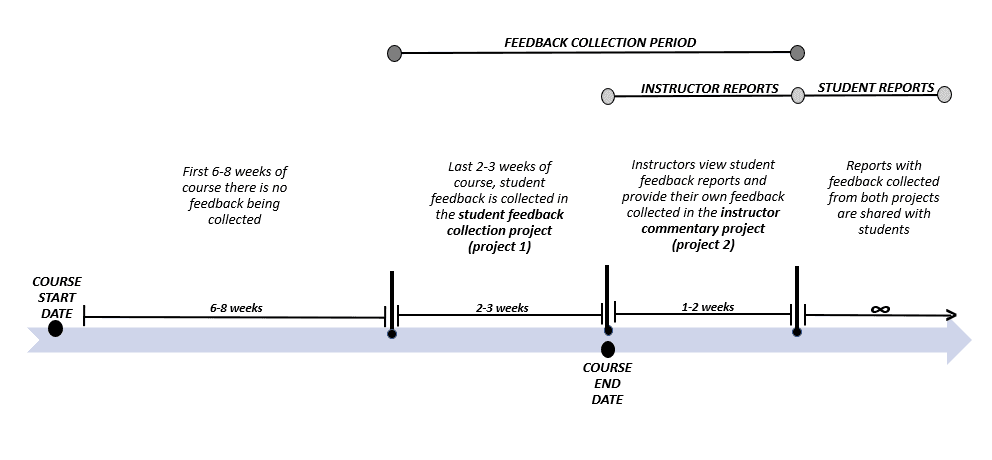
Closing the Feedback Loop Timeline
Project Mapping Considerations
When mapping Projects 1 and 2 for final reports:
Project Requirements
- Matching confidentiality levels
- Same Definition type
- Identical audience settings (both private or public)
- Only groups with fillout privilege can be mapped
Subject Requirements
- Reports only include subjects present in Project 1
- Subjects exclusive to Project 2 won't appear in reports
- Merged subjects cannot be used
Question Requirements
- Only questions of these types can be mapped:
- Single selection
- Single selection table
- Multiple selection
- Multiple selection table
- Comments
- Questions must have:
- Identical scale (same number of options)
- Matching score values
Limitations
- Text analytics unavailable
- Filters cannot be used (except when mapping survey projects)
Configure the Student Feedback Collection Project (Project 1)
First, we will configure Project 1 to collect student feedback. This project will closely resemble an end-of-term course evaluation.
General Overview of Steps for Project 1
- Add Datasources
Include data for:- Courses being evaluated
- Participants in the feedback process
- Their relationships
- Create the Definition
Select the appropriate evaluation structure type. - Define Groups and Privileges
- Create participant groups
- Assign evaluation privileges
- Create the Project
Configure:- Project Definition
- Audience type
- Confidentiality level
- Automatic group update option
- Verify Subjects and Members
Confirm correct inclusion of:- Subjects
- Group members
- Build the Questionnaire
- Create and configure mandatory survey instrument
- Optional: Allow coordinators/instructors to:
- Create questions
- Select from validated questions
- Configure Tasks
Apply initial task settings. - Schedule Tasks
Set timelines for:- Feedback collection tasks
- Reminders
- Publish Project
- Set overall evaluation schedule
- Publish the project
- Create Instructor Reports
Analyze student feedback in reports that provide:- Summary of evaluations
- Record for instructors
Step 1 - Add Datasources (Project 1)
The first step in creating the student feedback collection project is to add datasources containing:
- Course information
- Participant data
- Relationship mappings
Required Datasources:
| Name | Type | Contents |
|---|---|---|
| Courses | Object | Courses being evaluated |
| Users | User | All participants (students, instructors, coordinators, academic leaders) |
| Course-Student | Relationship | Student enrollment in courses |
| Course-Instructor | Relationship | Instructor assignments to courses |
| Course-Coordinator | Relationship | Coordinator oversight of courses |
| Dept-Hierarchy | Hierarchy | Departmental structure and course affiliations |
| Dept-Hierarchy-Users | Relationship | Academic leaders' organizational roles |
To learn more about creating a hierarchy and assigning organizational roles, see Set up an organizational hierarchy for DRA.
Step 2 - Create the Definition (Project 1)
After adding datasources, create the Definition that will be used for both projects.
Definition Requirements:
| Setting | Value |
|---|---|
| Definition type | Multiple secondary subject pairing |
| Subject source | Courses |
| Secondary source | Users |
| Pairing source | Course-Instructor |
For detailed steps on how to create an end-of-term Definition, see Step 2 - Create the Definition in Create end-of-term course evaluations.
Step 3 - Define Groups and Privileges (Project 1)
As part of the Definition setup, create participant groups and assign evaluation privileges.
Groups and Privileges Configuration:
| Group Name | Link Type | Privileges | Purpose |
|---|---|---|---|
| Students | Relationship datasource | Fillout (FO) | Complete evaluation questionnaires |
| Instructors | "Links to" | QP, RV | Personalize questionnaires (QP) and view reports (RV) |
| Coordinators | Relationship datasource | QP, SM | Personalize questionnaires (QP) and manage evaluations (SM) |
| Provost Office | Organization | RV | View evaluation reports |
| Deans | Organization | RV | View evaluation reports |
| Department Chairs | Organization | RV | View evaluation reports |
| Instructor Commentary1 | Relationship datasource | None | (Used only in Project 2) |
Key to Privileges:
- FO: Fillout
- QP: Question Personalization
- RV: Report Viewing
- SM: Subject Management
Footnotes
- Note: The Instructor Commentary group is only used in Project 2 for collecting instructor responses to student feedback. ↩
Instructor Commentary*: If you are creating a project from scratch, adding this group in the Definition allows you to select it as Automatic Update when creating project 2. If this group does not need Automatic Update, simply add the group directly in the project’s Definition in a later step.
For detailed steps on how to create the first six groups (students, instructors, coordinators, provost office, deans, and department chairs) and assign them privileges, see Step 3 - Define groups and privileges in Create end-of-term course evaluations.
Step 4 - Create the project (project 1)
The next step after defining groups is to create the feedback project.
Settings for the project:
| Project settings | Values |
|---|---|
| Definition selected | End-of-term definition created in Step 2 (project 1) |
| Automatic update | except instructor commentary group |
| Project audience | Private |
| Confidentiality | Yes (recommended) |
| Project name | Same as end-of-term evaluation |
| Remove subjects and raters that have been deleted | Enabled |
For detailed steps on how to create an end-of-term project, see Step 4 - Create the project in Create end-of-term course evaluations.
Step 5 - Verify Subjects and Group Members (Project 1)
Blue automatically populates subjects and group members when automatic update is enabled. However, you should verify the included subjects and members are correct.
Verification Process:
- Navigate to:
MEMBERS→EXPORT/IMPORTtab - Select
Export Membersto download a CSV file containing:- All courses
- Associated group members
📘 Reference:
For detailed instructions, see Export or Import Project Members.
Example Exported Data:
| SubjectID | SubjectName | GroupCaption | MemberID | MemberName |
|---|---|---|---|---|
101815-8504-Summer | 101815 Cultures of Modern Canada | Instructors | afong | Annette Fong |
101815-8504-Summer | 101815 Cultures of Modern Canada | Students | 60535 | Casey Andrade |
101815-8504-Summer | 101815 Cultures of Modern Canada | Students | 70088 | Scott Abraham |
101848-9502-Summer | 101848 Modern Art | Instructors | bbaker | Bernard Baker |
101848-9502-Summer | 101848 Modern Art | Students | 90493 | Nicole Ackerman |
101848-9502-Summer | 101848 Modern Art | Students | 90294 | Kyle Berry |
202047-7051-Summer | 202047 Computer Aided Structural Analysis | Instructors | jscott | James Scott |
202047-7051-Summer | 202047 Computer Aided Structural Analysis | Students | 90682 | Nolan Aloisi |
202047-7051-Summer | 202047 Computer Aided Structural Analysis | Students | 80904 | Keyly Allen |
Key Points:
- Verify all expected courses appear in
SubjectIDandSubjectName - Check each course has the correct:
- Instructors listed under
Instructorsgroup - Students listed under
Studentsgroup
- Instructors listed under
- Confirm all member IDs and names are accurate
If you did not enable automatic update for groups and subjects, see Select members in a multi secondary pairing project for steps on how to manually add group members to the project.
Step 6 - Build the Questionnaire (Project 1)
After creating the project, construct the questionnaire containing:
- Core questions (standard for all evaluations)
- Personalized questions (from instructors/coordinators)
- Comment questions (for main instructors' feedback)
Questionnaire Components:
| Section | Description | Resources |
|---|---|---|
| Core Questions | Standard questions that may be linked to specific: - Schools - Departments - Courses - Instructors - Instructor types | Question Bank Reference |
| Question Personalization | Allows instructors to: - Create custom questions - Select questions Per course they teach | Personalization Guide |
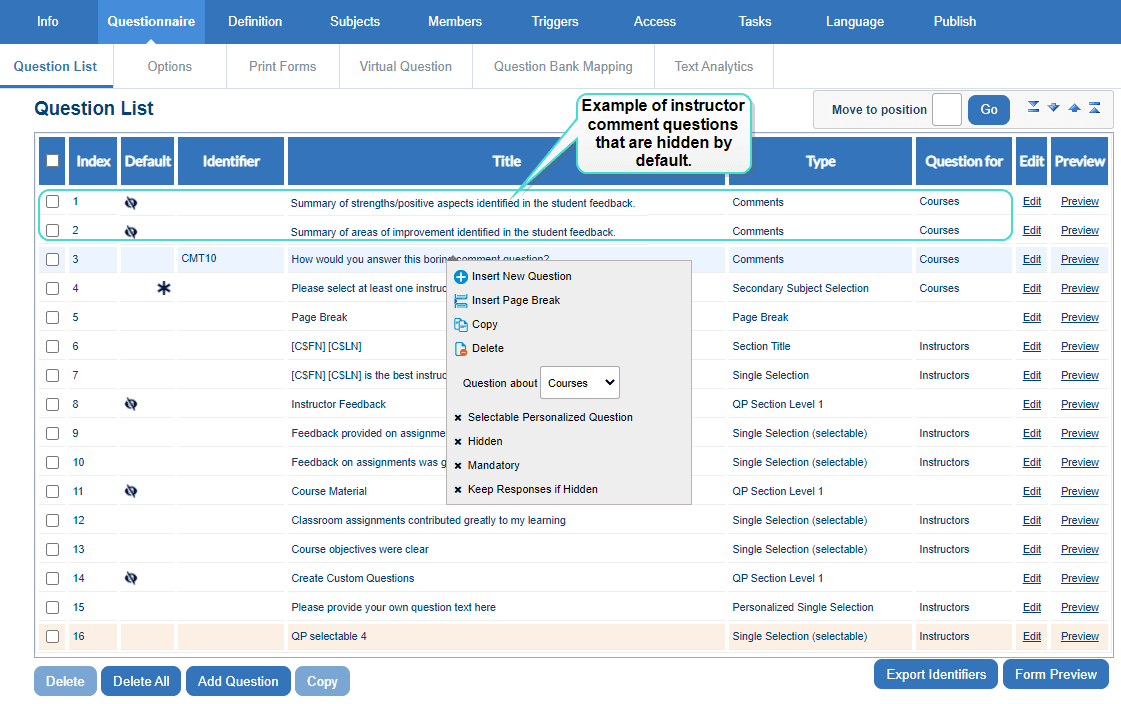
| Instructor Comment Questions | Feedback fields for main instructors (Hidden by default) |
Implementation Notes:
- Use the question bank for standardized items
- Enable personalization features where appropriate
- Configure visibility settings for comment questions
- Test questionnaire flow before publishing
Once the report has been created, all selected options will be final and cannot be changed. For more information, see Create a new report.
Example of setting up project 1's questionnaire:
Step 7 - Configure Tasks (Project 1)
Configure evaluation tasks for each privilege group, following standard end-of-term evaluation settings.
Task Configuration Summary
| Task Type | Owners | Key Settings | Status |
|---|---|---|---|
| Subject Management | Coordinators | • Set subject participation • Control scheduling • Set start dates | Enabled ✅ |
| • Authentication required • Owner removal deletes task | |||
| Question Personalization | Coordinators Instructors | • Modify after submission • View all questions • Copy from past projects | Enabled |
| • Question quotas: Min 1, Max 10 • Auth required • Removal deletes task | |||
| Fillout | Students | • Welcome page • Task list on thank-you page | Enabled ✅ |
| • Authentication required • Owner removal deletes task |
Legend:
- ✅ = Enabled feature
- Enabled = Configurable option
- • = Individual setting
Notes:
- All tasks require authentication (*)
- Task owner removal consistently deletes the associated task
- Question quotas apply per course/instructor level
For detailed steps on how to configure the three tasks and assign them privileges, see Step 7 - Configure tasks in Create end-of-term course evaluations.
Step 8 - Schedule tasks (project 1)
Once the tasks are configured, the next step is to schedule when each task starts and ends.
Example of student feedback collection project schedule (your schedule may vary):
| Task type | Start date | End date | Reminders |
|---|---|---|---|
| Subject management | Earliest course start date | Latest course end date | 1-2 |
| Question personalization | Earliest course start date | 1 day before fillout task begins | 1-2 |
| Fillout | 2-3 weeks before latest course end date | On latest course end date | 3-5 |

For steps on how to schedule tasks and reminders in your end-of-term project, see Configure project task schedules.
Step 9 - Publish Project (Project 1)
Publish the project to activate tasks for all groups.
Navigation: PUBLISH tab
Reference: Publish a project
Pre-Publication Checklist
| Verification Area | Requirements | Related Step |
|---|---|---|
| Students Group | Must have proper configuration | Steps 3, 4 |
| Instructor Commentary | Must NOT be configured (for Project 1) | Steps 3, 4 |
| Export Tab | Contains only instructors | Step 5 |
| Questionnaire | Displays correctly | Step 6 |
| Subject Management Task | Properly configured | Step 7 |
| Fillout Schedule | Appropriate end date | Step 8 |
After Verification:
- Set project start date → Earliest course start date
- Set project end date → Latest course end date/semester end
Step 10 - Create Instructor Reports (Project 1)
Analyze student feedback in reports that:
- Provide evaluation summaries for instructors
- Allow instructor comments (included in final reports)
- Will be shared with students, instructors, and academic leaders
Report Configuration
| Setting | Value |
|---|---|
| Project | Project 1 |
| Report Type | Individual |
| Distributed | Enabled |
| Auto Update | Enabled |
For more information on how to create reports, see Create a new report.
Example of published instructor report with a summary and comment block:

After creating your report, you will present the student feedback to instructors using report blocks.
The following steps are one of many ways to configure a report. Depending on the number of questions and the type of data you wish to see from the student feedback, you can choose multiple report blocks that are different from what is demonstrated in this guide. To learn more, see Build and manage report content.
Example of two report blocks used for instructor reports:
| Report block type | Report block description | Group element required | Group element description |
|---|---|---|---|
| Cross Category - Summary | Allows you to display the average score for each rating item in one single chart or table, and to compile data across different projects for analysis. | Average of Rater Groups | To enable a simple listing of all student questions with their average scores. |
| Question - Comments | Lists the full text of all responses received for the selected comments question. | Breakdown by Rater Group | To break down and display all comments given by respondents for the specific question. |
Before adding report blocks, it is recommended to first add the necessary group element for each block.
After you have added content to your report, it is time to set the distribution time frame that instructors will be able to access the report. To learn more, see Set distribution schedules for reports.
Settings for the report's distribution schedule:
| Report setting | Value |
|---|---|
| Distribution start date | 1 day after latest course end date |
| Distribution end date | 2 weeks after distribution start date |
The final step in creating the instructor reports is to publish the report which finalizes how and which data is reported. Navigate to the PUBLISH tab to start publishing the report. For more information, see Publish a report.
Critical items to verify before publishing the project:
| Group elements: | Demonstrated in: |
|---|---|
| group element | Step 10 - Create instructor reports (project 1) |
| Report blocks: | |
| Have the necessary group elements | Step 10 - Create instructor reports (project 1) |
| Distribution schedule: | |
| Is it set to end | Step 10 - Create instructor reports (project 1) |
| After verifying the above items: | |
| Set the report publish date to the earliest course start date Set the report expiry date 2-3 weeks after the latest course end date |
Configure instructor commentary project (project 2)
Once the student feedback collection project is set up, the next thing is to configure the second project which will collect feedback in response to the student feedback. This second project will be much simpler to configure since you can copy the first project and modify the necessary groups, subjects, questions, and schedules.
In the context of mapping both projects together for the final student reports, this instructor commentary project (project 2) will act as the auxiliary project to the master project (project 1).
Project 2 Configuration: Instructor Commentary
General Workflow Overview
- Project Creation
Copy Project 1 to maintain consistent:- Definition
- Audience type
- Confidentiality level
- Groups structure
- Subjects
- Questionnaire
- Group Cleanup
Remove all groups except:- Instructor Commentary group
- Definition Filtering
Add demographics-based filter to:- Restrict feedback to main instructors only
- Questionnaire Modification
- Unhide instructor comment questions
- Hide all other questions
- Task Scheduling
Configure fillout task timeline for:- Instructor feedback collection
- Publication
Set evaluation schedule and:- Publish project
- Report Generation
Create final student reports by:- Copying instructor reports
Step 1 - Create Project by Copying
Objective:
Establish Project 2 by duplicating Project 1 configuration.
Procedure:
- Locate Project 1 in project management interface
- Select "Copy Project" function
- Assign new project name (e.g., "Instructor Commentary - Term")
- Confirm duplication of all shared elements
Key Benefits:
- Preserves all existing relationships
- Maintains questionnaire consistency
- Saves configuration time
- Ensures data compatibility for reporting
Step 2 - Delete all groups except instructor commentary (project 2)
The next step is to delete all groups in the Definition except for the instructor commentary group. You will then assign the instructor commentary group the fillout privilege.
Step 3 - Add group filter to Definition (project 2)
Since this is a team-taught Definition, there will be multiple instructors for one course. Thus, the feedback we want to collect is from the course's main lecturer.
We recommend including a teaching role demographic value in the relationship table to easily select the main lecturer from the list using group filters. Alternatively, you may create a separate relationship datasource that only includes the main lecturer per course.
Example of exported data (courses, teachers, and their role in the course):
| CourseID | TeacherID | TeachingRole |
|---|---|---|
| 101815-8504-Winter | Bernard Baker | Main Lecturer |
| 101815-8765-Winter | Tom Leitner | Teaching Assistant |
| 101815-5643-Winter | Rodney Stewart | Lab Technician |
| 101815-8769-Winter | Linda Daniels | Main Lecturer |
| 101815-5824-Winter | James Scott | Main Lecturer |
Step 4 - Modify the questionnaire (project 2)
The next step is to modify the questionnaire. We recommend showing the hidden instructor comment questions and hiding the rest.
Step 5 - Configure fillout task schedule (project 2)
The next step will be to schedule when the instructor fillout task starts and ends.
| Task type | Start date | End date | Reminders |
|---|---|---|---|
| Fillout | At latest course end date | 1-2 weeks after course end date | 1-2 |
Example of instructor commentary schedule (your schedule may vary):

For steps on how to schedule tasks and reminders in your end-of-term project, see Configure project task schedules.
Step 6 - Publish the project (project 2)
The next step is to publish the project. Navigate to the PUBLISH tab to get started. For more information, see Publish a project.
Critical items to verify before publishing the project:
| Verification Item | Requirements | Related Step |
|---|---|---|
| Instructor Commentary Group | • Must be properly configured • Only remaining group after cleanup | Step 1 - Create project by copying Step 2 - Delete other groups |
| Demographics Filter | • Must filter to only main lecturers | Step 3 - Add group filter to Definition |
| Questionnaire | • Student questions must be hidden • Instructor comments visible | Step 4 - Modify questionnaire |
| Fillout Schedule | • Must have appropriate end date for feedback collection | Step 5 - Configure fillout task schedule |
Post-Verification Actions:
- Set project start date: Earliest course start date
- Set project end date: 2-3 weeks after latest course end date
Note: All verifications should be completed before publishing Project 2.
Step 7 - Create student reports (project 2)
The final step in configuring the second project is to create reports shared with the students. This report will include both the student and instructor feedback in a report to close the feedback loop.
This report will use project mapping to combine data from both projects. The student feedback (project 1) will act as the master project to the instructor commentary (project 2).
Basic settings for the student reports:
| Report setting | Value |
|---|---|
| Project selected | Project 1 |
| Report type | Individual |
| Distributed | Enabled |
| Breakdown by secondary subject | Enabled |
| Automatic update | Enabled |
| Master project | Project 1 |
Example of published student report with a summary block and three comment blocks:

After mapping both projects, instructor comment questions, and fillout groups to the student reports, add a Question - Comments type report block for each mapped instructor comment question.
Settings for adding report blocks:
| Report block type | Report block description | Group element required | Group element description |
|---|---|---|---|
| Question - Comments | Lists the full text of all responses received for the selected comments question. | Breakdown by Rater Group | To break down and display all comments given by instructors for the specific question. |
Before adding comment blocks, we recommend adding a Breakdown by Rater Group group element first.
After you have added the necessary comment blocks and group element to your report, it is time to set the distribution timeframe that students, instructors, and academic leaders will able to access the report. To learn more, see Set distribution schedules for reports.
Settings for the report's distribution schedule:
| Report setting | Value |
|---|---|
| Distribution start date | 15 days after course end date |
| Distribution end date | No expiry |
Before publishing the report, you will activate Dynamic Role Access for academic leader groups in the evaluations. This is so they can receive the final student reports.
Publish Student Reports (Final Step)
Purpose: Finalize report data and distribution settings
Navigation:
→ Go to PUBLISH tab
→ Reference: Publish a report
Pre-Publication Checklist
| Verification Area | Requirement | Reference Step |
|---|---|---|
| Project Mapping | Instructor Commentary group (Project 2) ↔ Students group (Project 1) mapped | Step 7 - Create student reports |
| Report Blocks | All required group elements configured | Step 7 - Create student report |
| Distribution Schedule | Proper end date set | Step 7 - Create student report |
| Report Viewers | Verified academic leader access | Step 7 |
Final Configuration
- Publish Date: Set to earliest course start date
- Expiry Date: Set to 2-3 weeks after latest course end date
Important: Verify all checklist items before publishing.
To learn more about the importance of reporting to students and how to set it up in Blue, please watch the in-depth webinar Reporting to Students - Closing the Feedback Loop Where it Began.
InBlue text analytics (BTA) guide
InA to Z guides