Structure data for sharing
MLY provides robust features that allow you to efficiently share analysis results with selected individuals or groups within your organization. By leveraging demographics from your user data and matching them with those in the feedback data, MLY can distribute analysis results, ensuring that each user views only information relevant to them.
We recommend comparing the demographics in your user data with those in your feedback data to help identify the commonalities between the two sources of data before you begin the analysis. The user and feedback demographics must match for the custom conditions in the sharing setup to work. If any user or feedback demographic values are missing, some users may not receive their analysis or parts of it may be missing.
Sample sharing scenario
In this scenario, we will share analyzed data with instructors showing only data for the courses they taught in their department.
Prerequisite: Review your existing user and feedback data files before analyzing your data
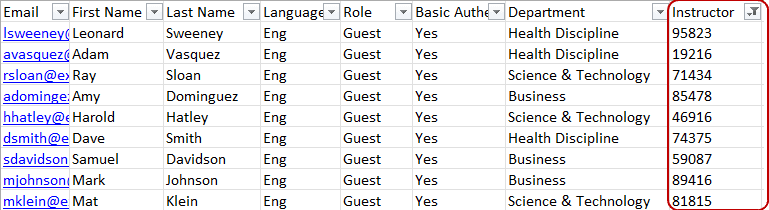
User list file
Navigate to the Users section in MLY and Export the user list file. The column headers in this file indicate which demographics are available in the MLY user profile.

The following screenshot displays the user demographics in our user list.
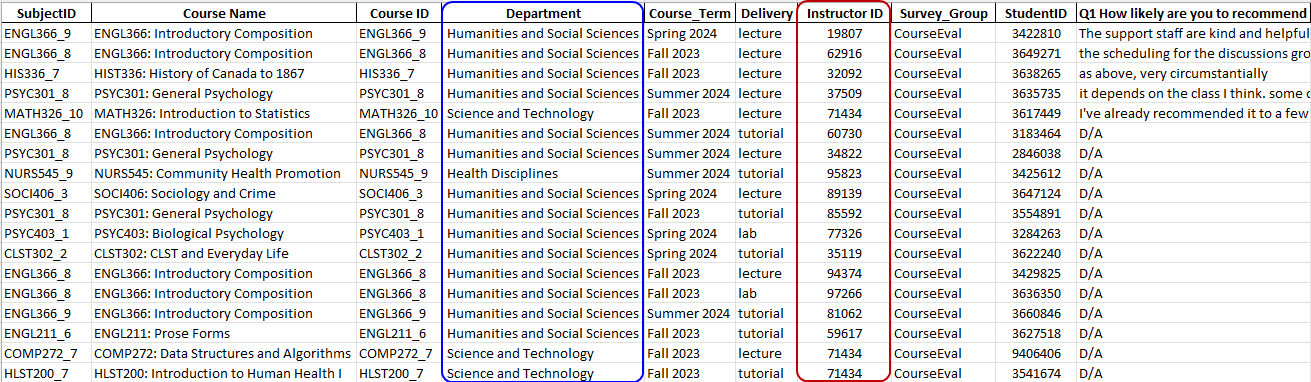
Feedback data file
Obtain a copy of the feedback data file that will be imported to MLY for analysis. It contains the demographics that will be available for sharing purposes.
The following screenshot displays feedback data in our sample list of comments.
Add additional columns to either file as needed,
- first upload your appended user list and
- then import your data for analysis,
- finally, go to the analysis list and select share analysis in the drop-down menu for the analysis you intend to share.
Step 1 - Select users
Create a Group of instructors
- From the Share with drop-down menu select Group.
- Click Share setup.
- Enter a Group name in the field provided.
- Click on Filter by user demographic, select the Instructor field to narrow down the users list.
- Click Apply. In our example, MLY indicates that there are 9 instructors in our user list.
- Select the users you wish to include in your group. We have selected 9 instructors. (If your search has produced multiple pages of instructors, to select all the instructors, click the check box beside the label First name which will insert a check in all the boxes for instructors on that page and repeat for the remainder of the pages related to your search to avoid selecting instructors individually).

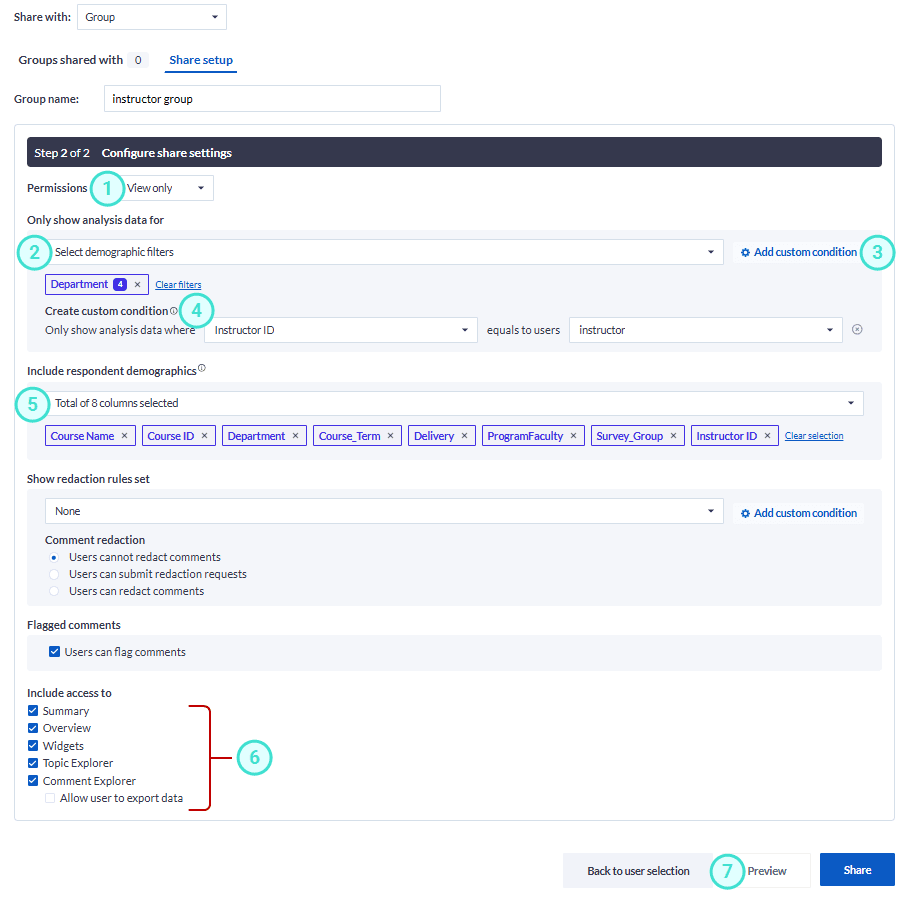
Step 2 - Configure share settings
Permissions
Two permission levels are available for users: Collaborate and View only. Users with the Collaborate permission will have full access to the entire analysis and all associated data. Users with the View only permission will only have access to a subset of the data based on the demographic filters and custom conditions that we create.

Only show analysis data and Create custom condition(s)
This section allows you to set limits on the data available in the shared analysis based on the demographic filters that are applied. For example, we have limited the data to departments. Custom conditions enable you to ensure that each user receives a shared analysis that contains only the data that is relevant to them. In this scenario the analysis data maps the Instructor id to the same instructor in the user data. This way the instructors will only see the courses they taught in their department.

Include respondent demographics
Select which demographic fields will be available to the users in the shared analysis to filter data in the Comment explorer page as needed. In this way, the analysis owner (admin or analyst) can ensure that sensitive demographics, such as Student ID, gender, age group, salary range, and others filters will not be selected and consequently will not appear in the shared analysis.

Learn how to Configure redaction for sharing an analysis and Manage flagged comments.
Analysis sections available in shared analysis
Each analysis can contain up to 5 sections: Summary, Overview, Widgets, Topic explorer and Comment explorer.
At least one section must be selected to create a shared analysis. Allow user to export data is also optional.

Steps to configure your share settings
- Select the View only permission.
- Choose to Only show analysis data for Departments which will filter the overall analysis to only that data.
- Click Add custom condition
- In the Create custom condition section, select Instructor ID from the drop-down list for the Only show respondent data where field. Then, choose the matching Instructor ID from the drop-down list in the which equals the user field.
- In the Include respondent demographics section, select which demographic filters will be displayed to the instructors in the Comment explorer section of the analysis. Any non-selected demographics will not be visible in the list of demographics for each comment.
- Select at least one section to include in the analysis shared with instructors in this group.
- Click Preview to review your share setup.
- From the Preview for drop-down list, select a user to review the sections of the analysis to confirm that the setup displays the correct data. If activated, the first screen displayed will be the personalize summary of the data related to this user.
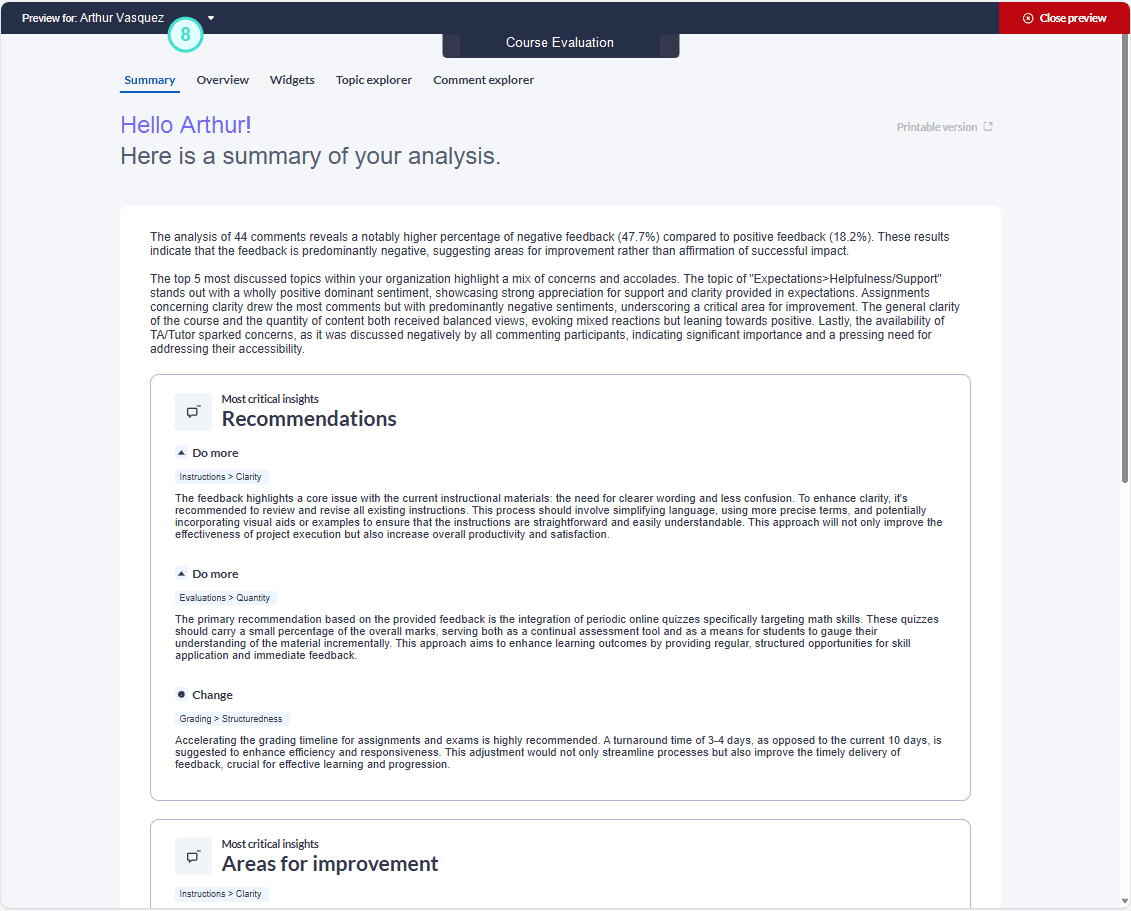
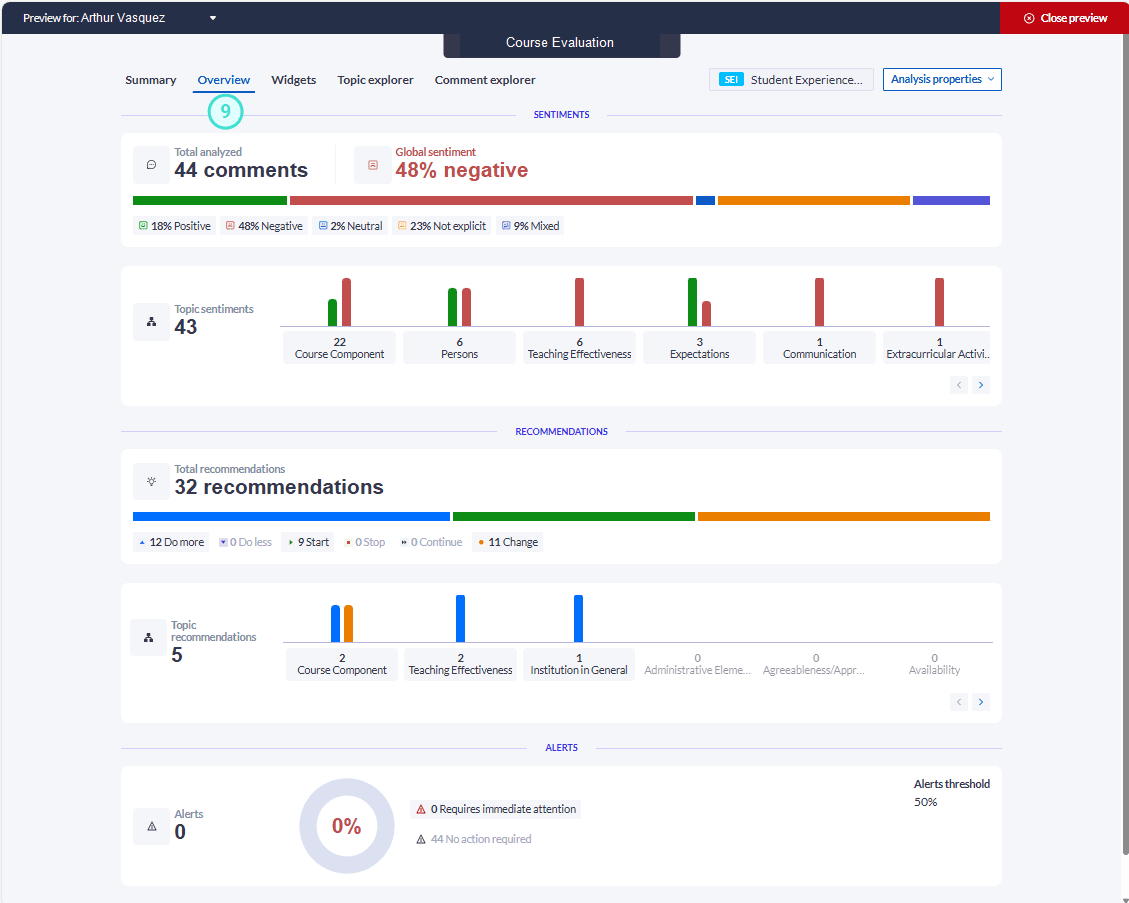
- Click on the analysis Overview presenting key insights from your analysis.
- Click on Widgets to view the data contained in each one. Types of widgets and how to create them.
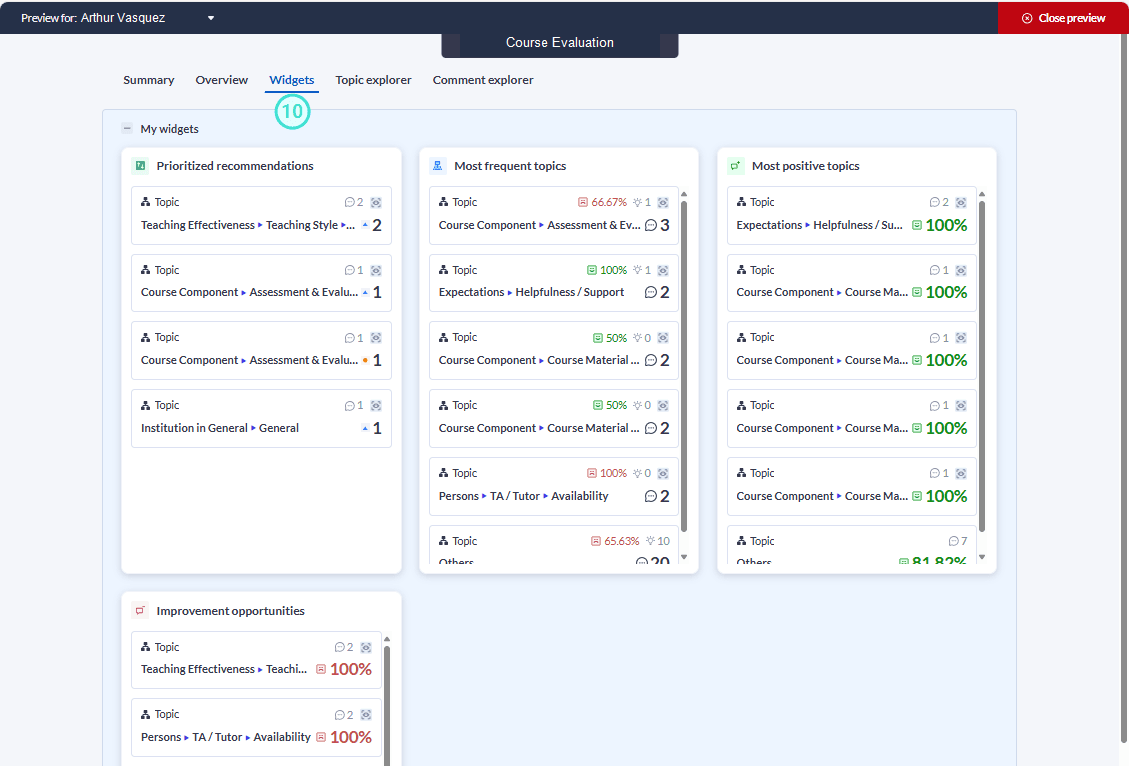
Including or excluding demographics in the shared analysis (Include respondent demographics section) will have an impact on how the widgets work and which information is available to them.
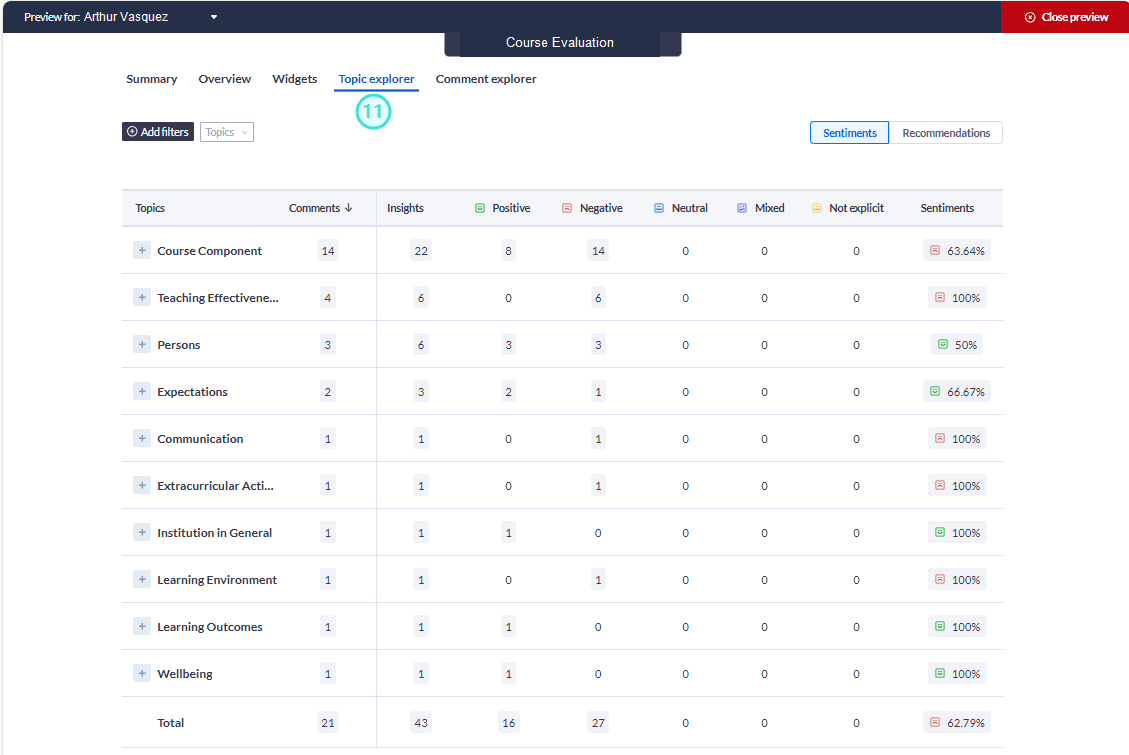
- Click on the Topic explorer, to preview the topic analysis for this instructor. How to explore insights in the Topic explorer
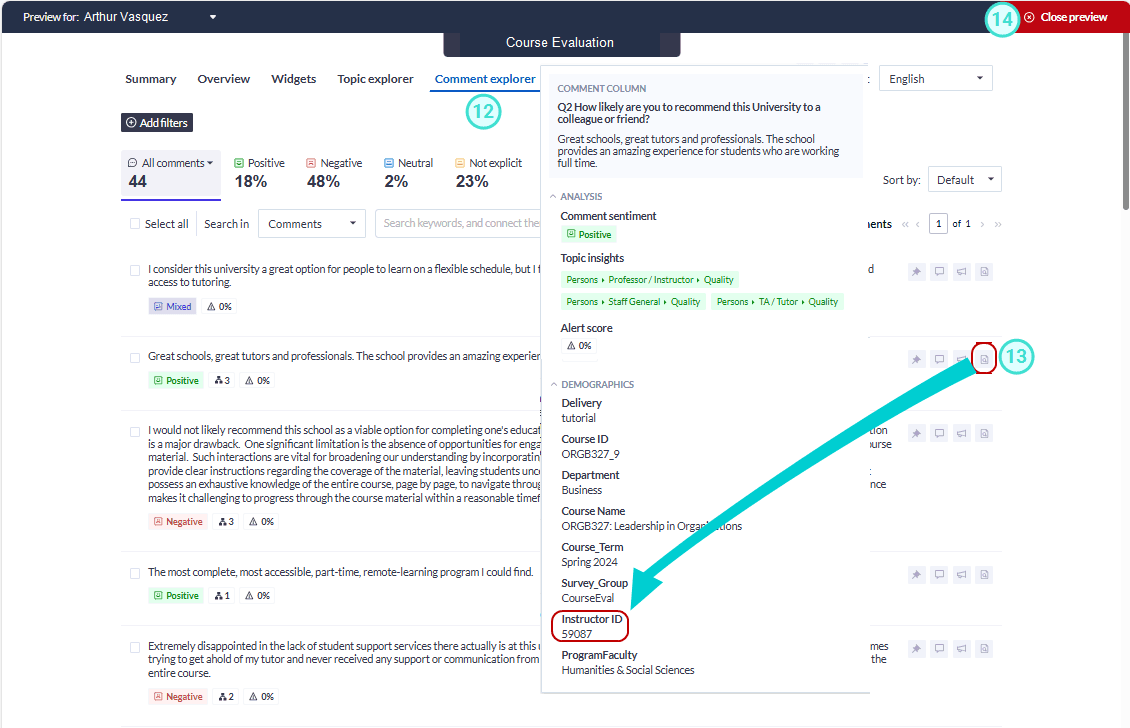
- Click on the Comments explorer to preview the comments for this instructor. Delve into actual comments in the Comments explorer
- By checking the instructor ID in the Comment column, you can confirm that the comments are related to this instructor and the course taught.
- Once you have completed your review of the previewed analyses, close the Preview screen.
- Click Share to automatically share the analysis with your users.
