Import and analyze data
- If you plan to add or update comments in your dataset: Before uploading your dataset for the initial analysis, ensure it includes a column with a unique ID for each comment (for example, a response ID). This unique ID allows MLY to track which comments have already been analyzed when you reload an updated dataset. As a result, MLY can identify only the comments that were added or changed, avoid reanalyzing unchanged comments, and reduce consumption from your MLY license quota.
- If you plan to share your analysis: Consult Structure data for sharing.
- To learn more about when analyzed comments are applied to your quota, see Analyzed comments quota - Impact of dataset and analysis changes
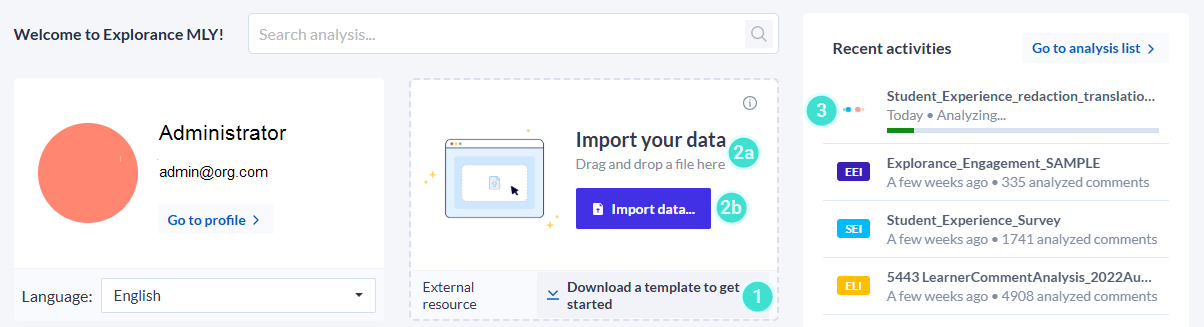
Upload data
- Download a template to organize your data as indicated above, if needed.
- Import your data file:
- 2a. Drag and drop a file here or
- 2b. Click Import data to navigate to a data file on your computer or network and download it to MLY.
- While your data file is uploading, you can navigate to another screen, however you cannot upload another data file until the current upload has been completed.
When data is imported into MLY for analysis, MLY automatically reviews each column to identify which column(s) contain a value that can serve as a unique ID—a column where no entries are repeated such as response IDs. If such a column is found, MLY designates it as the unique ID and displays it in the Data Preview. This column does not need to be the first column in the dataset. Multiple columns can sometimes be designated as containing unique IDs. Use caution when choosing which column to use in case additional comments may be repeats of existing content.
If you upload additional data without a unique ID column, MLY cannot determine which comments are new or modified compared to the original dataset. As a result:
- All comments in the dataset will be analyzed.
- The total number of analyzed comments will be applied to your quota.
Example:
- You upload 1,000 comments without a unique ID column for your initial analysis → 1,000 analyzed comments are applied to your quota.
- Later, you upload the same dataset with 500 additional comments → MLY analyzes 1,500 comments and applies 1,500 analyzed comments to your quota.
- The total number of analyzed comments is now 2,500 which includes: 1,000 originally analyzed comments + 1,000 duplicate comments + 500 newly analyzed comments.
To avoid duplicate analysis and unnecessary quota usage, always include a unique ID column such as a response ID when uploading or updating datasets.
Waiting for input
- Once your data has finished loading, your file will appear in recent files on the homepage and in the analysis list with the following message Waiting for input.
- Hover over your data file and click the ellipsis menu button on the right side of the list and select View import.

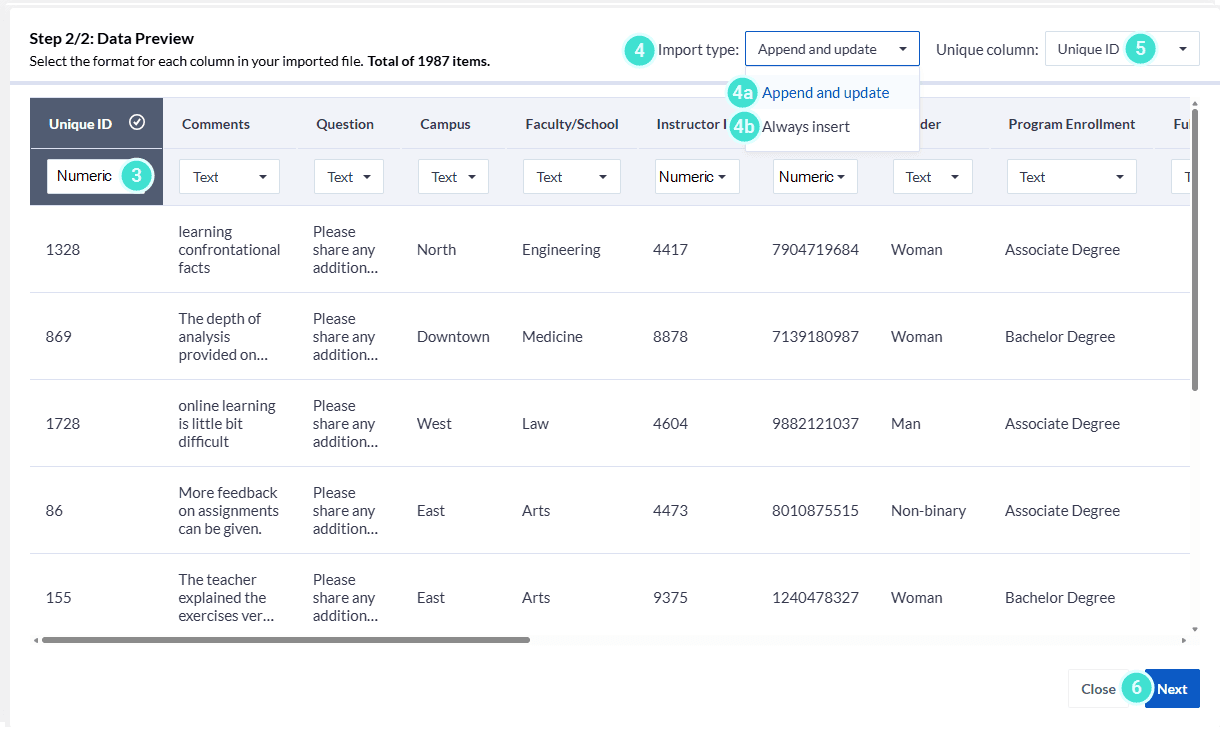
Data preview
- This screen displays the columns and rows of the imported data. If you plan to add comments later, make sure your dataset includes a unique ID column. See the Caution Note above for details.
- Choose an Import type and specify the data format.
- 4a. Append and update - Adds new rows and updates existing ones based on the Unique ID.
- 4b. Always insert - Adds all rows as new entries, regardless of duplicates.
Note: If a Unique ID is not found, the only Import type available will be the Always insert.
- MLY automatically detects your Unique ID column for use during the analysis.
- Click Next which will save your uploaded data and bring you to the Analysis settings screen. If you want to remove your dataset, click Close to return to your previous screen (i.e.: Analysis list or Homepage - Recent Activities).
To remove your data
- If you are uploading data that has not been saved for a new analysis, consult Remove a dataset before the comments are analyzed.
- If you are uploading additional data for an existing analysis - Contact Explorance support
Analysis settings
- Refer to the Comment Columns section to see the available columns in your dataset that can be selected for analysis. Choose one or more columns to include up to the maximum number allowed for the analysis, then either add a question to the column name or map another column to the comments column to enable contextualization for a more accurate, deeper analysis of each comment.
Sentiments, Recommendations and Alerts are included in each analysis regardless of the analysis type being used (SEI, ELI, or EEI).
- To exclude comments from your analysis, expand the "Exclude these comments" section, set the number of words (from 1-5) per comments that should be excluded and then either review the list of comments and select them individually or click All comments with X words or less. These comments will be transferred to the Selected comments panel.
- You can also add your own comments or selected words to exclude by clicking in the Selected comments panel and entering text.
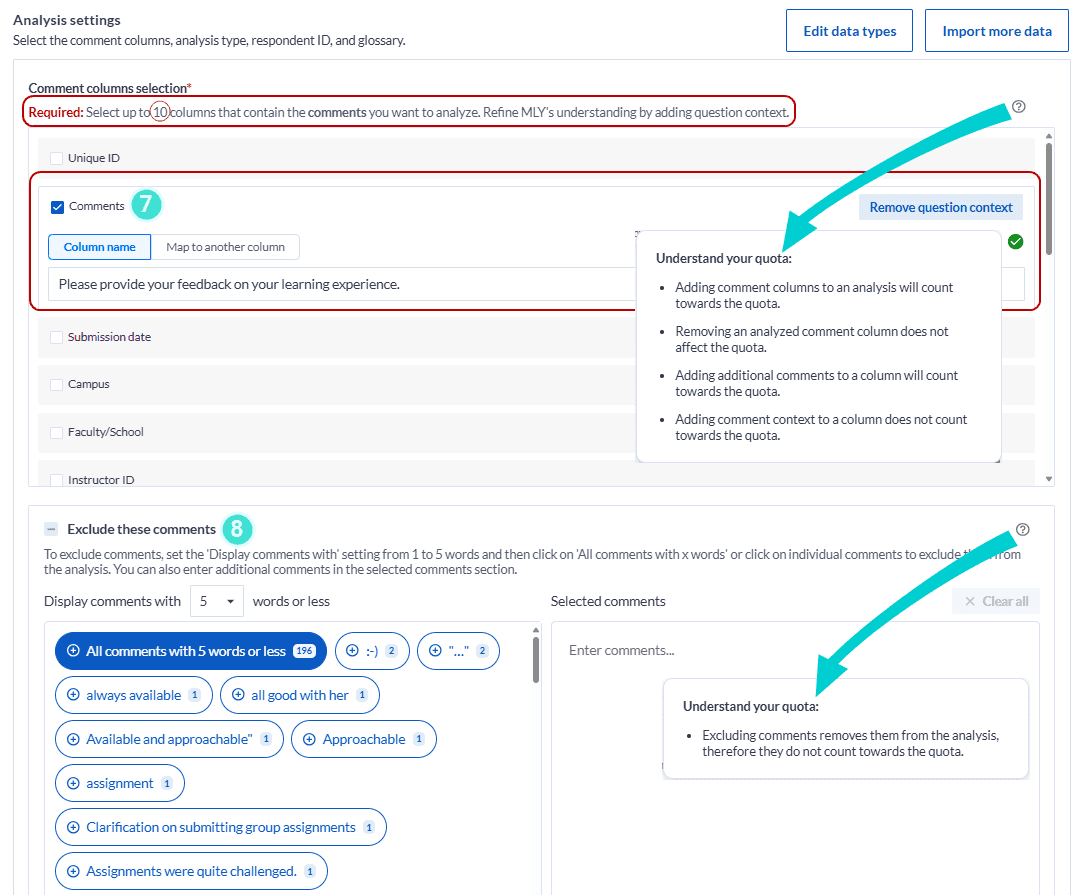
Comments consisting of symbols and non-words (i.e. emojis) contained in your data are uploaded to MLY just like normal text and can be seen in the data view. However, at the present time, MLY has not been trained to analyze these types of comments. If 5 words or less, they will appear in the Exclude these comments section of the Analysis settings where you can exclude them from your analysis.
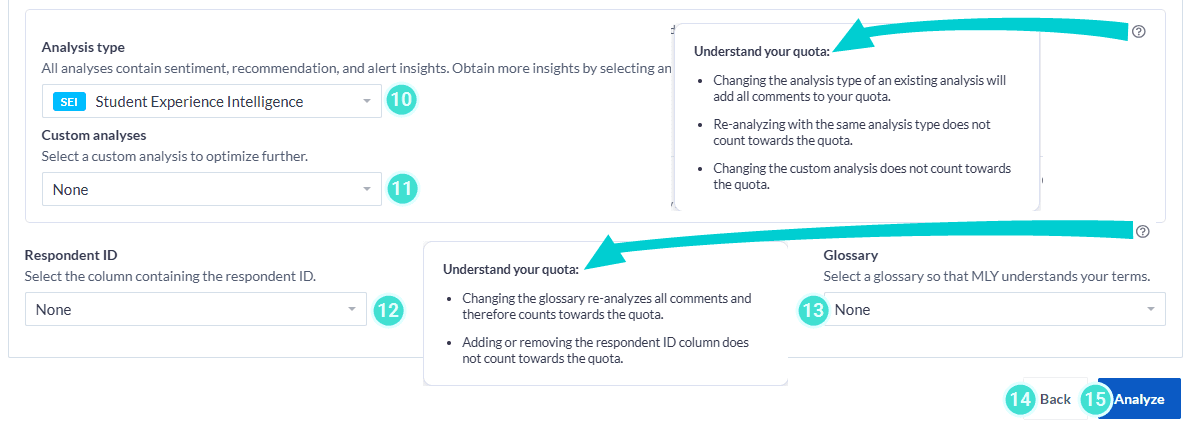
- Select the Analysis type (model) from the dropdown menu that MLY will use to analyze your comments.
- If you have created a Custom analysis (model), you can select it from the dropdown menu in this section.
- If your data file contains demographic information about the individuals who provided the comments, one of these columns can be used to indicate how many unique commenters were included in the data file. Select that column in the Respondent ID dropdown menu.
- If you created one or more Glossaries to help MLY understand the terms used by your organization or institution which are reflected in the comments, select the appropriate glossary for this analysis from the drop-down menu.
- Click Back to leave the settings and return to the My analyses screen. All settings you have made will be lost included which comments will be excluded from the analysis.
- Click Analyze to complete the process.
- The analysis process can be performed multiple times.
- To prevent MLY from reanalyzing all the comments from your initial dataset with your new comments, ensure that your file contains a unique ID for each row. This will enable MLY to determine which comments are new and which comments have been updated.
- If you reprocess your analysis using a different analysis type (model) (SEI, EEI, ELI and Customized analysis) or you modify and reprocess existing comments, the flags and discussion threads for these comments will be deleted.
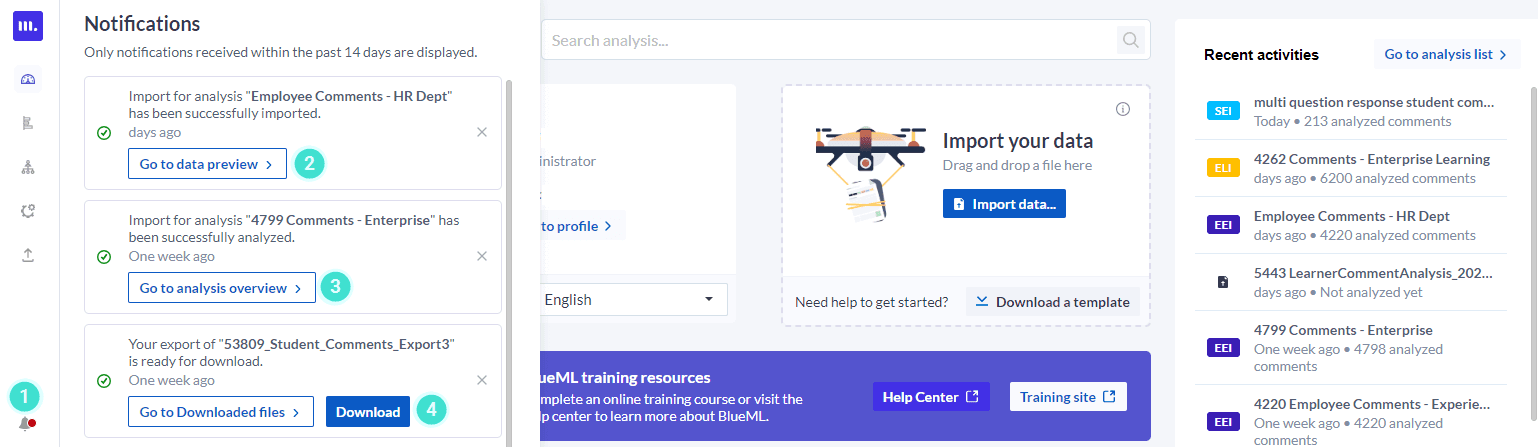
View notifications
- While your analysis is running, you can navigate away from this screen and return once it is completed. A red dot will appear on the notification icon in the left side taskbar while the upload is processing. Click on the Notification icon.
- Select View data to view your imported data file and complete the Analysis settings.
- Select Go to analysis Overview to view the Overview screen enabling you to review the results.
- When Exported files are processed, they also appear in the Notifications list. Click directly on Download this CSV file or Go to Exported files to access this and other files.