Publish your survey
After creating, designing, and testing your survey, you can distribute it throught publishing.
Define the scope of respondents as early as the survey planning stage. This helps ensure efficient survey design, as modifying the respondents list can affect the variables used in the survey form and email campaign.
Consider the following:
- Will the survey be made available to the general public or to a select group of people?
- Do you want your respondents to modify their answers after submitting the questionnaire?
- When do you want your survey to be available to the respondents?
- When do you want emails to be sent out?
Always preview your survey at least once before publishing it, and run a test if you wish to be thorough.
Configure publishing properties
In the Publishing section ( ), you can configure publishing settings for public or private surveys.
To learn about the differences, consult Private versus public surveys.
), you can configure publishing settings for public or private surveys.
To learn about the differences, consult Private versus public surveys.
See the following sections to learn how to configure each.
Distribution type
In the Distribution type section, configure the following:
- Select one of the following survey types:
- Public: Distribute the survey to anonymous respondents with a reusable QR code and public link.
Note: Respondents cannot view their responses after submitting a public survey. - Private fixed date: Distribute the survey to predefined respondents. Individual links are activated on a specific date.
- Private event based: Distribute the survey to predefined respondents. Individual survey links become active according to the event definition you configured.
- Public: Distribute the survey to anonymous respondents with a reusable QR code and public link.
- If you selected a private survey: Specify whether respondents can edit or cannot view their responses after submitting the questionnaire.
QR Code and public survey link
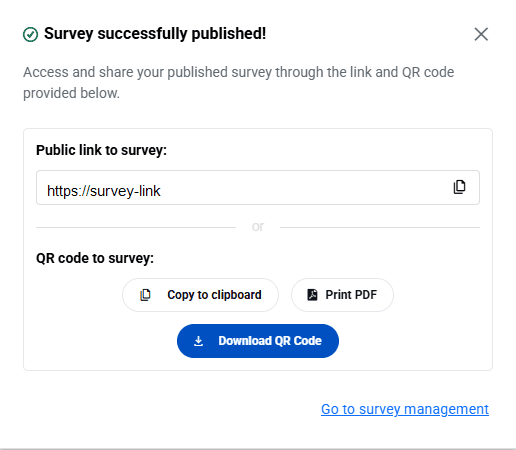
When you publish a public survey, a pop-up window appears with quick access to sharing options, allowing you to distribute the survey easily across different channels. The pop-up window provides:
- A public survey link (with a copy icon for quick sharing).
- A QR code for the survey, which you can:
- Copy to the clipboard
- Print as a PDF
- Download as a .png image for use in emails, posters, or other materials.
Publish a private event based survey
An event is a set of date conditions defined by the survey creator. When the event is met (i.e. when the event happens), it will trigger the respondent's questionnaire task to be sent out. For example, an event could be the birth date of a respondent. When the current date meets the birth date of a respondent, the questionnaire task of that respondent will be activated and sent out.
- Navigate to the Publishing section ().
- Navigate to the Distribution type subsection.
- Select Private - event based.
Selecting this survey type reveals the Event subsection. - Select whether respondents can edit or cannot edit their responses after submitting the questionnaire.
- Navigate to Response collection period to define a fixed start and end date for when your survey will be Live.
- Select a start time, or choose Start immediately.
- Select an end time, or choose No end date.
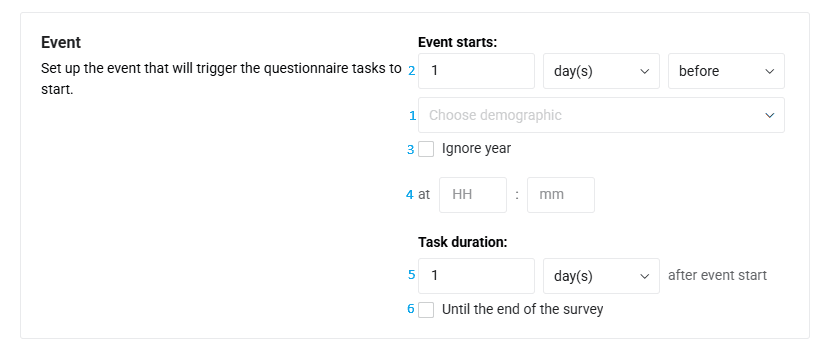
- Navigate to the Event subsection to set up an event that will trigger the distribution of the questionnaire tasks through email to selected respondents.
- Choose the date demographic you would like to base the event upon.
- Define when the event will start relative to the date demographic (how much time before or after the event).
- (Optional) If you wish to base your event solely on the date and month format, select Ignore year.
- (Optional) Define a specific time for the event to start. The default time will be set to 12:00 AM.
- Define the Task duration: How long respondents will be able to complete their survey after the event starts.
- (Optional) Select Until the end of survey to allow respondents to complete their survey until the fixed end date.
- Navigate to Email campaign schedule to define when emails should be sent out.
Access control settings
In the Access control settings section, you can enable features that verify that the person accessing the survey is a human coming from an approved network:
- Captcha: Verifies that the respondent is human.
- IP Controls: Confirms that respondents are connecting from an allowed location. Together, the features add layers of protection against automated abuse and unauthorized access without requiring users to log in. You can enable both features before or after your survey goes Live. The Live status means that the latest published version of the survey is accessible to the respondents.
Require Captcha for access
Take the following steps to enable or disable Captcha:
- Locate the Require Captcha for access toggle.
- Switch it on or off.
IP Control
Take the following steps to allow or block survey access by IP range:
- In the Access control settings, next to IP Control, select +Add a rule.
- From the dropdown menu, specify whether the IP range is Blocked or Allowed.
- Enter the IP range.
Confidential
In the Confidential section, you can set your survey as confidential which means that only select administrators can access respondents' identifying information. If you wish to publish a Confidential or Anonymous survey consult the following resources:
Response collection period
In the Response collection period section, you must define a fixed start and end date for when your survey goes Live.
- Select a start time, or choose Start immediately.
- Select an end time, or choose No end date.
Email campaign schedule
In the Email campaign schedule you can define when emails should be sent out. If you plan to use the BlueX email campaign to distribute your questionnaire to respondents, make sure you have inserted the survey link variable into the invitation email (and ideally in the reminder email too).
Review the Summary
After the configuration of a public or private survey, open the Summary tab to verify if there are any warning or error messages.
Publish the changes
Once the publishing settings are defined and there are no errors in the list, ensure to select the Publish button to apply your survey configuration changes.
Previewing and testing your survey are crucial components of your publishing process.
Once the survey is published, you can monitor the survey statistics in the Dashboard. Manage the questionnaire tasks for a private survey in Task management, or view and export the collected responses.
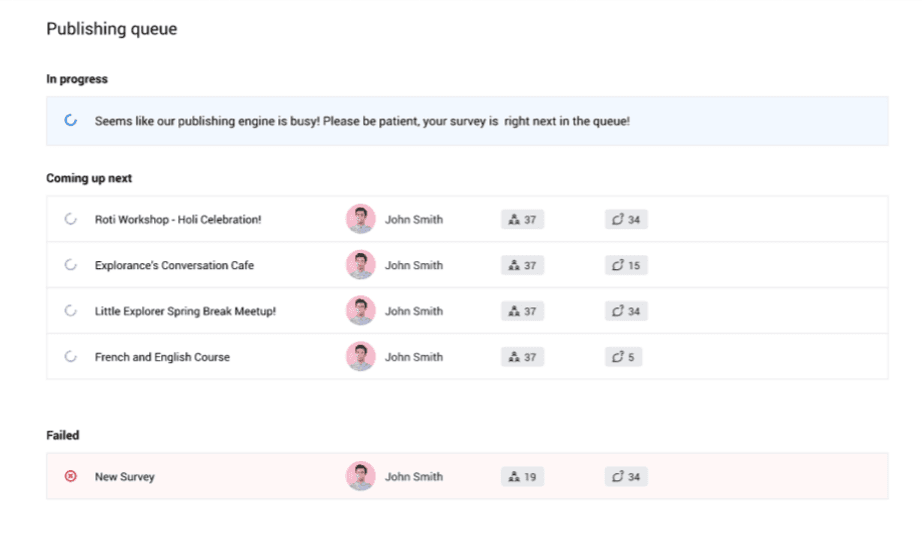
Consult the publishing queue
Every survey published is added to a queue to be processed sequentially, similar to how a network printer queues printing jobs. To consult the queue, you can select Publishing queue from the BlueX homepage.
Depending on your user privileges, you might only see your own surveys in the list.
Every survey listed in the publishing queue page displays the following information:
- Survey name
- Survey publisher
- Number of respondents
- Number of questions
The larger the number of respondents and questions, the longer it will take to publish the survey.