Create instructor peer and self evaluations
Introduction
This guide will focus primarily on the project setup for instructor self and peer evaluations. This component is the third addition to the holistic feedback approach that include end-of-term course evaluations and midterm. The significance of incorporating instructor self and peer evaluations into the process can help to facilitate a well-rounded understanding of teaching effectiveness for your institution.
By leveraging the data collected from all three feedback components (midterm, end-of-term, and instructor self and peer) it becomes possible to generate reports and dashboards with multiple dimensions, providing in-depth analysis and a holistic view of instructors' performance.
What we are building
An evaluation that allows instructors to evaluate themselves and their fellow peers.
Our choices
The following parameters will be applied throughout this guide:
- Instructor self and peer assessment - Instructors will assess their own performance and also be assessed by their fellow peers.
- Core questions Each evaluation will include predefined core questions at an institutional, school, or departmental level.
- Question personalization - Coordinators and instructors will have the ability to add or select questions. Coordinator questions will focus on aspects of the course, and instructor questions will focus on aspects of their own teaching (approachability, knowledge of course material, student engagement, etc.).
- Shared reports - Reports are shared with the academic leaders and instructors.
General overview of steps
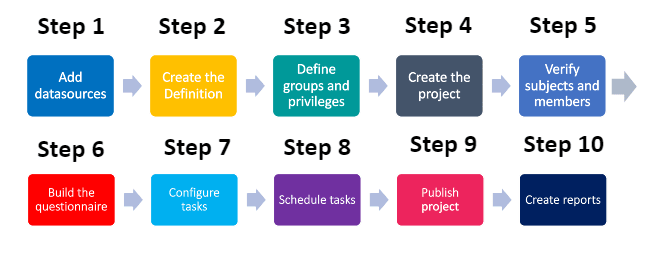
- Add datasources - Include the data for the courses/instructors being evaluated, the people involved in the feedback process, and their relationships to each other.
- Create the Definition - Select which type of evaluation structure to use.
- Define groups and privileges - Create the groups that will participate in the evaluations and assign privileges to them.
- Create the project - Select the project's Definition, audience type, confidentiality level, and automatic update option for groups.
- Verify subjects and members - Check to see that the right subjects and group members have been automatically included in the project.
- Build the questionnaire - Create and configure the mandatory survey instrument to your specifications, and optionally allow coordinators and instructors to create questions or select from a list of validated questions.
- Configure tasks - Apply initial task settings.
- Schedule tasks - Set the schedule for tasks and reminders to collect the feedback.
- Publish project - Set an overall schedule for the evaluation process and publish the project.
- Create reports - Analyze the feedback in a report to provide a summary and record of the evaluation.
Common terms in instructor peer evaluations
Depending on your region, the terms used in your institution may vary. Common terms that are used in instructor peer evaluations:
Course evaluation - The typical course evaluation refers broadly to the student end of class summative survey in a college/university. Other common terms used for course evaluation include "student evaluation", "learning feedback", "student feedback", "paper evaluation", "module evaluation", and "teaching effectiveness survey".
Instructor - Instructor refers to someone who teaches one or many courses. Other terms used for instructor include “professor”, “teacher”, and “lecturer”.
Course - Course refers to a unit of teaching that typically lasts one academic term. Other terms used for course include “class”, “module”, and “paper”.
Program - A program refers to a collection of inter-related courses that define the focus or specialization of a student's degree. Other terms used for program include "module" and "field of study".
Academic term - An academic term is a portion of a year during which an institution holds courses. Other terms used for academic term include “semester”, “trimester”, and “quarter”.
Course coordinator - Course coordinator refers to the person who coordinates and maintains teaching quality and materials for one or many courses. Other terms used for course coordinator include “course leader”, “module leader”, and “primary instructor”.
Academic leader - An academic leader refers to the head of an academic department, faculty, or institution. Specific terms used for academic leaders include "provost", "dean", "headmaster", "department chair", "director", "superintendent", etc.
Organizational unit - An organizational unit is one of the many essential business functions that reside at a particular level of the organization (e.g., “School” of Arts & Science, “Department” of Dentistry, “Sub Department” of Civil Engineering, where each of these are org units within a School, Department and Sub Department respectively).
Hierarchy level -An organizational structure is typically subdivided into levels for chain-of-command significance, such as University (level 1) > School (level 2) > Department (level 3) > Sub Department (level 4). These levels can vary in number and in nomenclature depending on the institution.
Step 1 - Add datasources
The first step is to add datasources containing relevant information on courses, the people involved, and their relationships to each other.
What you need for datasources:
| Name | Type | Contents |
|---|---|---|
| Courses/Instructors | Object | Courses/instructors being evaluated |
| Users | User | Students, instructors, coordinators, and academic leaders |
| Course-Instructor | Relationship | How instructors are linked to courses/instructors |
| Course-Instructor-Peer | Relationship | How instructors are linked to courses and their fellow peers |
| Dept-Hierarchy | Hierarchy | How the departmental hierarchy is structured and links to courses/instructors |
| Dept-Hierarchy-Users | Relationship | How academic leaders are linked to their respective organizational roles |
To learn more about creating a hierarchy and assigning organizational roles, see Dynamic Role Access (DRA) power guide.
Step 2 - Create the Definition
The next step after adding datasources is to create the Definition.
What you need for the Definition:
| Definition settings | Values |
|---|---|
| Definition type | Multiple secondary subject pairing |
| Subject source | Courses/Instructors |
| Secondary source | Users |
| Pairing source | Course-Instructor |
Step 3 - Define groups and privileges
As part of the Definition, you will also need to create the groups of individuals that will be participating in your end-of-term evaluations, and assign them privileges.
- You may also apply a data filter as part of the Definition to select specific courses, students, or instructors if not all departments wish to participate in offering end-of-term evaluations.
- If you wish to give academic leaders access to the Response Rate Monitor to monitor aggregate response rates, see Setting up the Response Rate Monitor.
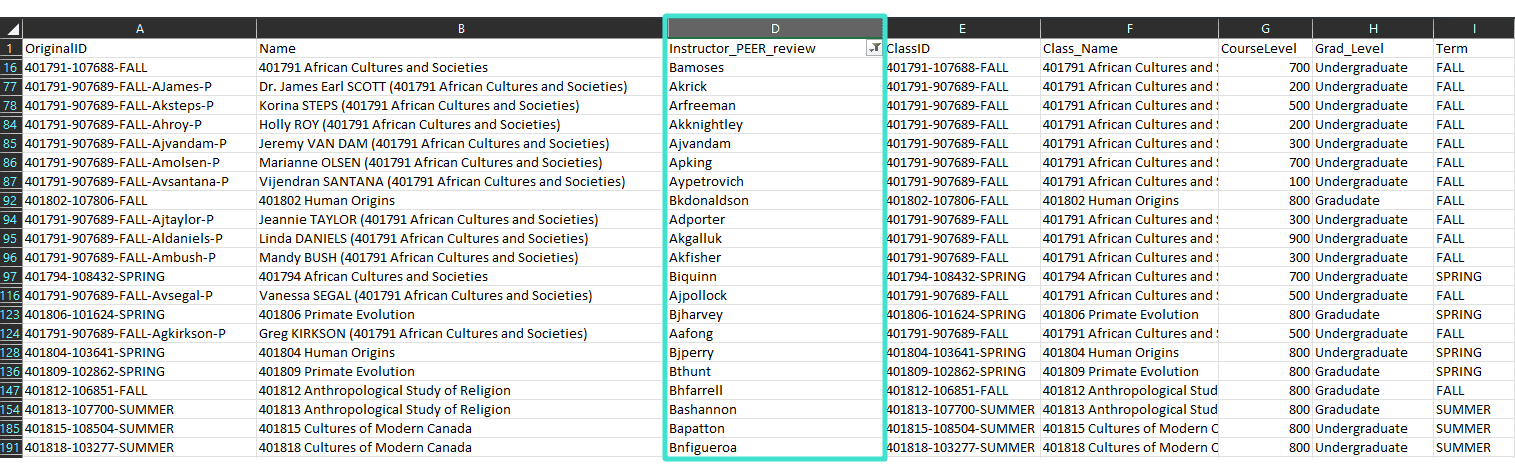
- It may be useful to understand what the fields in your courses/instructors datasource represent before defining groups and privileges for your instructor peer and self evaluations. For example, the Instructor_Peer_Review column represents which person is that instructor's peer, so we will be using that field to create the Peers group.
What you need for groups and privileges:
| Name | Link type | Privileges | Purpose |
|---|---|---|---|
| Instructors | "Links to" | Question personalization (QP) Report viewing (RV) | Instructors will be asked to personalize the questionnaire at the instructor level (QP) and view reports (RV). |
| Self | Relationship datasource | Fillout (FO) | Instructors will be asked to fill out a questionnaire about themselves (FO). |
| Peers | Relationship datasource | Fillout (FO) | Instructors will be asked to fill out a questionnaire about their peers (FO). |
| Provost office | Organization | Report viewing (RV) | Academic leaders will be invited to view reports (RV). |
| Deans | Organization | Report viewing (RV) | |
| Department chairs | Organization | Report viewing (RV) |
Organization: The organization link type will not be listed until you have created organizational links. For more information, see Dynamic Role Access (DRA) power guide.
Step 4 - Create the project
The next step after defining groups is to create the feedback project.
What you need to create the project:
| Project settings | Values |
|---|---|
| Definition selected | Instructor peer & self definition created in Step 2 |
| Automatic update | Enabled for all groups |
| Project audience | Private |
| Confidentiality | Yes (recommended) |
| Project name | Instructor peer & self evaluation |
| Remove subjects and raters that have been deleted | Enabled |
Step 5 - Verify subjects and group members
Since Automatic Update was enabled for all subjects and groups when creating the project, Blue will automatically populate subjects and group members in the project.
Although this process is automated, it is crucial that you verify the right subjects and group members have been included in the project.
Get started by navigating to the MEMBERS - EXPORT/IMPORT tab and select export members to download a CSV file of all courses and associated group members in your project. For more information, see Export or import project members.
Example of exported data (peers and their paired group members):
| SubjectID | SubjectName | GroupCaption | MemberID | MemberName |
|---|---|---|---|---|
| 401791-307689-Spring-Agkirkson-P | Greg Kirkson (401791 African Cultures and Societies) | Instructor | Agkirkson | Greg Kirkson |
| 401791-307689-Spring-Agkirkson-P | Greg Kirkson (401791 African Cultures and Societies) | Self | Agkirkson | Greg Kirkson |
| 401791-307689-Spring-Agkirkson-P | Greg Kirkson (401791 African Cultures and Societies) | Peer | Aksteps | Korina Steps |
| 401858-302041-Spring-Abbaker-P | Bernard Baker (401858 Fundamentals of Visual Art 1) | Instructor | Abbaker | Bernard Baker |
| 401858-302041-Spring-Abbaker-P | Bernard Baker (401858 Fundamentals of Visual Art 1) | Self | Abbaker | Bernard Baker |
| 401858-302041-Spring-Abbaker-P | Bernard Baker (401858 Fundamentals of Visual Art 1) | Peer | Ankorn | Nicole Ackerman |
| 401877-304156-Spring-Akknightley-P | Kent Knightley (401877 Art of the 16th Century in Europe) | Instructor | Akknightley | Kent Knightley |
| 401877-304156-Spring-Akknightley-P | Kent Knightley (401877 Art of the 16th Century in Europe) | Self | Akknightley | Kent Knightley |
| 401877-304156-Spring-Akknightley-P | Kent Knightley (401877 Art of the 16th Century in Europe) | Peer | Ajtaylor | Jeannie Taylor |
If you did not enable Automatic Update for groups and subjects, see Select members in a multi secondary pairing project for steps on how to manually add group members to the project.
Step 6 - Build the questionnaire
The next step after creating the project is to build the questionnaire which will include a list of core questions, and personalized questions from both the instructor and coordinator. To learn more, see Build and manage a questionnaire.
What you need to know about building the questionnaire:
| Sections | Description |
|---|---|
| Core questions | Questions may also be linked to specific schools, departments, courses, instructors or instructor types. |
| Question personalization | Instructors can create or select questions for themselves for each course they teach. |
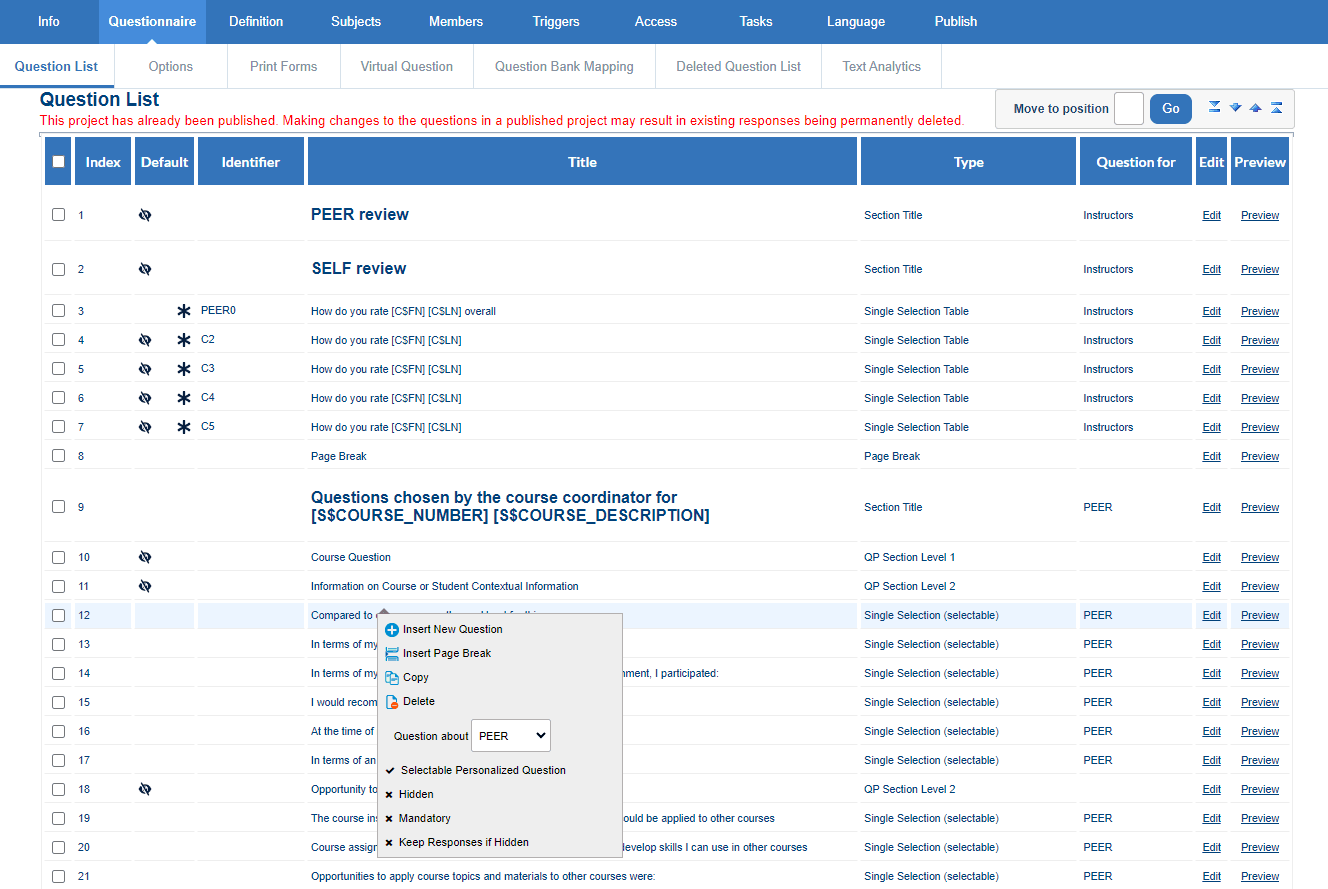
Example of an instructor self and peer questionnaire:
Step 7 - Configure tasks
The next step is to configure the tasks associated with each privilege so that those tasks can be performed by the defined groups.
What you need to configure your tasks:
| Task type | Task owner | Configuration | Selected option |
|---|---|---|---|
| Question personalization | Instructors | Allow modifications after submitting | Enabled |
| Show all questions in question personalization view | Enabled | ||
| Allow task owner to copy questions from a previous project | Enabled | ||
| Set min and max for instructor questions quota | Min: 1 Max: 10 Min: 1 Max: 10 | ||
| Require authentication | Enabled | ||
| Impact of task owner removal | Delete task | ||
| Fillout | SelfPeers SelfPeers | Include welcome page | Enabled |
| Include task list on thank you page | Enabled | ||
| Require authentication* | Enabled | ||
| Impact of task owner removal* | Delete task |
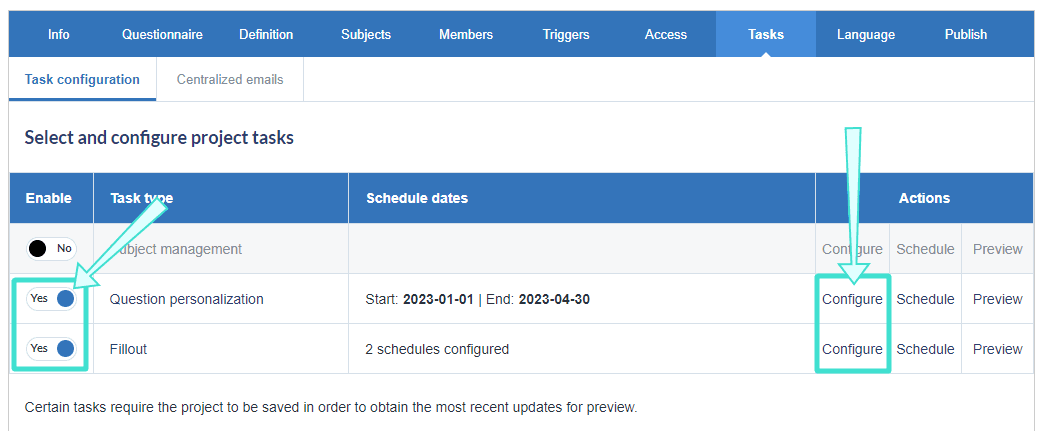
Get started by navigating to the TASKS tab and enabling the question personalization and fillout tasks. For each task, select configure to configure the settings.
- *Require authentication: It is recommended to enable this option for all task types especially if participants in your organization use SSO.
- *Impact of task owner removal: It is recommended to enable 'Delete task' for all task types.
Get started by navigating to the TASKS tab and enabling the question personalization and fillout tasks. For each task, select configure to configure the settings.
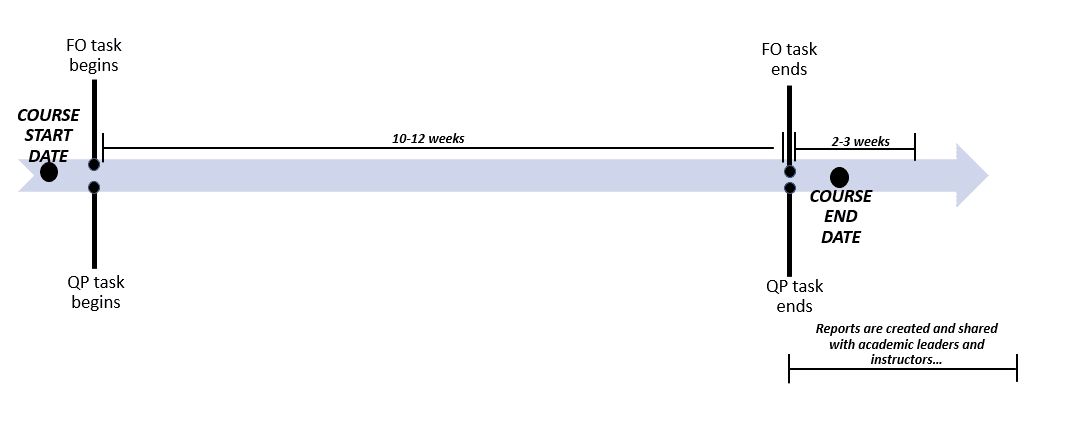
Step 8 - Schedule tasks
After you have configured the tasks, the next step is to schedule when each task starts and ends.
Example of instructor peer & self evaluation schedule (your schedule may vary):
| Task type | Start date | End date | Reminders |
|---|---|---|---|
| Question personalization | Earliest course start date | Course end date | 1-2 |
| Fillout | Earliest course start date | Course end date | 1-2 |
For steps on how to schedule tasks and reminders in your instructor peer project, see Configure project task schedules.
Step 9 - Publish project
The next step is to publish the project, which is essentially activating the tasks so that they can be completed by all the groups.
What you will need to publish the project:
| Publishing setting | Selected option |
|---|---|
| Verify that subjects and members are added | Export members shown in Step 5. |
| Project start date | Earliest course start date |
| Project end date | 2-3 weeks after the course end date |
Before publishing the project, verify that subjects and members have been automatically populated to the project if not already done in Step 5.
After verifying that the appropriate subjects and members have been added, navigate to the PUBLISH tab to start publishing the project. For more information, see Publish a project.
For future semesters, you can simply copy the instructor peer project created in this guide and change the dates according to your semester. To learn more, see Copy an existing project.
Step 10 - Create reports
The final step is to create reports which analyzes the feedback collected from the project. For instructor peer & self evaluations, reports will be shared with instructors and academic leaders.
What you will need for reports:
| Report setting | Value |
|---|---|
| Project type selected | Instructor peer & self project |
| Report type | Individual |
| Distributed | Enabled |
| Breakdown by secondary subject | Enabled |
| Automatic update | Enabled |
For steps on how to create reports, see Create a new report and Add a response sheet type report block.
For future semesters, you can simply copy the instructor peer report created in this guide and change the dates according to your semester. To learn more, see Copy an existing report.